
You are using an out of date browser. It may not display this or other websites correctly.
You should upgrade or use an alternative browser.
You should upgrade or use an alternative browser.
What Did You Do With Your Commando Today?
- Thread starter Starvingphotog
- Start date
- Joined
- Aug 2011
- Messages
- 1,518
Saber,Set valve clearances, polished valve covers and installed new shiny nuts, checked head bolts torque (motion pro wrench holder for torque readings is nice), new spark plugs, knocked surface rust off some steel bolt heads. A good therapy session.
I also like the way the MotionPro torque adapter works.Makes a miserable job tolerable and accurate.
Mike
Bonzo
FULL MEMBER
- Joined
- May 2022
- Messages
- 1,024
Isn't that other washer there to 'protect' the softer locking washer from the nut?? I think (hope) Baz might chime in?
I had to dress my seal down slightly but it all fitted okay")
It was commoz that pointed out the tab washer is too soft and pressure from the nut starts to cut through it
So the clutch center merrily wears the splines out
Hmm, the more I ponder on this, the more I feel like I'll always have a concern that removing the washer (063447) was a bad move

Bellville washer?
KiwiShane
MEMBER
- Joined
- Mar 2021
- Messages
- 2,371
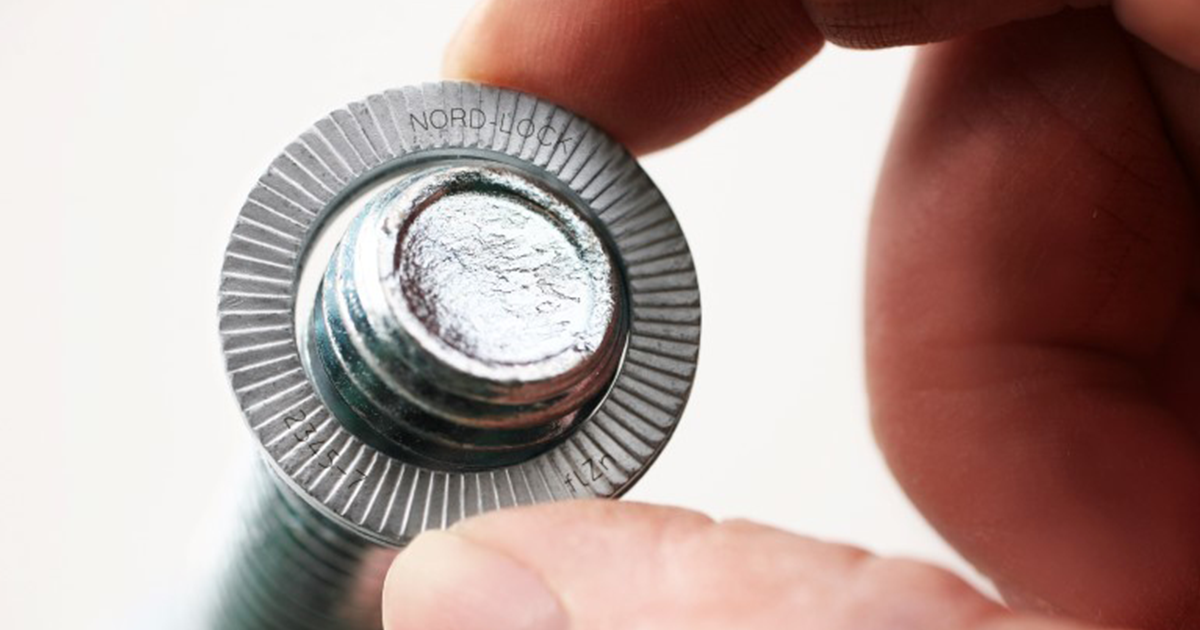
Nord-Lock Washer Torqued to 35 ta 40 lbs...Hmm, the more I ponder on this, the more I feel like I'll always have a concern that removing the washer (063447) was a bad move
Bellville washer?
Attachments

Bonzo
FULL MEMBER
- Joined
- May 2022
- Messages
- 1,024
I spotted your pic earlier Shane.Nord-Lock Washer Torqued to 35 ta 40 lbs...
What depth is the Nord-Lock washer?
I also realised that I bent the three sides over the tab washer over the nut instead of just the one, as per the manual. Luckily I have spares tab washers and I haven't fitted the chain case cover yet.
- Joined
- Nov 2004
- Messages
- 21,432
I also realised that I bent the three sides over the tab washer over the nut instead of just the one, as per the manual.
In my opinion, the three tabs are arranged so the one that aligns best with a flat is used. The manual instructions, however, say to "Squeeze the centre portion of the tab washer to 2 flats of the nut (late models)..." so does that mean bending up two tabs of the "centre portion" or the central tab over the corner so it is in contact with "2 flats"?

Motorcycle parts and spares for Norton motorbikes - Andover Norton Spare Parts - Andover Norton Motorcycles Parts - Original Andover Norton Parts
Motorcycle parts and spares for Andover Norton motorbikes: Andover Norton manufactures and supplies all Factory Spare Parts for Norton motorcycles built before 2002.
 andover-norton.co.uk
Last edited:
KiwiShane
MEMBER
- Joined
- Mar 2021
- Messages
- 2,371
I use the Twin Nord-Lock washer ...no lock tab... no lock tab support washer...they are not that cheap but keen to know if someone knows of a better lock washer.. I'd be very interested..I spotted your pic earlier Shane.
What depth is the Nord-Lock washer?
I also realised that I bent the three sides over the tab washer over the nut instead of just the one, as per the manual. Luckily I have spares tab washers and I haven't fitted the chain case cover yet.

Are Nord-Lock Wedge-Locking Washers Reusable?
It is normally okay to reuse Nord-Lock wedge-locking washers, but you must inspect their condition for signs of wear and tear first.
 www.nord-lock.com
Last edited:
Bonzo
FULL MEMBER
- Joined
- May 2022
- Messages
- 1,024
In my opinion, the three tabs are arranged so the one that aligns best with a flat is used. The manual instructions, however, say to "Squeeze the centre portion of the tab washer to 2 flats of the nut (late models)..." so does that mean bending up two tabs of the "centre portion" or the central tab over the corner so it is in contact with "2 flats"?
Bending the other two as well isn't going to matter but they won't align with a flat.Motorcycle parts and spares for Norton motorbikes - Andover Norton Spare Parts - Andover Norton Motorcycles Parts - Original Andover Norton Parts
Motorcycle parts and spares for Andover Norton motorbikes: Andover Norton manufactures and supplies all Factory Spare Parts for Norton motorcycles built before 2002.
Good to know Les cheers.
I won't bother replacing mine in that case

- Joined
- Nov 2004
- Messages
- 21,432
Good to know Les cheers.
I won't bother replacing mine in that case
I think I might have found the answer to why the instructions say: "Squeeze the centre portion to 2 flats of the nut..." in section C34, 12, which says to: "Fit the......nut and tab washer*... (late models) in the case of the tab washer engaging the ends, in the 2 holes in the clutch centre."
So it looks like the tab washer could have been redesigned from having two locating legs 180 degrees apart and two centre tabs to a tab washer with one locating leg and a third tab washer after the manual instructions had been written.
*(also the hardened flat washer)
Flatspot
FULL MEMBER
- Joined
- Jan 2020
- Messages
- 1,347
I refitted the rear wheel which had been taken out when I did my horn rebuild. Filled the empty oil tank, and then cycled the engine over with the fuel off using the CNW starter motor, and was once more amazed just how quickly it turns the engine over. Usually with fuel on it starts almost immediately so I wasn’t aware just how quick it was.
Then I turned the fuel on, waited for the fuel to reach the carb. choke on, ignition on, and it started immediately. All courtesy of EI , a single Mikuni and that wonderful CNW starter.
First start in almost 6 months, to my shame.
Then I turned the fuel on, waited for the fuel to reach the carb. choke on, ignition on, and it started immediately. All courtesy of EI , a single Mikuni and that wonderful CNW starter.
First start in almost 6 months, to my shame.
I finished my project to get my clutch working properly.
Having replaced the clutch centre and fitted new Barnett plates, I adjusted the clutch stack height today, and its made an enormous difference to the feel at the lever. Its now substantially lighter.
The stack height was 3mm short of ideal, so I swapped 2 x 2mm std steel plates with a 3mm and a 4mm RGM steel plates, and reassembled everything, now it only takes two fingers to pull the clutch lever to the bar. Amazing.
If I get time later today, I will replace the clutch cable, but it doesn't really seem to need it ... but maybe with the new cable it will only need 1-finger to operate the clutch ?
Also, I replaced a failed tachometer lamp, using the first LED on the bike. These things are super bright, and a nice crisp white colour, so much brighter that the original bulb, luckily I bought two, the difference is very noticeable.
Bonzo
FULL MEMBER
- Joined
- May 2022
- Messages
- 1,024
Depending on the age/condition of the old cable, it might be good piece of mind to install the new one, and then you have a spare for your tool bag in the unlikely event of a break ")
I popped a Venhill superlight in and it was exactly the right size.
I've been doing very similar mods to you by the look of it
I popped a Venhill superlight in and it was exactly the right size.
I've been doing very similar mods to you by the look of it
HouTexNorton
FULL MEMBER
- Joined
- Jan 2022
- Messages
- 70
I need to replace the failed speedometer light and the tachometer light is very dim. Is your bike positive ground and what LED lights did you use that were just a swap out for the OEM lamps?I finished my project to get my clutch working properly.
Having replaced the clutch centre and fitted new Barnett plates, I adjusted the clutch stack height today, and its made an enormous difference to the feel at the lever. Its now substantially lighter.
The stack height was 3mm short of ideal, so I swapped 2 x 2mm std steel plates with a 3mm and a 4mm RGM steel plates, and reassembled everything, now it only takes two fingers to pull the clutch lever to the bar. Amazing.
If I get time later today, I will replace the clutch cable, but it doesn't really seem to need it ... but maybe with the new cable it will only need 1-finger to operate the clutch ?
Also, I replaced a failed tachometer lamp, using the first LED on the bike. These things are super bright, and a nice crisp white colour, so much brighter that the original bulb, luckily I bought two, the difference is very noticeable.
Bonzo
FULL MEMBER
- Joined
- May 2022
- Messages
- 1,024
I'm really impressed with the new Lucas LEDsI need to replace the failed speedometer light and the tachometer light is very dim. Is your bike positive ground and what LED lights did you use that were just a swap out for the OEM lamps?
BA7S for + earth instrument lights
Lucas Classic | Motorcycle
 www.lucasclassicmotorcycle.com
*EDIT* - Sorry, just realised I got his wrong. BA7S are the warning lights. BA9S are the speedo/tacho (+ pilot) bulbs (12v)
Last edited:
Its a +ve earth bike, the LEDs are Lucas, and just swapped straight in. They only cost £2 each from RGM. The dials are now so bright you can see if the lights are on by looking at the dial, that never used to happen before. The lights are off to the left of the dials, so illumination is mainly on the left, arguably that is ok, its a Norton, so you are normally doing low revs, and I rarely travel at speeds over on the right of the speedo, and if I did, I really wouldn't be looking at the dialsI need to replace the failed speedometer light and the tachometer light is very dim. Is your bike positive ground and what LED lights did you use that were just a swap out for the OEM lamps?

The old cable was one I installed in the 70s, and it has been pulling a very stiff clutch, so is due retirement. I had a spare already in place cable tied to the working one, both have been removed now.Depending on the age/condition of the old cable, it might be good piece of mind to install the new one, and then you have a spare for your tool bag in the unlikely event of a break
I popped a Venhill superlight in and it was exactly the right size.
I've been doing very similar mods to you by the look of it
I put in a AN cable, lubed it with some silicon grease before installing and it is now a one-finger clutch, an amazing difference from the way it was. Unfortunately, it was the right cable for my 1970 bike, which had short, straight bars, the ones on the bike now are a bit taller and wider, so the cable fits but its too short really. Will try rerouting it tomorrow and if that doesn't work ,I'll get out the angle grinder and shorten the bars a little.
ashman
FULL MEMBER
- Joined
- Jul 2010
- Messages
- 6,940
Most clutch cables fail at the handle bar adjuster back in my early days on my Commando I went through clutch cables regularly until I started putting a dab of grease on the lever pivit and adjuster since doing that have never broken a cable since ever oil change and a fresh dab of grease on the end of the cable and a Venhill cable for smooth running I still use the dab of grease at the ends of the cable.
Similar threads
- Replies
- 103
- Views
- 12,921
- Replies
- 10
- Views
- 1,936
- Locked
- Replies
- 93
- Views
- 17,124
V
- Replies
- 67
- Views
- 10,273