CNW e start conversion, sprag failures

Morning Nigel
Those bearings are in play all the time the engine is running. The outer race (drive gear) revolves when the button is pushed but the inner race is on the engine sprocket.
All of this has a parallel with the fiasco of the first commando electric start mechanism. Back in the early 70s the factory designed an electric start that drove through the timing side (some of the 750 commandos still have the aperture for this) This nearly made it into production, but it had a design fault that destroyed the timing side case. The road testers at the time knew this and had to prove it to the management (they didn't believe it).
I wonder how many test miles/starts were done on all the kits now available? The factory road testers at the time were doing hundreds of miles a day. Test mileages like that would have shown up faults in the Cnw and Alton kits in very short order.
My experience of the cNw kit is limited to fitting it in 2019 and never having looked at it since !

I can’t work out what these bearings are doing, and the absence of an exploded diagram doesn’t help.

Can you explain what they’re doing Pete ??
 
Last edited:
Nigel,
I don’t understand your questioning about the belt. I have never even had to adjust mine since initial installation but I don’t bang shifts.What am I looking for?Excess dust? I know you are much more experienced on this and would like to know your thoughts.
Thanks,Mike
I’ve got a lot of experience with many different belt drives on many different bikes Mike. Interestingly, I’ve only ever had one failure and that was on my first pre unit Triton and was operator error… I didn’t tighten the gearbox adjuster correctly (actually the alloy plates were a bit chewed up). But as mentioned above, my experience with the cNw kit is fitting it in 2019, using it, and never really looking at or thinking about it very much since !

You should not ever have to adjust the belt IMO, so don’t fret about that. In principle belts do not really stretch, they wear. So if a belt needs adjusting it’s because of wear (material being lost) and if enough material has been lost to require adjustment (in this application), it’s time to replace rather than adjust IMHO at least. This all assumes (obviously) that it was set correctly to begin with and nothing is slipping / moving (like my gearbox mounts mentioned above).

But belts do have a life expectancy, they will snap or delaminate given enough use, anyone with a toothed timing belt knows that! Therefore they need changing periodically, but I have no idea what periodicity would be ideal. In this application belts do have a tough life, giving a Commando the beans puts way more stress on them than driving cams, or a conveyor belt, etc!

My gut feel for a cNw service schedule would be something like: replace the sprag and grease the bearings every 10k and replace the belt every 30k. But that’s just a finger in the air, some experience and logic from the collective would be good…
 
Last edited:
My experience of the cNw kit is fitting it in 2019 and never having looked at it since !

I can’t work out what these bearings are doing, and the absence of an exploded diagram doesn’t help.

Can you explain what they’re doing Pete ??
The bearings carry the drive gear on the engine sprocket, one either side of the sprag.


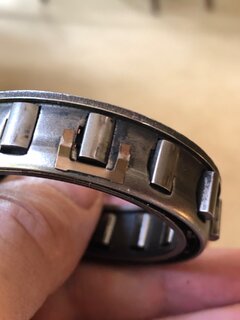
The third photo shows a dud sprag within the drive gear and the one of the bearings removed. You can see the other bearing behind the sprag

This photo shows the bearing a bit better.
These photos were sent to me from a Cnw kit owner.
 
Last edited:
The bearings carry the drive gear on the engine sprocket, one either side of the sprag.
Thanks for that Pete. Very informative.
I'm in the same camp as Nigel, never having touched mine.
If I understand what you've shown correctly, that gear (including the two bearings and the sprag) can be removed for servicing by only removing the alternator stator and rotor. Is that correct?
Cheers
 
Thanks for that Pete. Very informative.
I'm in the same camp as Nigel, never having touched mine.
If I understand what you've shown correctly, that gear (including the two bearings and the sprag) can be removed for servicing by only removing the alternator stator and rotor. Is that correct?
Cheers
Yes.
If and when you do get in there to replace/regrease etc. Can you make a note of how tight the 'fit' is of the drive gear/bearings on the engine sprocket? I,m interested to know if the inner race of the bearings are an interference fit on the engine sprocket, or as i suspect, a sliding fit. If it is a sliding fit, that could also contribute to mechanical noise from there, The bearing grease could/does dry out and the inner race then turn on the sprocket. If the bearing races (where they mount on the sprocket) have a 'polished' look about them (as opposed to the ground finish when new) this tells you that they have been turning where they shouldn't
 
Last edited:
Yes.
If and when you do get in there to replace/regrease etc. Can you make a note of how tight the 'fit' is of the drive gear/bearings on the engine sprocket? I,m interested to know if the inner race of the bearings are an interference fit on the engine sprocket, or as i suspect, a sliding fit. If it is a sliding fit, that could also contribute to mechanical noise from there, The bearing grease could/does dry out and the inner race then turn on the sprocket. If the bearing races (where they mount on the sprocket) have a 'polished' look about them (as opposed to the ground finish when new) this tells you that they have been turning where they shouldn't
I have pasted in Matt's instructions he sent me for removing the outrigger plate, etc when I had to replace a leaky crankshaft seal. If you see #8 and #11 that should give you an idea.

----------------

1- Remove the foot rest assembly and outer primary cover

2- Remove alternator stator held in place with 3 socket head allen bolts. You don't have to undo the lead. Just be sure it doesn't hang by that lead. Support the stator somehow so there is no load on it

3- Remove the outrigger plate (red anodized teardrop shaped plate). Leave the 2 screws that adjust the transfer gear rotation in place as is. There are 4 socket caps bolts holding the outrigger plate in place. There is a bearing on the back side of this plate that engages the transfer gear. This bearing is in there with a slide fit, so it may fall out when removing the plate. Be sure to keep the bearing for the installation later on

4- Remove the alternator rotor. Back out the large center nut. It's tightened to about 70 ft/lbs, but this can be removed with an air impact gun, wrench or a long ratchet. The air impact gun won't require that you keep the drive from turning. If you use a ratchet, wrench or breaker bar, then the drive will rotate and you will have to put the bike in gear (3rd or 4th) and secure the rear wheel. Either by someone holding it or with the rear brake applied

5- The rotor should slide off the crank at this time. There is a small key on the crank. Remove this if it comes out easily. If not, just leave it in place

6-Now you are looking at the drive gear that is parts of the front sprocket assembly

7- Towards the center of this gear you will see a circlip. One side of the circlip has a small notch in it. Use a small screw driver and pry it out of its retaining groove. Be careful not to puncture the rubber seal on the bearing behind the circlip

8-Now you will need a small puller (in case the gear doesn't pull off just by hand). A puller that will grab onto the gear on the outside. This can be a 2 or 3 arm puller. Since you don't want to pull the sprocket off of the crank, use a socket that fits over the crank shaft and bottoms out on the race that the circlip was attached to. Put the puller in place and snug it up. As you tighten the puller. also rotate the gear slowly to the right. This ensures that the sprag doesn't 'engage' and makes it harder for the gear to pull out. Keep tightening and slowly rotating. You may have to re-position the puller since you will run into sections of the inner primary

9- As the gear start backing out it will get to a point where it will just release. Be careful that it doesn't fall down on your exhaust. Remove it, the socket and puller

10-This is as far as you will want to take it down

11 (Do this step only if you are replacing the sprag bearing). Remove the outer circlip that holds the sealed bearing in place and grab it with your fingers on the inside race and pull out. Remove the inner circlip and then the sprag can get pulled out. Take note of how the sprag is located in there since it's critical that it's installed the same way in order to operate directionally correct. There is a noticeable difference on the two sides of the sprag bearing. One side is flat with a step on it and the other has more of a curve to it. The flat/step goes towards the bottom. Re-install the inner circlip, bearing and outer circlip

12- Carefully place the replacement gear over the center portion of the front sprocket and while slowly rotating the gear to the right, firmly push it in. This can also be done with a large socket and a rubber mallet as long as you don't do more than tap on the socket as you are rotating it. The sprag that is inside the gear needs to slide into place and heavy impact can cause damage to the sprag. The gear needs to be pushed in far enough so that the circlip groove on the center is exposed Note: If the new gear appears to slide on partially and then come to a stop, you can remove the outer bearing in the gear and while putting light pressure on the assembly, use a thin, flat tool to carefully work the doglegs on the sprag out of the way until it slides onto the front sprocket. Then slide the bearing back in place

13-Once you have the groove exposed, re-install the circlip. Test spin the gear by hand at this time. It should lock, when turning it counter clockwise and freewheel, when turning it clockwise

14 Next is the rotor. Be sure to have the key in place and slide the rotor over that. Re-use the large dished washer (high spot against the nut) and put some blue thread locker (Loctite or similar) on the threads in the nut. Then thread onto the crank and using a torque wrench, tighten the nut to 70 ft/lbs. Important: Do not use an impact tool to tighten this nut. This type of tool can be used for taking it off only. You may have to leave the bike in gear (3rd or 4th) and have someone hold the rear wheel or apply the rear brake to secure while tightening the nut

15- Be sure that the bearing for the transfer gear is in its pocket on the outrigger plate. Put the outrigger in place, making sure the end of the transfer gear engages the bearing, and re-install using the 4 socket head cap bolts. Tighten those 4 bolts evenly

16- The two screws that adjust the tension on the transfer gear should be fine as they were not pulled out

17-Re-install the stator with the 3 socket cap bolts

18- Using a feeler gauge, make sure you have 006-.008 clearance all the way around, between the stator and rotor

19- Before this next step, be sure you have the gear box in neutral. Leaving the kill button OFF, so the bike doesn't fire and run, do a test start of the system to make sure it operates properly.

20- Re install the primary and foot rest assembly

 
Last edited:
Yes.
If and when you do get in there to replace/regrease etc. Can you make a note of how tight the 'fit' is of the drive gear/bearings on the engine sprocket? I,m interested to know if the inner race of the bearings are an interference fit on the engine sprocket, or as i suspect, a sliding fit. If it is a sliding fit, that could also contribute to mechanical noise from there, The bearing grease could/does dry out and the inner race then turn on the sprocket. If the bearing races (where they mount on the sprocket) have a 'polished' look about them (as opposed to the ground finish when new) this tells you that they have been turning where they shouldn't
Do you think this grease would be suitable for the bearings either side of the sprag?

Cheers
 
It’s actually hard plastic not rubber with a central groove on the inner side roughly 3/4 of its width to allow for the races. They simply snap back in place as they have a small lip on both inner & outer edges.

The second bearing was interesting. There was no sign of grease at all, everything nice n shiny, wasn’t expecting that.

As it may take a while to get a box of goodies from Matt including a sprag I might be tempted to replace the old one with the refurbished bearings and give it a go. I’m such a friggin’ expert in stripping & rebuilding the primary I did it in less than 1 hr heck I might even try it blindfolded like soldiers do with their rifles 🤣🤣🤣
In reference to @gortnipper s post above, step #8, did you need a puller to get that gear off?
Cheers
 
In reference to @gortnipper s post above, step #8, did you need a puller to get that gear off?
Cheers
Simple answer is it depends.

Remember to remove the circlip (there’s an engraved reminder on the sprocket) and it can sometimes just be pulled by hand.

Other times I’ve used the 2 claws of an AN puller and simultaneously tugged like a slide puller and that’s done it. Last time though I had to use a small 3 claw puller but there is little to no resistance so very easily removed.

If you decide to remove the inner belt sprocket you definitely need a puller but you can’t use a 3 claw as there’s not enough clearance to get the claws behind.
For this job you need to screw in the puller threads into the 2 holes inside the sprocket. I purchased an AN puller for this in advance but the spacing is wrong on Matt’s compared to the Norton part so you cannot get the 2nd bolt in. I had to enlarge one hole which was a pain with just a cordless drill
 
I have pasted in Matt's instructions he sent me for removing the outrigger plate, etc when I had to replace a leaky crankshaft seal. If you see #8 and #11 that should give you an idea.

----------------

1- Remove the foot rest assembly and outer primary cover

2- Remove alternator stator held in place with 3 socket head allen bolts. You don't have to undo the lead. Just be sure it doesn't hang by that lead. Support the stator somehow so there is no load on it

3- Remove the outrigger plate (red anodized teardrop shaped plate). Leave the 2 screws that adjust the transfer gear rotation in place as is. There are 4 socket caps bolts holding the outrigger plate in place. There is a bearing on the back side of this plate that engages the transfer gear. This bearing is in there with a slide fit, so it may fall out when removing the plate. Be sure to keep the bearing for the installation later on

4- Remove the alternator rotor. Back out the large center nut. It's tightened to about 70 ft/lbs, but this can be removed with an air impact gun, wrench or a long ratchet. The air impact gun won't require that you keep the drive from turning. If you use a ratchet, wrench or breaker bar, then the drive will rotate and you will have to put the bike in gear (3rd or 4th) and secure the rear wheel. Either by someone holding it or with the rear brake applied

5- The rotor should slide off the crank at this time. There is a small key on the crank. Remove this if it comes out easily. If not, just leave it in place

6-Now you are looking at the drive gear that is parts of the front sprocket assembly

7- Towards the center of this gear you will see a circlip. One side of the circlip has a small notch in it. Use a small screw driver and pry it out of its retaining groove. Be careful not to puncture the rubber seal on the bearing behind the circlip

8-Now you will need a small puller (in case the gear doesn't pull off just by hand). A puller that will grab onto the gear on the outside. This can be a 2 or 3 arm puller. Since you don't want to pull the sprocket off of the crank, use a socket that fits over the crank shaft and bottoms out on the race that the circlip was attached to. Put the puller in place and snug it up. As you tighten the puller. also rotate the gear slowly to the right. This ensures that the sprag doesn't 'engage' and makes it harder for the gear to pull out. Keep tightening and slowly rotating. You may have to re-position the puller since you will run into sections of the inner primary

9- As the gear start backing out it will get to a point where it will just release. Be careful that it doesn't fall down on your exhaust. Remove it, the socket and puller

10-This is as far as you will want to take it down

11 (Do this step only if you are replacing the sprag bearing). Remove the outer circlip that holds the sealed bearing in place and grab it with your fingers on the inside race and pull out. Remove the inner circlip and then the sprag can get pulled out. Take note of how the sprag is located in there since it's critical that it's installed the same way in order to operate directionally correct. There is a noticeable difference on the two sides of the sprag bearing. One side is flat with a step on it and the other has more of a curve to it. The flat/step goes towards the bottom. Re-install the inner circlip, bearing and outer circlip

12- Carefully place the replacement gear over the center portion of the front sprocket and while slowly rotating the gear to the right, firmly push it in. This can also be done with a large socket and a rubber mallet as long as you don't do more than tap on the socket as you are rotating it. The sprag that is inside the gear needs to slide into place and heavy impact can cause damage to the sprag. The gear needs to be pushed in far enough so that the circlip groove on the center is exposed Note: If the new gear appears to slide on partially and then come to a stop, you can remove the outer bearing in the gear and while putting light pressure on the assembly, use a thin, flat tool to carefully work the doglegs on the sprag out of the way until it slides onto the front sprocket. Then slide the bearing back in place

13-Once you have the groove exposed, re-install the circlip. Test spin the gear by hand at this time. It should lock, when turning it counter clockwise and freewheel, when turning it clockwise

14 Next is the rotor. Be sure to have the key in place and slide the rotor over that. Re-use the large dished washer (high spot against the nut) and put some blue thread locker (Loctite or similar) on the threads in the nut. Then thread onto the crank and using a torque wrench, tighten the nut to 70 ft/lbs. Important: Do not use an impact tool to tighten this nut. This type of tool can be used for taking it off only. You may have to leave the bike in gear (3rd or 4th) and have someone hold the rear wheel or apply the rear brake to secure while tightening the nut

15- Be sure that the bearing for the transfer gear is in its pocket on the outrigger plate. Put the outrigger in place, making sure the end of the transfer gear engages the bearing, and re-install using the 4 socket head cap bolts. Tighten those 4 bolts evenly

16- The two screws that adjust the tension on the transfer gear should be fine as they were not pulled out

17-Re-install the stator with the 3 socket cap bolts

18- Using a feeler gauge, make sure you have 006-.008 clearance all the way around, between the stator and rotor

19- Before this next step, be sure you have the gear box in neutral. Leaving the kill button OFF, so the bike doesn't fire and run, do a test start of the system to make sure it operates properly.

20- Re install the primary and foot rest assembly
Missing from this is that there are 2 washers 1 each side of the transfer gear spindle, they have a centre land on one side which must be outwards in both cases ie mating with the small bearings.

Also, the bolts that hold on the plate should have blue Loctite as do the stator bolts. Matt makes no mention of the torque for the plate bolts.

After this installation the transfer gear MUST be reset from scratch following Matt’s separate instructions ie the two doing loaded pins that’s locate in the gear indents, simple job but critical for operation and reliability.
 
Missing from this is that there are 2 washers 1 each side of the transfer gear spindle, they have a centre land on one side which must be outwards in both cases ie mating with the small bearings.

Also, the bolts that hold on the plate should have blue Loctite as do the stator bolts. Matt makes no mention of the torque for the plate bolts.

After this installation the transfer gear MUST be reset from scratch following Matt’s separate instructions ie the two doing loaded pins that’s locate in the gear indents, simple job but critical for operation and reliability.
To examine/repack the bearings (sprag + 2 roller) from the sprag gear, the transfer gear doesn't need to be touched, does it?
Those gears appear to be straight cut, so I assumed the sprag gear would simply slide out.

On second thought, the shaft that carries the two transfer gears must run in bearings (one in the red plate and one in the inner case), so it's probably wise to inspect and lube them whilst in there.
 
Last edited:
To examine/repack the bearings (sprag + 2 roller) from the sprag gear, the transfer gear doesn't need to be touched, does it?
Those gears appear to be straight cut, so I assumed the sprag gear would simply slide out.

On second thought, the shaft that carries the two transfer gears must run in bearings (one in the red plate and one in the inner case), so it's probably wise to inspect and lube them whilst in there.
You need to.pull the transfer gear to get at the bearing behind it in the case.

CNW e start conversion, sprag failures
 
To examine/repack the bearings (sprag + 2 roller) from the sprag gear, the transfer gear doesn't need to be touched, does it?
Those gears appear to be straight cut, so I assumed the sprag gear would simply slide out.

On second thought, the shaft that carries the two transfer gears must run in bearings (one in the red plate and one in the inner case), so it's probably wise to inspect and lube them whilst in there.
Rob,
The bearings that carry the transfer shaft are very small sealed units.Are you suggesting taking one side of the caps off to lube them?
Thanks,Mike
 
Just out of interest, anybody that knows the dimensions of the bearings (ID, OD, width)?
I tried looking at my original phone photos from when I installed the kit, but don't see a p/n on the one in the case.

AI infers it is a 6000-2RS when i queried it specifically.

Inner Diameter (Bore): 10 mm
Outer Diameter: 26 mm
Width (Thickness): 8 mm


Using the known factory specs of the drive-side crankshaft oil seal as a hard visual baseline, the 10mm inside diameter of a 6000-2RS bearing scales perfectly with the image:
## 1. Scaling the Proportions

* The Crankshaft Seal Base: The factory oil seal has an inside diameter of 30 mm and an outside diameter of 45 mm.
* The Target Bearing: A standard 6000-2RS bearing has an inside diameter of 10 mm and an outside diameter of 26 mm. [1, 2]

## 2. Direct Geometric Comparison
If you hold a 6000-2RS bearing up next to that 30mm crankshaft seal opening:

* The Inside Hole: The 10mm inner bore of the bearing is exactly one-third (1/3) the size of the 30mm crankshaft seal opening.
* The Outside Edge: The 26mm overall width of the bearing is slightly smaller than the 30mm inner opening of the oil seal. This means the entire physical bearing could easily pass through the open center hole of the crank seal.

Visually, the small bearing pocket centered on the cNw plate matches these proportions relative to the crank seal bore, which confirms that a 10mm x 26mm x 8mm (6000 series) unit is structurally consistent with the scale of the photo.


Beware, no idea if that is true.
 
Rob,
The bearings that carry the transfer shaft are very small sealed units.Are you suggesting taking one side of the caps off to lube them?
Thanks,Mike
Don't know Mike - haven't seen them yet. Maybe?
Their duty will be much lighter - only turning when the e-start is pressed, so maybe not.
 
Correct, those 2 bearings have a very easy life, I don’t intend dismantling them for sure.

Closer examination shows the damage to my sprag; 2 of the 3 spring clips are broken
image.jpg
image.jpg
CNW e start conversion, sprag failures
 

Attachments

  • CNW e start conversion, sprag failures
    image.jpg
    289.6 KB · Views: 16
Back
Top