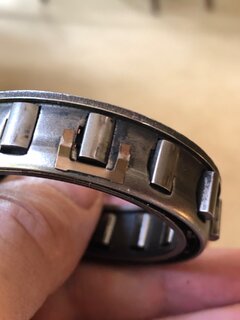
Yes.
If and when you do get in there to replace/regrease etc. Can you make a note of how tight the 'fit' is of the drive gear/bearings on the engine sprocket? I,m interested to know if the inner race of the bearings are an interference fit on the engine sprocket, or as i suspect, a sliding fit. If it is a sliding fit, that could also contribute to mechanical noise from there, The bearing grease could/does dry out and the inner race then turn on the sprocket. If the bearing races (where they mount on the sprocket) have a 'polished' look about them (as opposed to the ground finish when new) this tells you that they have been turning where they shouldn't
I have pasted in Matt's instructions he sent me for removing the outrigger plate, etc when I had to replace a leaky crankshaft seal. If you see #8 and #11 that should give you an idea.
----------------
1- Remove the foot rest assembly and outer primary cover
2- Remove alternator stator held in place with 3 socket head allen bolts. You don't have to undo the lead. Just be sure it doesn't hang by that lead. Support the stator somehow so there is no load on it
3- Remove the outrigger plate (red anodized teardrop shaped plate). Leave the 2 screws that adjust the transfer gear rotation in place as is. There are 4 socket caps bolts holding the outrigger plate in place. There is a bearing on the back side of this plate that engages the transfer gear. This bearing is in there with a slide fit, so it may fall out when removing the plate. Be sure to keep the bearing for the installation later on
4- Remove the alternator rotor. Back out the large center nut. It's tightened to about 70 ft/lbs, but this can be removed with an air impact gun, wrench or a long ratchet. The air impact gun won't require that you keep the drive from turning. If you use a ratchet, wrench or breaker bar, then the drive will rotate and you will have to put the bike in gear (3rd or 4th) and secure the rear wheel. Either by someone holding it or with the rear brake applied
5- The rotor should slide off the crank at this time. There is a small key on the crank. Remove this if it comes out easily. If not, just leave it in place
6-Now you are looking at the drive gear that is parts of the front sprocket assembly
7- Towards the center of this gear you will see a circlip. One side of the circlip has a small notch in it. Use a small screw driver and pry it out of its retaining groove. Be careful not to puncture the rubber seal on the bearing behind the circlip
8-Now you will need a small puller (in case the gear doesn't pull off just by hand). A puller that will grab onto the gear on the outside. This can be a 2 or 3 arm puller. Since you don't want to pull the sprocket off of the crank, use a socket that fits over the crank shaft and bottoms out on the race that the circlip was attached to. Put the puller in place and snug it up. As you tighten the puller. also rotate the gear slowly to the right. This ensures that the sprag doesn't 'engage' and makes it harder for the gear to pull out. Keep tightening and slowly rotating. You may have to re-position the puller since you will run into sections of the inner primary
9- As the gear start backing out it will get to a point where it will just release. Be careful that it doesn't fall down on your exhaust. Remove it, the socket and puller
10-This is as far as you will want to take it down
11 (Do this step only if you are replacing the sprag bearing). Remove the outer circlip that holds the sealed bearing in place and grab it with your fingers on the inside race and pull out. Remove the inner circlip and then the sprag can get pulled out. Take note of how the sprag is located in there since it's critical that it's installed the same way in order to operate directionally correct. There is a noticeable difference on the two sides of the sprag bearing. One side is flat with a step on it and the other has more of a curve to it. The flat/step goes towards the bottom. Re-install the inner circlip, bearing and outer circlip
12- Carefully place the replacement gear over the center portion of the front sprocket and while slowly rotating the gear to the right, firmly push it in. This can also be done with a large socket and a rubber mallet as long as you don't do more than tap on the socket as you are rotating it. The sprag that is inside the gear needs to slide into place and heavy impact can cause damage to the sprag. The gear needs to be pushed in far enough so that the circlip groove on the center is exposed Note: If the new gear appears to slide on partially and then come to a stop, you can remove the outer bearing in the gear and while putting light pressure on the assembly, use a thin, flat tool to carefully work the doglegs on the sprag out of the way until it slides onto the front sprocket. Then slide the bearing back in place
13-Once you have the groove exposed, re-install the circlip. Test spin the gear by hand at this time. It should lock, when turning it counter clockwise and freewheel, when turning it clockwise
14 Next is the rotor. Be sure to have the key in place and slide the rotor over that. Re-use the large dished washer (high spot against the nut) and put some blue thread locker (Loctite or similar) on the threads in the nut. Then thread onto the crank and using a torque wrench, tighten the nut to 70 ft/lbs. Important: Do not use an impact tool to tighten this nut. This type of tool can be used for taking it off only. You may have to leave the bike in gear (3rd or 4th) and have someone hold the rear wheel or apply the rear brake to secure while tightening the nut
15- Be sure that the bearing for the transfer gear is in its pocket on the outrigger plate. Put the outrigger in place, making sure the end of the transfer gear engages the bearing, and re-install using the 4 socket head cap bolts. Tighten those 4 bolts evenly
16- The two screws that adjust the tension on the transfer gear should be fine as they were not pulled out
17-Re-install the stator with the 3 socket cap bolts
18- Using a feeler gauge, make sure you have 006-.008 clearance all the way around, between the stator and rotor
19- Before this next step, be sure you have the gear box in neutral. Leaving the kill button OFF, so the bike doesn't fire and run, do a test start of the system to make sure it operates properly.
20- Re install the primary and foot rest assembly