P11 basket case

Does the stock P11 air filter fit the frame when using Commando 28/30mm curved manifolds?

- Knut
Wrong angle on Commando intake manifolds. Amals would be pointed down at the rear end and uphill at the front installed on a Commando intake manifold. Not ideal and it would look funny.

Quite a bit of room back there behind the motor, but the coils can get in the way on an extended intake manifold and either have to be moved or a modern smaller footprint dual coil installed out of the way.
 
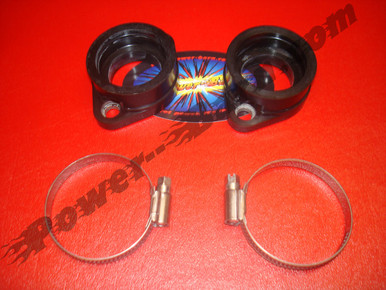
I made these intake manifolds cave man style from Commando MkII spigot intake manifolds. Trouble free no air leaks rubber mount. Automotive 1.5" fuel tank filler hose and some clamps were used. Not too hard to do, but you need a carburetor with a spigot mount.
Those manifolds look good, Schwany. I think similar manifolds are available off the shelf (for fitting twin Concentric Mk2). However, a tank filler hose doesn't cut it for me. For swirl-free flow, a stepped hose is needed, keeping the ID constant all the way. A fancy carburettor hooked up to a manifold acting as a swirl inducer is a show-stopper. I know some people have inserted alloy spacers inside a hose. This may work, but the advantage of a rubber mounting is at least partially negated.

The Mikuni manifold should work better. No curvature though.

- Knut
 
Last edited:
Old guy talk: If what you install initially for carburetion works, might as well just use it and save the money. Those Keihin knock offs are supposed to work. The flange is made of better material than Amal silly putty metal. They should not warp easily and hold a tune. However, I know it is hard to stop the modification bug once you have it.

I also cave man modified a set of MAP manifolds for Commando twin Mikuni carburetion for my P11. I modified the flange and turned them into spigot type at the right angle to mount the Mikuni's level on the upright motor. They worked really well. I still have that setup. Slightly more street friendly than the FCRs.

Get off the internet and get to work! ;)
Oh sure, I know. If I do fool around with other carbs it will just be for my own amusement/professional development. I already own all the carbs I mentioned (plus more, I guess you could call me a collector of oddball carbs) so there's no worry about spending/saving money.

Professional development has been the excuse for a lot of this project, let me tell you. At some point I probably will try the single carb; from a reliability/maintenance point of view, I like the single carb very much, and in fact, if I had a P11 single carb manifold on hand, I would probably go ahead and install it for the first start/cam break-in.
 
Got my engine/primary case spacer today! From the photos I aw on eBay I assumed it was alumin(i)um, but no, this one is steal and appears to be NOS, maybe? The packaging certainly is very much like NOS 196's Land Rover parts which I have quite a few of, right down to the bug eaten paper, so? There was a handwritten price of $9.83 on it, but no clue when that was written on there. It appears to have been cut out of a bigger piece of steel with a torch or maybe a plasma arc cutter, but no matter how they did it they must have used a fixture or or had some sort of automated process, as they are very nice cuts. Like another spacer mentioned in this thread, it appears to have a substantial zinc coating for corrosion resistance.
You received the genuine AMC part (030243). I made the comment about zinc plating.

- Knut
 
Those manifolds look good, Schwany. I think similar manifolds are available off the shelf (for fitting twin Concentric Mk2). However, a tank filler hose doesn't cut it for me. For swirl-free flow, a stepped hose is needed, keeping the ID constant all the way. A fancy carburettor hooked up to a manifold acting as a swirl inducer is a show-stopper. I know some people have inserted alloy spacers inside a hose. This may work, but the advantage of a rubber mounting is at least partially negated.

The Mikuni manifold should work better. No curvature though.

- Knut
Those stepped type rubber intake manifold adapters did not work well when I tried them. I did not use a flange type they were straight spigot to spigot adapters. They got too soft and slippery from the heat. One of them slipped off the intake. That is the only reason I don't use them. They could be better now, but I'm a once bitten twice shy guy.

Something you may or may not be aware of is the filler hose actually swells a little between the carburetor and intake. The step is minimal or nearly eliminated. Lots of guys use the fuel filler hose on race bikes. Although they might have an aluminum sleeve between the intake and carburetor inside the hose. Not sure.

I agree about the flow, but it does mean a lot unless trying to break the land speed record. ;)

I won't buy from the Power Barn. Bad experience.
 
Many times I have fabricated intake stubs for custom applications and just used a cut-off piece of radiator hose and a couple hose clamps for the intake. If I have the space and the time, I might go ahead and machine barbs on the intake stub to keep the hose from blowing off, but I don't always do that.
 
Second oiler installed, but still no gaskets and no plan for how to locate the rocker spindles yet.
P11 basket case


Primary chain mocked up. I used a RK MXV 428 chain. It's not a Renolds, I know, but I've always been happy with RK's longevity in the past, though I admit I've never used one in a primary chain application. Will it handle 50+ hp? They do have a pretty high tensile strength rating.

The observant might also notice a 23 tooth crank sprocket. I did this because of the theory that the faster you can spin the transmission (within bounds of reason) the more teeth you can spread the load across. Because I am using a non-standard rear wheel, I have a lot of options for the final drive ratio, and will compensate for the 23 tooth drive sprocket in the final drive. That's my plan anyway.
P11 basket case


I had the NEB clutch installed, but when I tried to install the drive chain the first time, I discovered that the clutch basket was so close to the inner primary cover that there was no way the drive chain would fit. Closer inspection showed that the clutch sprocket was 0.175" out of line. Removed the clutch and made up a 0.175" thick spacer to fit behind it. Now the sprockets line up, but how I have this problem:
P11 basket case

There aren't enough threads on the shaft. Does anybody know if I can remove the steel plate, (which appears to be pretty thick) and run without it? Just experimentally, I tried to unscrew those allen headed screws but only succeeded in twisting an allen wrench!! Those suckers are tight. I guess I may have to try heat, see if maybe there is some kind of loctite in there that I can break lose.
 
Second oiler installed, but still no gaskets and no plan for how to locate the rocker spindles yet.

Primary chain mocked up. I used a RK MXV 428 chain. It's not a Renolds, I know, but I've always been happy with RK's longevity in the past, though I admit I've never used one in a primary chain application. Will it handle 50+ hp? They do have a pretty high tensile strength rating.

The observant might also notice a 23 tooth crank sprocket. I did this because of the theory that the faster you can spin the transmission (within bounds of reason) the more teeth you can spread the load across. Because I am using a non-standard rear wheel, I have a lot of options for the final drive ratio, and will compensate for the 23 tooth drive sprocket in the final drive. That's my plan anyway.

I had the NEB clutch installed, but when I tried to install the drive chain the first time, I discovered that the clutch basket was so close to the inner primary cover that there was no way the drive chain would fit. Closer inspection showed that the clutch sprocket was 0.175" out of line. Removed the clutch and made up a 0.175" thick spacer to fit behind it. Now the sprockets line up, but how I have this problem:

There aren't enough threads on the shaft. Does anybody know if I can remove the steel plate, (which appears to be pretty thick) and run without it? Just experimentally, I tried to unscrew those allen headed screws but only succeeded in twisting an allen wrench!! Those suckers are tight. I guess I may have to try heat, see if maybe there is some kind of loctite in there that I can break lose.
Damn I had a feeling these NEB performance clutches might not work right out of the box on a Prototype 11 Norton. Looks like that steel plate needs to have some material removed from the backside. Heat might help to get it off. I also tried to remove the plate without heat to see what was behind it and got nowhere. Be good to know if you have success before I bother taking my primary cover off. I won't have exactly the same issue, because I don't need or want to shim for an o-ring chain, but it looks like there will be very little thread for the nut and lock washer. Could be just enough in my case though. Fingers crossed.

Part I wrote once and deleted, but it's back again: You sure you have the gearbox and cradle spacers right, and the inner primary is running in a straight line? You could move the gearbox over and pull the shim to get more thread at the end of the mainshaft.

The Renold chain handles 50+HP and lifting the front wheel just a little in 1st. I would not worry much about the 428 o-ring chain. However they are near the limit on motorcycle weight as a rear chain. Don't run it too tight, and you should be good for a long time given how well they get oiled in the primary.

BTW two of the round head phillips screws more than likely will get surfaced by the chain to nearly flat against the inner primary. Those screws need a lot of sealer as well. Crank case pressure is going to want to push engine oil out of them.

All I can say about the 23 tooth engine sprocket is your chain will last longer and it's a lot of sprocket for the stock gears out back. Would not be able to go very slow in city traffic. Fortunately, you have options on the gears you can use on the rear hub as well as the gearbox.

Looks like JS makes his 1-piece rocker spindle covers from 1/4" aluminum flat stock. I'm using his rocker spindle covers. An 1/8" or whatever the right diameter hole to keep pressure correct drilled in the middle of something like what he makes could go behind the finned oiler with a gasket on both sides of the rocker spindle cover. The oilers would stand off the head more obviously. Not sure what else would work other than using the oil ports up top, standard style rocker spindle covers, and boxing the finned oilers up.

Enough of my BS. Have a good one.
 
My primary chain is a non-o-ring chain. I may have called it by the wrong model designation. It is a D.I.D., and is intended for the smaller motocross bikes., where they don't use o-ring chains. I doubt the one I am using is any wider than a Renolds.

I forgot to mention that drive chain longevity is another reason why I went with the 23 tooth sprocket.

I am pretty sure that my spacers are all in the proper places; in any case my gearbox is right up against the engine mounting plate, so it can't go any farther to the left. Pretty sure if I get that steel plate out we'll be okay. I wonder why that plate is there? Is it possible that it is meant to be removed when using the clutch in an Atlas application?

I considered using a set of the original steel spindle locators and drilling holes through them for my oilers. Might still try that, though I agree with you, it'd be nice if the oiler could butt right up against the head.
The gearbox cradle on the primary side has .175 spacers between it and the frame at the back. The spacers between the engine and cradle on that side are thicker. The gearbox is up against the cradle as you say. Is that what you have? I'm thinking not much of anything would line up if you didn't have it set up with way. I'm only asking because the spacer and the shim you made are about the same thickness. Probably a coincidence, but a weird one.

I thought similar about the plate. Don't know, but it looks like I'll probably have to modify it if I decide to use that clutch.

I should have left the bike alone a long time ago. It's fun to play with, but a bit of a fluster cluck at times. ;)

When I first put the spacers in, I had some of them on the wrong side. I eventually figured out where they were supposed to go. The gearbox is up against the engine mounting plate/cradle, the engine is spaced away from it by .343" (as per the Hycam spacer list).

I suppose I could shift the left rear engine mounting plate/cradle over a bit farther, leave the engine where it is, but move the plate/cradle and gearbox over even farther to the left than it is now. Off the top of my head I can't think of any reason why I couldn't do this. The limiting factor is the inner primary cover, which is already up against the head of the upper gearbox mounting bolt.

Hmmmmmmm. Have to sleep on it.
 
That plate on the NEB clutch hub is close to the same thickness as the shim spacer you made. I will give a shot at pulling the top plate off tomorrow. There is another spacer behind the plate that is slightly thicker than the plate. The top plate is not tight against the spacer and it can be wiggled a little. If it is also countersunk like the top plate, I may use it by itself, or pull it out and resecure the top plate to get some more thread for the clutch nut. All depends on how it is put together. Not sure what the torque spec should be for the nut on the NEB clutch, but will go for 54ft lbs and see how long it all stays together. Worst case is I'll have to cave man another plate. More fluster cluckery.

BTW, I use a clutch rod condom to keep gear lube in the gearbox and out of the primary cover. Works great so far (about 3K miles), and should fit with the NEB clutch.

P11 basket case


I made the clutch rod condom with these bits. Punch and a very old 3/8" vacuum port cap. The cap is not rubber. It was a flexible rubber like material when I installed it. Now it's kind of stiff, but still holding back the gear lube. I would imagine gear lube on the NEB clutch would make it really grabby and hard to loosen up cold.

P11 basket case
 
I am pretty sure that my spacers are all in the proper places; in any case my gearbox is right up against the engine mounting plate, so it can't go any farther to the left. Pretty sure if I get that steel plate out we'll be okay. I wonder why that plate is there? Is it possible that it is meant to be removed when using the clutch in an Atlas application?
If my memory serves me the steel plate (spacer) is needed to prevent final drive chain to rub on the inner cover.

Do you own an AMC clutch? If you do, or if someone will borrow you one, I'd try to install everything using stock parts, to ensure all parts line up.

- Knut
 
If my memory serves me the steel plate (spacer) is needed to prevent final drive chain to rub on the inner cover.

Do you own an AMC clutch? If you do, or if someone will borrow you one, I'd try to install everything using stock parts, to ensure all parts line up.

- Knut

The other spacer plate being discussed is the one in the middle of the NEB clutch hub. Essentially, it's two spacers. If the top one (or bottom one) is removed more threads would be available for the clutch nut and split washer on the Junglebiker install. Mine could be different. I'm hoping I won't need the spacer, but chances are I will.

The Commando setup that has the bearing in the center of the hub like the NEB clutch does use thin spacers behind the clutch. I don't have any spacers for the AMC clutch on my P11 and the engine and clutch sprockets align, and I can get the chain on. May not be relevant if the rear of the NEB clutch hub is not protruding out the back end the same distance as the AMC clutch does. Not sure that makes any sense, but I typed it up anyway.

P11 basket case
 
The other spacer plate being discussed is the one in the middle of the NEB clutch hub. Essentially, it's two spacers. If the top one (or bottom one) is removed more threads would be available for the clutch nut and split washer on the Junglebiker install. Mine could be different. I'm hoping I won't need the spacer, but chances are I will.

The Commando setup that has the bearing in the center of the hub like the NEB clutch does use thin spacers behind the clutch. I don't have any spacers for the AMC clutch on my P11 and the engine and clutch sprockets align, and I can get the chain on. May not be relevant if the rear of the NEB clutch hub is not protruding out the back end the same distance as the AMC clutch does. Not sure that makes any sense, but I typed it up anyway.
My mistake. Obviously you need to make the clutch hub slimmer. NEB claims the clutch is a replacement to suit G80 (and hence, the P11) and BSA Goldstar models. It's poor engineering practice if they didn't trial fit it.
However, they are offering a "centre sleeve nut type", i.e., a different hub. I wonder if this is a required accessory to fit the NEB clutch.

Junglebiker, have you contacted Joe Maxwell Engineering about your fitting problem?

- Knut
 
blah blah blah.... Mine could be different. I'm hoping I won't need the spacer, but chances are I will.

Should say ... "Mine could be different. I'm hoping I won't need to remove the spacer, but chances are I will."
 
Sorry, I forgot to bring my camera with me yesterday--once I used a little heat, the countersunk screws holding the steel plate in the center came out easily. After that there were enough threads for the nut, so I just assembled it that way.

A sleeve nut would not have worked, as the steel plate in the center of the hub was much too tight of a fit on the shaft--in fact I felt like it was just a little tighter on the threads than I liked, though it did not seem to be damaging the threads.

With the plate removed and the short sleeve behind it also removed, THEN a sleeve nut would probably have worked. As it is, I am content with the solution I came up with. It looks to me as if most of the clutches they make are sold without the plate or the sleeve behind it.
 
By the way, I did compare my NEB clutch to an original clutch. I don't know for sure what the "original" clutch was originally fitted to, but I'm guessing Atlas or maybe P11.

Anyway, placed both clutches side by side flat on a table top, the sprocket on the NEB sits flat against the surface, the sprocket on the original sits about .300" above the table.
Farts!! Means my chain won't work either without a custom spacer behind the clutch, and the hub spacer removed.

My NEB is not flat against the sprocket laying on flat surface, but a lot closer than .3". Might be up off the table surface whatever 1/32nd is equal to.

"Fits on model X" for aftermarket performance parts should be interpreted as a "if you do everything you need to do, it fits right on model X" statement. Might need a custom shim spacer and a longer Commando mainshaft to get a fits right on without taking the hub plates off on the P11.

Did you get that center hub plate off with heat?

Here's a made up on the spot thought. Maybe the top spacer comes off and the one under it goes behind the clutch. Then you have the option of replacing the top spacer where it was or not using it at all.
 
Back
Top