P11 basket case

Looking good. You're getting there.

I'm a simple guy. Only thing that can keep a motor from starting is fuel or fire. It is probably a bit more difficult to set up the ignition timing on a Hunt magneto than it is on something like a TriSpark ignition, which really is easy as long as a degree wheel is used on a P11. Your symptoms sound like the timing is still off. When you hit the right numbers, it will light right up and it won't backfire.

Drifting off topic: Took my P11 for a spin with the NEB clutch in it. Apparently, I know how to shift a motorcycle after riding them for 60 years. It shifts into 1st gear silently and better than the AMC clutch did, but the AMC center hub was in need of replacement. I think you're really going to like the NEB clutch with the cush rear hub. What has me a little worried is how I mounted it so far out on the mainshaft and it is noisy. Sounds like a late 90's Ducati with a light-weight alloy clutch in it. Also not totally convinced it is supposed to be run wet. It got kind of late grabby once it was soaked in ATF about 12 miles into the ride. Really close to stalling it at traffic light launches. It probably needs 1/4" play at the handle for my clutch use style. P11 spec is 1/8" to 1/4" gap.

I'll keep an eye out for your progress reports in 2023.
 
Got the head on!

View attachment 95443

And yes, that is a newly made Molnar cylinder block. Anybody spot the little bit of vintage Webco? Inside are JS Motorsports/Carillo rods (longer than stock, with JSM/Wiseco lightweight pistons to match), JSM JS0 camshaft, JSM BSA style radiused lifters and bronze lifter block, JSM/KPMI Black Diamond valves, JSM Beehive springs, JSM reinforced silicone gaskets, JSM/Total Seal gapless rings, maybe more I am forgetting about. Went with a Commando head in the end, but nothing special about it aside from light porting.
What nuts did you end up using for the three 3/8 studs the come down from the head (2 in front, 1 in back), and how did you get them started? I bought a bolt kit from Andy and his sleeved nuts for those studs require magic fingers to get started. I actually don't plan to use them. His sleeved nuts look like what you used on the studs coming up from the cases through the barrel flange. The recessed pockets for those studs and nuts is ridiculously confined in every direction. Did you do some machine work around the recessed pockets? Just curious.
 
Got all the spacers done and in place now. I realised, after studying the Hycam list again (thanks, Knut!) that I had several spacers in the wrong places., which explained a discrepancy that was popping up in discussions about spacers: some say that the 2 spacers at the front, (frontmost? foremost?) engine mount are of equal thickness, whereas the Hycam list shows one to be more than twice as thick as the other. We'll get back to this in a minute.

Wrapping my mind around the placement of the spacers was more difficult than I expected. I at first assumed that the left rear engine plate was simply spaced over to the left a ways and the gearbox moved over to meet it and then more spacers between the gearbox and the right rear engine plate. And yes, it probably can be assembled that way and work just fine as long as you make all the necessary allowances in other places to compensate.

But the Hycam list clearly labels some spacers as fitting between the right rear engine plate and the frame. It wasn't until I tried putting myself in the position of the guys who built the first prototype that I finally understood correctly what was going on: the production models are built like the prototype, just a Norton engine in a Matchless frame rather than a Norton engine in a Matchless derived frame.

So! Back to those front spacers. If you have the spacers on the rearmost frame lugs (upper and lower) on one side, you'll end up needing equal thickness spacers on the front mount. If you have the spacers on the other side, then you will need the spacers described on the Hycam list, AND your engine will actually be centered in the frame.

So NOW I have the right spacers in the right places. I went ahead and bought a engine/primary cover spacer off of eBay. It's exactly the same as the ones sold by Baxter Cycles, and if I had to do it over again, I'd just by it from Baxter, as once the shipping and taxes were added on, I only ended up saving a whole dollar over Baxter.

Here's pics of what I assume will be the final positions of the spacers--these are made and placed according to the Hycam descriptions. Note the gearbox spacer slightly right of the centre of the photo and the engine spacers in the upper right quadrant:

View attachment 95788View attachment 95789

Here we see the front spacers--do it this way and your engine ends up centrally located in the frame--or at least mine did....
View attachment 95790

Here you can see a little of the difference between the front engine mounting plate and the rear engine mounting plate in terms of spacing. The front engine mounting plate has the spacers on the outside (between the frame and the plate), whereas the spacers on the rear plates are between the engine and the plate on the left side, then between the frame and the plate on the right side. On the gearbox the spacers go between the gearbox and the right mounting plate.
View attachment 95791

Here's a good shot of the .343" thick spacers between the engine and the left rear plate and the .156" thick spacers between the frame lugs and the right mounting plate:
View attachment 95792

I feel pretty confident now that the spacing is all correct. although I do not have my engine/primary case spacer yet, I did experimentally put the inner primary case in place and was pleased with how much better the line-up of things in that area seems to be now--the inner case itself seems parallel with the mounting plate and the gearbox input shaft sticks out far enough now that I am not wondering how in the world the clutch is going to fit.

Anybody know if a Burkhardt magneto cover will fit a Hunt magneto? We're about to find out....
hello. im working on a p11 and am dry fitting the cases and trans to figure out the puzzle of plates and spacers. right now i have mine set up like you do in this image and it seems to fit ok. with the small spacers on the Lt side. I see in later images of your (very helpful) posts you moved the small spacers to the Rt side. Why did you move them? thanks for any info.
 
hello. im working on a p11 and am dry fitting the cases and trans to figure out the puzzle of plates and spacers. right now i have mine set up like you do in this image and it seems to fit ok. with the small spacers on the Lt side. I see in later images of your (very helpful) posts you moved the small spacers to the Rt side. Why did you move them? thanks for any info.
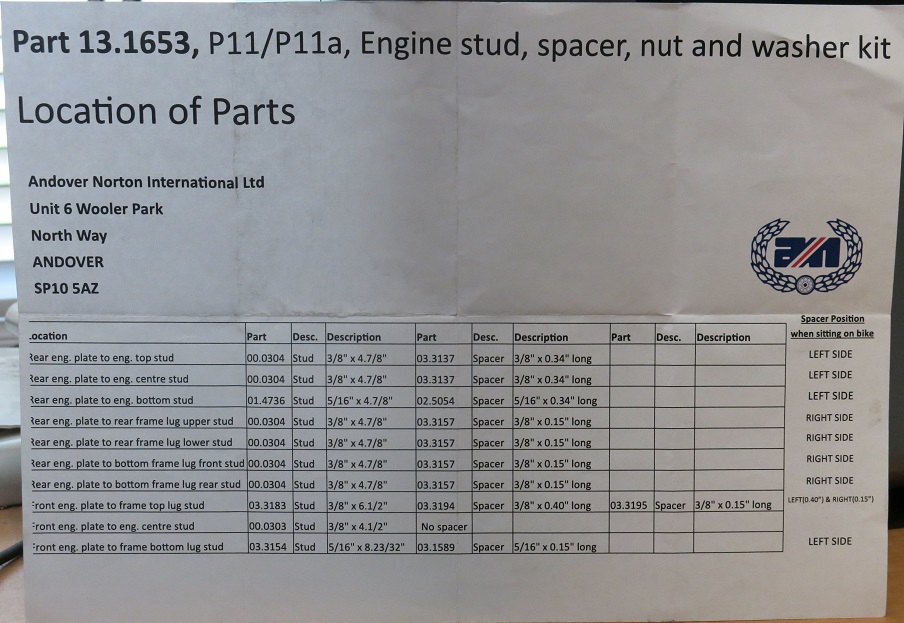
I know you are not asking me, but if you purchase the P11 engine mounting fastener kit from AN it comes with a sheet of paper that includes a table indicating where the spacers go. The table has been posted before on this site somewhere, (might even be in this thread) but I'll dig it out later and post an image of the table. In the meantime, you could try a search.

Here it is: You are welcome
P11 basket case
 
Last edited:
hello. im working on a p11 and am dry fitting the cases and trans to figure out the puzzle of plates and spacers. right now i have mine set up like you do in this image and it seems to fit ok. with the small spacers on the Lt side. I see in later images of your (very helpful) posts you moved the small spacers to the Rt side. Why did you move them? thanks for any info.

Hello, Luis! Welcome to the site. I started off with no spacers whatsoever and thought that looked just fine. Looking back now, I shudder to think what stresses I was subjecting various parts to assembling things that way, but I mention it here just to point out the fact that it is very possible to get these spacers wrong or to leave them out altogether and have it seem to be "right" when in fact it is definitely not. Schwany's thread on his P11 was a huge help to me in determining where the spacers are supposed to go; go through my thread you'll also find other helpful links, including references to a list which details the thicknesses of specific spacers, which was good info for me as I ended up making all my own new spacers on a lathe. But to answer your specific question:

At two or three points along the way I thought I understood the spacers; I was wrong every time but the last time. Page 8 of this thread is where it finally all comes together properly. I think the best way I can describe it is that the engine needs to go to the left and the transmission needs to go to the right. Earlier I thought that all the spacers needed to go one one side, and indeed it will fit like that, but if you do that then your primary drive sprockets won't line up. Pay attention to the front upper mount, it has spacers on both sides. Along the way it was helpful to me to remember that the frame was originally intended for a different engine and the P11 spacers are sort of an "adapter kit" to make the Atlas engine fit. Coming from Japanese motorcycles, this was a surprisingly difficult concept to wrap my head around--the Japanese don't do this sort of thing. If Honda had wanted to build a CR500 with CBR600 engine in it, they would have just designed and built a whole new frame to marry the CR500 brakes/suspension/bodywork to the CBR engine and would have done so apparently with casual abandon.

Remember that there is no need to force your engine mounting plates (do not assume that they must be under bending tension to fit properly--I wondered about that at one point, thinking to myself, "Maybe that's just the way the Brits did things?") and and also that things properly installed will be parallel and square. Holes will line up, bolts will be long enough, etc.

I'm happy to answer questions you may have, just be aware that I am currently on the other side of the planet from my P11--I work in Papua New Guinea and my P11 is in storage in the US right now and will be there for at least the next couple of years, so I can't just run out to the garage and take measurements for you.
 
Back
Top