- Joined
- Nov 2004
- Messages
- 21,432
Is the casting of the caliper machines to take a banjo ?
The two calipers on my Mk3 are not machined but wouldn't take much to smooth the surface down if done with care.

Is the casting of the caliper machines to take a banjo ?
For some reason RGM sent me a braded hose with a flange type union on the end instead of the taper seat type. I was pretty surprised they would do that, as like you mentioned the surface is not machined and normally has the casting joint running right across it. I was under time pressure to take the bike for it's MFK (MOT) test so I elected to use it. I put a foam earplug in the hole and carefully filed the surface flat, then used a copper washer to seal it. By the time I got to the testing centre the bloody thing has wept enough for the tester to see and failed it.The two calipers on my Mk3 are not machined but wouldn't take much to smooth the surface down if done with care.

Like this? What fitting did it have at the other end?For some reason RGM sent me a braded hose with a flange type union on the end instead of the taper seat type.
RGM: "STATE IF YOU ARE GOING FROM MASTER CYLINDER TO THE CALIPER OR MASTER CYLINDER TO METAL BRACKET."

 andover-norton.co.uk
 andover-norton.co.uk
andover-norton.co.uk
andover-norton.co.uk
I understand that the flat metal washer include in the rebuild kit is not necessary but looking at Norton diagram it looks to me that the thinner rubber piston seal with the smaller hole is needed to be inserted between the white nylon part over the spring and the metal piston, don`t you think so?The rubber boot in the first picture is not the correct item for the Mk3 rear master cylinder.
It should be:
Motorcycle parts and spares for Norton motorbikes - Andover Norton Spare Parts - Andover Norton Motorcycles Parts - Original Andover Norton Parts
Motorcycle parts and spares for Andover Norton motorbikes: Andover Norton manufactures and supplies all Factory Spare Parts for Norton motorcycles built before 2002.
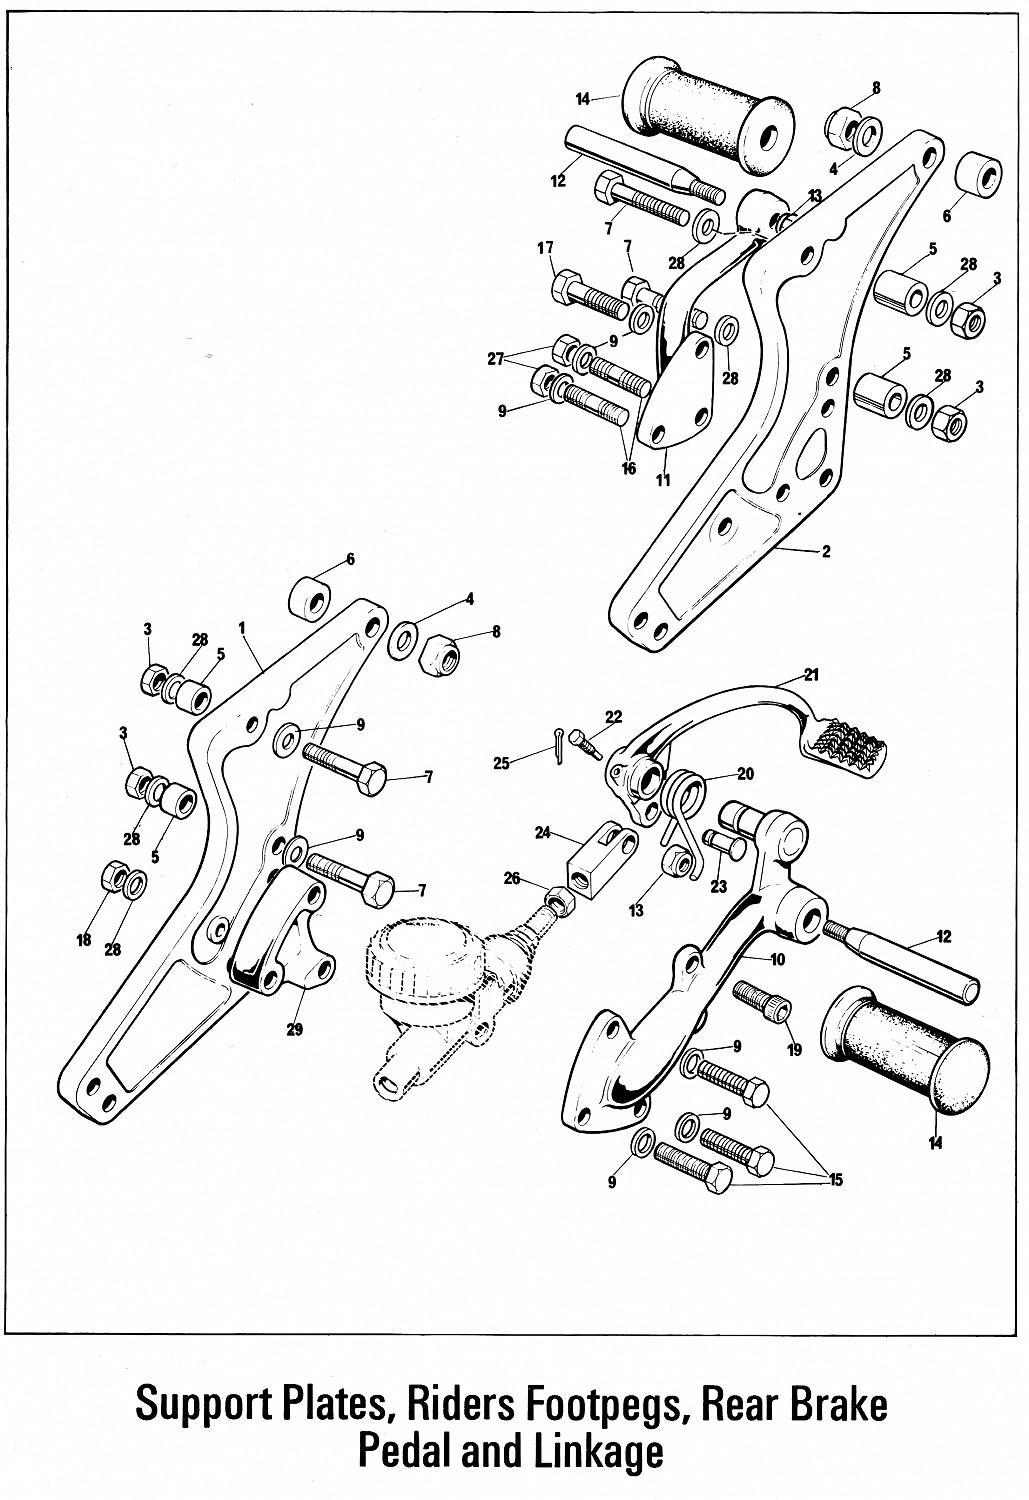
The operating rod limit nut (with the groove and facing the wrong direction in your picture) should be set to the dimension below (and locked with the thin nut).
Note that the flat metal washer and thinner rubber piston seal with the smaller hole included in the rebuild kit are not used.
Motorcycle parts and spares for Norton motorbikes - Andover Norton Spare Parts - Andover Norton Motorcycles Parts - Original Andover Norton Parts
Motorcycle parts and spares for Andover Norton motorbikes: Andover Norton manufactures and supplies all Factory Spare Parts for Norton motorcycles built before 2002.
It looks like there could be a circlip instead of the standard safety fastener on the clevis pin.
(The safety fastener 06.5782 is drawn as a split pin on the parts diagram but that is not correct)Motorcycle parts and spares for Norton motorbikes - Andover Norton Spare Parts - Andover Norton Motorcycles Parts - Original Andover Norton Parts
Motorcycle parts and spares for Andover Norton motorbikes: Andover Norton manufactures and supplies all Factory Spare Parts for Norton motorcycles built before 2002.
I understand that the flat metal washer include in the rebuild kit is not necessary but looking at Norton diagram it looks to me that the thinner rubber piston seal with the smaller hole is needed to be inserted between the white nylon part over the spring and the metal piston, don`t you think so?


Item 25, (drawn incorrectly) retains the clevis pin 23 which would otherwise work its way out without a retainer.And I do not quite understand from which parts diagram comes the safety fastener 06.5782 which also think is useless.
 andover-norton.co.uk


But the rubber seal with the small hole is not the one I need to insert on the metal piston?
You may have had a slightly scored or irregular bore that can NEVER seal properly.I rebuilt my rear master cylinder, installed it and never could get it to work properly. Ended up buying a new one and have had no problems since. I also tried to use the original bundy pipes but could never get them to seal properly. Ended up getting new bundy pipes also. I was able to rebuild both calipers. Everything else was replaced with new. The good news is that it stops well and doesn’t leak. Good luck.
I rebuilt my rear master cylinder, installed it and never could get it to work properly. Ended up buying a new one and have had no problems since.
If "tapered" then it cannot be 3/8" UNF thread.It seems includes a 3/8" thread screw,...
Are the oil line and connectors the same as the ones normally used as brake line?