Shrapnel in Sump

Status
Not open for further replies.
I’m sure I recall reading on here previously that one manufacturers rotor had this known issue ?

If it’s as tight as you say I don’t see how you can lap with paste as suggested? You’ll force it on… which will force all the paste out… and leave you with a stuck rotor…
 
If the rotor "almost" enters the shaft, after lapping the crank end, I would use flapping emery cloth fixed to a 10 mm slotted rod which is clamped in the chuck of your hand drill. Gently sand the rotor's bore until you get a tight sliding fit at the shaft.
For a larger diameter/bore mismatch I would use a reamer.

- Knut
 
Last edited:
Before lapping, sanding, deburring, filing, polishing, fitting, fettling & all that, stop. Get some measuring tools. Measure the I.D. of the rotor and post it here.
Don't have any bore guages. Trying to measure inside rotor bore with verniers just to imprecise in my hands. Do have a micrometer to measure crank.
As said, original rotor goes on nicely, no forcing on or off. Will have a go with some emery paper on spindle to see if any improvement.
 
Don't have any bore guages. Trying to measure inside rotor bore with verniers just to imprecise in my hands. Do have a micrometer to measure crank.
As said, original rotor goes on nicely, no forcing on or off. Will have a go with some emery paper on spindle to see if any improvement.
If the original rotor goes on ok then your crank is not oversized.

Therefore if you remove material from the crank, any future rotor will likely be a sloppy fit.

It is your rotor that is incorrect. So that’s what should be corrected.
 
Don't have any bore guages. Trying to measure inside rotor bore with verniers just to imprecise in my hands. Do have a micrometer to measure crank.
As said, original rotor goes on nicely, no forcing on or off. Will have a go with some emery paper on spindle to see if any improvement.
I would definitely not emery paper the shaft unless there is damage at one point
Ask yourself why does the original one fit and the new one doesn't !
Either ream your new rotor to fit or get a proper sized replacement
Just my opinion
 
If the original rotor goes on ok then your crank is not oversized.

Therefore if you remove material from the crank, any future rotor will likely be a sloppy fit.

It is your rotor that is incorrect. So that’s what should be corrected.
In general, I agree. But that's why I said to try the new rotor normal and backward to see if it went on the same amount. It doesn't take much of a burr to stop a properly sized rotor from going on. I also said not to reduce the diameter but to get rid of any burr or mushroom. Lots of rotors have been run loose and the keyway edges have mushroomed and the rotor and/or shaft have worn. With what we have to work with, we have no idea which is the actual problem.

Edit: Please ignore: All that said, the rotor came in a green box so it is not the current stock and I have no experience with it.

Every red box rotor I've installed was a slightly closer fit than the original and with any burrs removed was a slip fit with no noticeable play - a good thing.
 
Last edited:
In general, I agree. But that's why I said to try the new rotor normal and backward to see if it went on the same amount. It doesn't take much of a burr to stop a properly sized rotor from going on. I also said not to reduce the diameter but to get rid of any burr or mushroom. Lots of rotors have been run loose and the keyway edges have mushroomed and the rotor and/or shaft have worn. With what we have to work with, we have no idea which is the actual problem.

All that said, the rotor came in a green box so it is not the current stock and I have no experience with it. Every red box rotor I've installed was a slightly closer fit than the original and with any burrs removed was a slip fit with no noticeable play - a good thing.
Rotor was redboxed, stator green.

Also, same issue trying rotor flipped around, no fit.
 
Rotor was redboxed, stator green.
Oops! Then it should be correct. Really interested to see how this turns out. In general, I'm happy with current Lucas parts but if there are still consistency problems I want to know and I will report them.

To me, Wassell and EMGO both have some superior products, some decent parts, and some junk parts and I hate recommending junk!
 
Also, same issue trying rotor flipped around, no fit.
With it the same flipped around either you should be able to find the restriction in the shaft or rotor since you now know exactly where it occurs. Try sliding it to that point and then twisting back and forth to see if you can mark either the shaft or rotor. You can also mark the shaft at that position with a sharpie pen and determine how far it goes on before binding.
 
Rotor in a red box, rm24 stator in green box.

Both the rotor and stator I got came in green Lucas boxes and pre 2019.
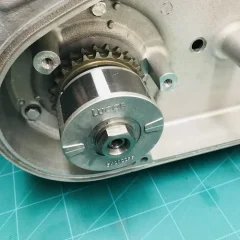
The rotor fit perfectly on the crankshaft but did machine the OD on a mandrel to increase the running clearance.

It should fit without any shenanigans being a heavy rotating part.

c8.jpg c9.jpg
 
With it the same flipped around either you should be able to find the restriction in the shaft or rotor since you now know exactly where it occurs. Try sliding it to that point and then twisting back and forth to see if you can mark either the shaft or rotor. You can also mark the shaft at that position with a sharpie pen and determine how far it goes on before binding.
Thinking to try some magic marker on spindle to see witness marks after trying to fit. Might show up a burr. Recall this came about b/c the rotor nut came loose and rotor got slammed into outer casing timing scale & and its hammer in rivets. This could have made some distortion of the keyway.
 
I'm to lazy to do all that.
The inner primary cover is spigot ed to the engine raised boss, that is a given and even if the PCD of the three stator mounting studs was out it would matter little (which is why the many online postings of trying to bend or tweak those studs is wishful thinking at best)

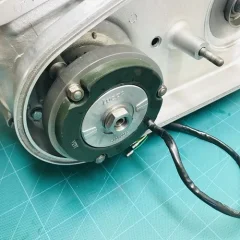
I increased the hole sizes in the new stator slightly in the mill, that meant the stator then had some radial movement. (It might have been 8.2 mm holes)
I used convex placed wide band Belleville retaining washers because they will simply compress as the three nuts are tightened and not skew the stator radially. (with a plastic sheet spacer setting the rotor to stator clearance which might have been around 0.009" out of the boxes. I increased it by machining to at least 0.015" maybe even 0.020" but forget now )

The rotor fit and retaining nut tightened (with a new locking washer) to 70 ft/lbs with the split clamp holding tool made for that job. (Done three times over the previous day so the drive sprocket is definitely set on the crankshaft taper)
 
What do I think about a good deal of the replacement parts available.

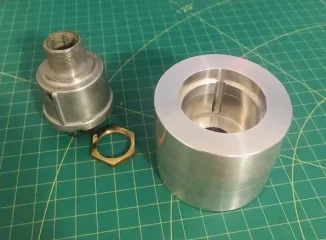
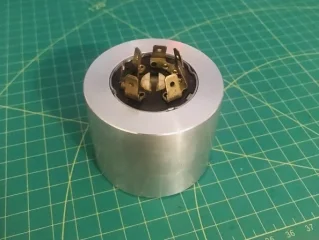
Buy a new crappy Lucas switch or service the original.
No doubt that is real Bakelite.

4.jpg 2.jpg 3.jpg

Some people in the past have waffled on about the factory tooling being worn out.
Before I modified the inner primary to suit the Duplex drive I clocked the three stator pedestals as found, the three heights were within the same 0.001" ?

df.jpg

I have total empathy for anyone rebuilding old things without a machine shop of sorts in the garage.
 
Last edited:
I increased the hole sizes in the new stator slightly in the mill, that meant the stator then had some radial movement. (It might have been 8.2 mm holes)
I can imagine doing it with a mill working - I don't have one. I made the mistake once trying to do it with a drill - 1 second of stupidity and I was waiting for the new stator I had to order as a result to arrive.

Please don't try opening the holes in a stator with a drill bit - I promise you will be sorry.

I have found that the stator spacers are not very precise lengths and sometimes simply changing their locations will get the gap right.
In Norman White's restoration book, he recommends reducing the three stator mount studs slightly by placing in a drill (or even better a lathe) and running emery over them. This gives some adjustment for stator without risking damage.
 
The mating surfaces between the inner primary cover and the crankcase can somewhat alter the rotor/stator clearance. Whether the alloys relax through the decades after being machined flat, who knows. I used this observation and shimmed 2 of the 3 spots between the cases just enough to eliminate the rocking and also to allow the necessary stator clearance. This is with Alton equipment along with no gasket between then and using sealant. I have discovered that these machines need tweaking now and then and that is part of the program.
 
Update:

Success! Took quite fair bit of emery paper (400 grit wrapped around a suitable socket and rolling rotor around by hand) and lapping compound (by dremel buffing pad) but started to see further distance onto spindle. Some evidence of key slot in spindle had high points along edges, b/c the emery shined them more. Overall more work was needed on rotor bore though. It now fits tighter than original but quite possible to fit home by hand.

Confirmed sprockets are pretty closely aligned, within a 0.1mm by my crude measuring using straight edge off outer teeth row then a venier depth reading from edge of inner primary to straight edge.

New stator also seems to fit studs easily and i'm getting uniform gap to rotor all around, used 0.01" plastic strips at four point while doing up the nuts, then confirmed with feeler guage. Stud nuts and washers also fit easily and my Whitworth tall socket was no issue against stator.

Next job is to thoroughly clean up sealing ring grove of sealant muck.
 
I can imagine doing it with a mill working - I don't have one. I made the mistake once trying to do it with a drill - 1 second of stupidity and I was waiting for the new stator I had to order as a result to arrive.

Please don't try opening the holes in a stator with a drill bit - I promise you will be sorry.

Shrapnel in Sump
 
Status
Not open for further replies.
Back
Top