Mk3 WLA, Alternator, Rectifier, Zeners, battery

Status
Not open for further replies.

p400

VIP MEMBER
Joined
Jul 14, 2014
Messages
1,289
Country flag
My red "ignition" warning light, on my Canadian MK3, has gone from
1. fading to dark with rpm, lasted about 1000 miles
2. fading slightly with rpm, lasted about 1000 miles
3. not fading at all, after fitting new H4 headlight, no headlight in run position.

This Mk3 has been running a Shorai LFX18A1-12BS Li battery with a totally stock charging system. 2 wire alt, rectifier, pair of zener diodes, blue capacitor
....I am sure 1975 vintage.

So my Canadian red light is on bright all the time with no headlight diming with low rpm.
Pilot light does come on in run position.

Headlight and pilot are on when switched to "headlight".

I ran a 45 mile run, to a Norton meeting, with two restarts...
and then 45 miles back home with two restarts...
only running pilot light in run position.
the Shorai battery took 5 mins to recharge, Shorai charger.

How do I check this system to find the faulty pieces?

Do I need a 1 ohm resistor?
What are it's exact details rather than 18ga wire?

My goal is to not "wire hack" this nice original Mk3


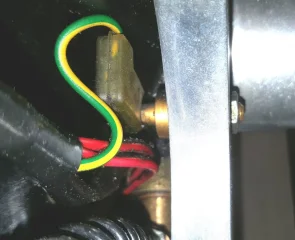
Mk3 WLA, Alternator, Rectifier, Zeners, battery Mk3 WLA, Alternator, Rectifier, Zeners, battery Mk3 WLA, Alternator, Rectifier, Zeners, battery Mk3 WLA, Alternator, Rectifier, Zeners, battery
 
Last edited:
Tests I did run
check Shorai battery after Shorai charge = 14.35v
check Shorai battery after short, bench top Mk3 run= 13.45v
disconnect either zener to see what voltage to ground while 1000-3000rpm = 0v

The WLA is not easy to access, but the rectifier and zeners are easy.

A Canadian Mk3 has
different ignition switch
different WLA
different wire harness
 
Last edited:
My red "ignition" warning light, on my Canadian MK3, has gone from
1. fading to dark with rpm, lasted about 1000 miles
2. fading slightly with rpm, lasted about 1000 miles

The Canadian automatic 'headlight on' is for starting the engine after which the key should be turned to 'Ignition and Lights' for normal running so is that what you are doing?

A Canadian Mk3 has
different ignition switch
different WLA
different wire harness

Should be the same harness with both sets of wires for the later assimilators (see Mk3 wiring diagram. Canadian assimilator wires 'U' and 'NG' are marked 'Not used').
 
Last edited:
My understanding of Canadian switching to "headlight " position is to eliminate rpm brightness after dark.
Once you switch out of Canadian "run", the red warning is off and you have no fading red light to indicate charging.
So my day time running is in the "run" position took keep an eye on the red light.

i dont see loose WLA tab connectors, so it appears to be a different harness.

How do I check this system to find the faulty pieces?

Do I need a 1 ohm resistor?
What are it's exact details rather than 18ga wire?

My goal is to not "wire hack" this nice original Mk3
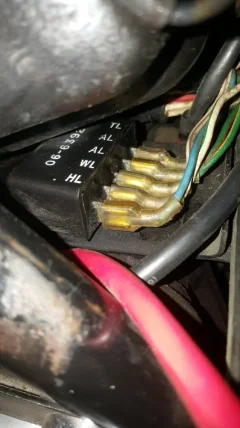
 
My understanding of Canadian switching to "headlight " position is to eliminate rpm brightness after dark.

No, read the Mk3 manual section J8 (or read the relevant section below).
Mk3 WLA, Alternator, Rectifier, Zeners, battery


Once you switch out of Canadian "run", the red warning is off and you have no fading red light to indicate charging.
So my day time running is in the "run" position took keep an eye on the red light.

The Canadian 'assimilator' may not work as a 'charge warning' device at all (DD quote below)? It's purpose is to tell you the headlamp is on at the 'Ignition' position by glowing. Again see manual section J8.

https://www.accessnorton.com/NortonCommando/warning-light-assimilator.27846/#post-432408
MKIII is different and the Canadian headlight control is NOT a warning light assimilator as such.


i dont see loose WLA tab connectors, so it appears to be a different harness.

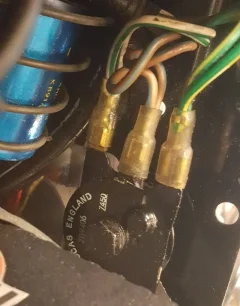
Well, the standard (5-wire assimilator) harness includes the Canadian wires so I'd expect there to be a disconnected white and red somewhere, just as the standard harness below, has the 'unused' Canadian blue and brown/green wires. Edit: Isn't that a white and a red in the background of your second pic?
Mk3 WLA, Alternator, Rectifier, Zeners, battery


How do I check this system to find the faulty pieces?
Do I need a 1 ohm resistor?

Not necessarily:
http://www.aoservices.co.uk/info/MKIIINORTON_ JPN_CHARGE.pdf
http://www.aoservices.co.uk/info/ALTERNATOR_COLOURS.pdf


My goal is to not "wire hack" this nice original Mk3
If it's a simple charging fault then there shouldn't be any need to.
 
Last edited:
My understanding is:
1. WL box detects condition of: "engine is running", due to alternator running/charging system out put being detcted.
then
2. Box will turn on headlight since HL required on all the time (unless engine not running).

My guessing that if Canadian WLA switches HL on, then it may be better to control a "HL relay" rather than hi amperage light bulb ...the WLA box transistor may not be able to handle the higher current bulb???
 
Any Canadian Mk3 successfully running an H4 headlight with Canadian WLA?

My H4 was just purchased thru Andover.......and it functioned the very first time dimming with rpm, but after clicking the ignition switch to headlight and clicking hi/lo and then back to run, no headlight on, simply pilot, no more rpm dimming.

Headlight does light (with pilot) and do hi/lo with ignition in "headlight" position.

But back to my needs - I want to verify the alternator output.
I cant easily get to the alternator wires running across the trans under the air filter.

Can I disconnect both zeners, disconnect both rectifier, disconnect both WLA and perform an output check on this alternator?
All these tabs are easily reached as shown in pics above.
 
You can disconnect the alternator wires from the rectifier and test it while the engine runs on the battery. One ohm of 18 ga. copper wire would be about 150 ft of wire. Nichrome wire would only be a couple feet. You can buy power resistors from Digikey and the like - you'd need at least 100 watts and a heatsink (metal plate): https://www.digikey.com/product-det...passive-product/HSC1001R0J/A102106-ND/2055297

In a pinch, I've used a car headlight with both high and low beams tied together.
 
Can I do some continuity check?
maybe an ohm ck across the two terminals?
Maybe ck AC voltage to ground on each leg with engine at idle?
 
Simplest check is to put a 10 amp ammeter in place of the fuse. You can tell by the current polarity whether the battery is charging or it's supplying power. Then turn headlight on high beam and check again. I would want to see that the battery does not supply power after 2500 rpm.

Disclaimer: I'm not a MK III guy, so I dunno if the wiring is different in the charging circuit.
 
Yes you can check the rotor driven stator, You must disconnect all 3 devices.
WLA/HCU(headlight control unit), both legs off the rectifier pair and both legs off the zener pair.

If you go buy the digikey resistors, you better buy 4 minimun and make 2- 1 ohmers in series for 2 ohms, then another pair in parallel with the first pair which will get you back to 1 ohm. The MKIII is 180 watts...
Dimming then death of HCU was probably the output transistor dying.
If it's dead can I have it for autopsy?
I disected a solid state WLA but have never had a HCU apart for reverse engineering.examination...
 
As Alan Osborn points out on his website the twin zener diodes on the MK111 control on the AC side of the circuit giving 0.7 of a volt less output.
Also running a halogen headlight you are probably not getting enough voltage to charge a lithium battery.
14 volts before you start charging? Can you substitute a lead acid?
 
Simplest check is to put a 10 amp ammeter in place of the fuse. You can tell by the current polarity whether the battery is charging or it's supplying power. Then turn headlight on high beam and check again. I would want to see that the battery does not supply power after 2500 rpm.

Disclaimer: I'm not a MK III guy, so I dunno if the wiring is different in the charging circuit.


I have an ammeter installed on my bike and it shows current flow direction. When it's pointing into the positive, current is flowing into your battery. flipping on electrical circuits like the headlight reduce that flow. If you are riding along at a slow pace with your headlight on and the ammeter is at 0, you are maintaining your battery but not charging it... obviously. If you are idling and it's pointing into the negative you aren't turning the engine fast enough to charge the battery. If you are buzzing down the road at a good clip, the ammeter should be showing a positive charging state. If it's not, you need to start searching for the why...

The last time I went out and my ammeter showed discharge while I was buzzing along, I found a wire was cut by dropping in front of the gearbox sprocket and chain. I repaired it and everything is normal again.

If you disconnect your zener with your ammeter in place, then rev the engine, the ammeter will point far into the positive direction because your zener controls overcharging, and without it in place you see that reflected in your ammeter reading.
 
I disconnected WLA AL leads (w/g & g/y), disconnected two rectifier leads, disconnected zeners.
w/g and g/y zener leads check open, 0 ohms to ground.
2.1 ohms between the two zener leads.

fitted a new 12 amp meter to the brown/blue battery lead (leaving the stock 30amp fuse in line).
key turned on to first position "run" ......pilot light, taillight, gage lights, red dash light, green neutral light and (I am going to guess) ignition on.
temporary 12 amp ammeter needle moves about a needle width.

But turn signal use (in run position) will peg ammeter, key switch to headlight will peg meter.

pressing the starter green button to hear the solenoid click will peg the meter.

Pulling front brake lever to activate brake light indicates 6 amps half scale.

Mk3 WLA, Alternator, Rectifier, Zeners, battery
 
Last edited:
Something's not right. A pair of blinkers or the headlight should not peg a 12 amp meter.
 
fitted a new 12 amp meter to the brown/blue battery lead (leaving the stock 30amp fuse in line).

Stock fuse should be Lucas type 35A blow, 17A continuous (or 15A-20A modern equivalent continuous fuse)

key turned on to first position "run" ......pilot light, taillight, gage lights, red dash light, green neutral light and (I am going to guess) ignition on.
temporary 12 amp ammeter needle moves about a needle width.

But turn signal use (in run position) will peg ammeter, key switch to headlight will peg meter.

pressing the starter green button to hear the solenoid click will peg the meter.

Pulling front brake lever to activate brake light indicates 6 amps half scale.

I think your ammeter is over-reading more than double but the information above won't identify whether the charging system is working correctly (and the electrical loads are listed in the Mk3 manual section J3).
 
This is a new 12Amp ammeter out of the box.
I thought about the vertical configuration, revised temporary ammeter to horizontal mount.

New data -

key turned on to first position "run" ......pilot light, taillight, gage lights, red dash light, green neutral light and (I am going to guess) ignition on.
Horizontal temporary 12 amp ammeter needle moves about a needle width.

Turn signal use (in run position) indicates 7 then 1, 7 amp then 1amp.
Key switch to headlight lo beam indicates 8amps, hi beam 9amps with new H4 bulb.
Pressing the starter green button to hear the solenoid click will indicate 6 amps.
Pulling front brake lever to activate brake light indicates 3 amps .

Mk3 WLA, Alternator, Rectifier, Zeners, battery
 
This is a new 12Amp ammeter out of the box.
I thought about the vertical configuration, revised temporary ammeter to horizontal mount.

New data -

key turned on to first position "run" ......pilot light, taillight, gage lights, red dash light, green neutral light and (I am going to guess) ignition on.
Horizontal temporary 12 amp ammeter needle moves about a needle width.

Turn signal use (in run position) indicates 7 then 1, 7 amp then 1amp.
Key switch to headlight lo beam indicates 8amps, hi beam 9amps with new H4 bulb.
Pressing the starter green button to hear the solenoid click will indicate 6 amps.
Pulling front brake lever to activate brake light indicates 3 amps .

View attachment 11653

It's still over-reading, but none of this is checking the charging system.
 
You need to hook all the wires back up and run the engine with the ammeter in place.
 
So bike all reconnected, WLA, rectifier, zeners .
temp horizontal ammeter clipped on.
electric started , idle in run , ammeter at zero.
rev bike to 2000-3000 no change in neutral ammeter
rev 4000 ammeter shows 2-3 amps charge.

still running, switch key to headlight lo beam and ammeter starts swinging plus 6 then minus 6 amps every second. tick tock while revs at 3000rpm. the swinging is so pulsing that I cant really tell what the actual reading is .
 
Status
Not open for further replies.
Back
Top