Rear Axle Puzzle

Status
Not open for further replies.
Swooshdave,
I feel your infection with fever and chills.
First error was thinking you acquired an ordinary motorcycle
to just follow manual like prior projects and all will be well LOL!

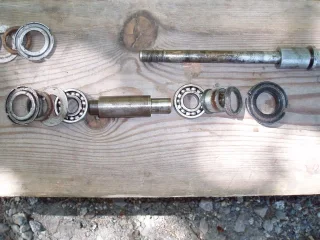
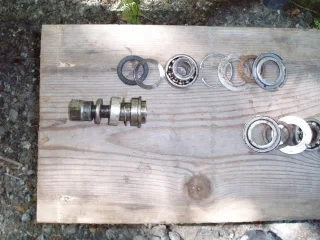
Its been years since I had your same symptoms so I forget
the exact cure for my '72, but here's a photo of the 3
stud axles to pick from.

http://rides.webshots.com/photo/2072321 ... 1179bWeYcl
Rear Axle Puzzle


There's a central side issue to be aware of - these axles do
break at last thread not screwed into stud axle. Of all
the items to have magfluxed and cryogentic tempered
this is it. Past Peel's let go at 90 mph going over cement
hyw seams me standing on pegs, too many miracles
in a row to list here saved us,

But revealed what happens and a safety feature to install
so miracles not required for pilot to ride on into future.
This is only one of a number of times a rear rod link impressed
me no end.

Fracture releases the clamp force holding RH wheel forward
against the chain adjuster, this both tips tyre over into
swing arm and fender edge it also turns tire patch clockwise
looking down. Following rider said we disappeared in rubber
smoke cloud to his view.

Something should be made to hold the RH axle tight to
the adjuster. I used hose clamps to ride to a motel
for a truck home end of 2000 mile adventure.

If needed, I may be able to find the two stubs that didn't work
or take apart factory Trixie conveniently hanging in shed now.

hobot
 
OK don't say I never did anything for you...I tore the rear hub on my '72 apart just so you can get the order right...and if you need dimensions you better call me or something cuz I am going to put it back together soon!

Now..."I do wish you would listen, it's perfectly simple. If you're not getting your haircut, you don't have to move your brother's clothes down to the lower peg, you simply collect his note before lunch, after you've done your scripture prep, when you've written own letter home, before rest, move your own clothes down to the lower peg..."

Sorry couldn't resist. Reading the manual for the tear down reminded me of a Monty Python skit. Anyway below are photos, an overview and then some closer of the two sub groups to show a little more detail.


Starting at the right...spindle, washer, spacer, (speedo drive and its bushing), threaded lock ring, felt washer, stepped bushing, bearing, axel, bearing, washer, felt, dished washer.

Now from the left for the Dummy spindle side...

from the left...nut, washer, (cam bearing and stay), spacer, (brake plate), washer, (brake drum), dummy spindle, bearing, circlip, washer, felt, dished washer.

I hope to all hell I haven't goofed this up, this was harder than tearing down the gearbox! The items in parenthesis are not in the photo...note the swingarm has to go in here some place. Also, in the blow up it looks like there is a washer between the dummy spindle and the brake drum (#21). I found this between the brake drum and the face plate.

Hope this helps (me put it back together).

Russ
 

Attachments

  • Rear Axle Puzzle
    rear axel parts2.jpg
    96.7 KB · Views: 497
  • Rear Axle Puzzle
    rear axel parts.jpg
    78.1 KB · Views: 486
  • Rear Axle Puzzle
    rear axel subgroup.jpg
    76 KB · Views: 452
I used Paint.exe to draw up a schematic. The white items are things you have in your original picture. (felts are shown as brown, probably should be replaced or done away with). The yellow items are your missing parts

Rear Axle Puzzle


Using the Old Britts parts list, I compiled a list of part #s
http://www.oldbritts.com/ob_start.html

From what I can tell, you need:

dummy axle washer..................(#21 _ NME5276)
dummy axle...........................(#44 _ 062067)
small felt retaining washer..........(#45 _ 062072)
(2) large felt retaining washers.....(#30 _ 062071) <---- you actually have one of these already, but there is a hole drilled in it
top hat spacer........................(#31 _ NM18234)
lockring................................(#27 _ 060317)
speedo drive..........................(#5 __ 060627)
speedo spacer.........................(#34 _ NM13270)
large axle spacer......................(#4 __ 060324)
axle washer............................(#35 _ NM19266)


For what it's worth, I suggest replacing the bearings (at least the 6203 single rows) with 2RS (fully sealed). This does away with all the pesky felts. The problem you run into with the 4203 is getting a sealed one (which comes as a 3203 from SKF) is 1.46mm too thick, meaning you need to have the bearing bore in the brake drum and the length of the dummy axle turned down by that much to accommodate it.

hope this helps,
Jeff
 
Checked the threads on my axle and inside the dummy shaft...it is 18 tpi.

Also realized after the last post that my comment about the placement of the washer was completely idiotic...oh well, I never said I was smart just stubborn.

I pulled the dimensions off my dummy shaft...just in case it helps (and so I can put it together without guilt). I don't have a decent caliper here at the house so figure the measurements are only reasonably close. The drawing is not to scale without apologies. The diamters are shown in the center of the drawing, the lengths are along the side.
 

Attachments

  • Rear Axle Puzzle
    dummy axle diagram.jpg
    10.9 KB · Views: 456
hobot said:

Oh, crap. For you following along at home realize that I'm dealing with a true basketcase and to make it more complicated, there is a high probability of parts mixed from a variety of years of Commandos. If there are multiple drums, dummy axles and who knows what else there is a good chance these parts may not go together at all.

Thank you for the drawings, photos and descriptions. I think I'm comfortable with the order the parts go, but the problem is that they don't fit. Now to find out why.
 
Dave,
As long as your brake drum has the paddles on the back it is the right one. It is the same number showing for all years '71-74, 062764. I am thinking you just need the correct dummy shaft, 062067, again it is the same number listed for '71-74 (so the odds should be good even at random!). Then of course an axle with the correct thread to fit it.
I did not measure my axle but it is not tightened down yet so I could pull it and check it easily.
Russ
 
rvich said:
Checked the threads on my axle and inside the dummy shaft...it is 18 tpi.

Also realized after the last post that my comment about the placement of the washer was completely idiotic...oh well, I never said I was smart just stubborn.

I pulled the dimensions off my dummy shaft...just in case it helps (and so I can put it together without guilt). I don't have a decent caliper here at the house so figure the measurements are only reasonably close. The drawing is not to scale without apologies. The diamters are shown in the center of the drawing, the lengths are along the side.

Rear Axle Puzzle

Rear Axle Puzzle


I did use a caliper (they are under $10 from Harbor Freight and are more accurate than eyeballing...)

So... I think the problem is that I have a MkIII Rear Axle (1/2-20) but didn't know it. GP had sent me the right dummy axle but I assumed it was wrong because it didn't fit the axle. Turns out I need to get the right Dummy Axle and the right Axle (18tpi)

I knew there was a chance of getting the wrong year parts, especially since my brother has a mix of MkIII and earlier parts in the piles. Now I know.

Except I have no idea what the dummy axle I have is with it's 1/2-20 threads. Me so confused...
 
Once you find correct stub axle or get whole new kit,
hot rodders like you better take a close look at the
cush drive paddles sticking out the drum.
These are usually just a press fit peened in place or spot welded IIRC.

They can twist to skew flats from bearing squarely on thin cushions,
eats up cushions after one good hi spirited ride.
Solution is weld a few beads to merge with hub then grind
back so brake parts clear.

Peel's power melted to mush the factory kind, so switched to
tough multi belted rock grade conveyor belt and
still chewed them apart after short season of hi spirited rides.

hobot
 
Rear Axle Puzzle


So this was pulled from Old Britts. What has me perplexed is that I think that the dummy axle I have (that I got from GP) is 20tpi. I need to check it again.

I'm also assuming that the brake drum I have is the 71-74 style.

Anyone have a photo of the MkIII Dummy Axle?

And I don't know about the axle I have either, I'm also assuming a 20tpi but it's not a MkIII.

I know, the smart thing would just to buy an 72 axle, axle nut and dummy axle and you guys wouldn't have to listen to all this. :(
 
rvich said:
I pulled the dimensions off my dummy shaft...just in case it helps (and so I can put it together without guilt). I don't have a decent caliper here at the house so figure the measurements are only reasonably close.

The measurements given are probably within .010. Which should be close enough to identify the correct one. I said I didn't use a "decent" caliper...not that I used a tape measure! :shock:
 
rvich said:
rvich said:
I pulled the dimensions off my dummy shaft...just in case it helps (and so I can put it together without guilt). I don't have a decent caliper here at the house so figure the measurements are only reasonably close.

The measurements given are probably within .010. Which should be close enough to identify the correct one. I said I didn't use a "decent" caliper...not that I used a tape measure! :shock:

Some of the measurements are off in the comparison by way more than .01, especially the widest flange (the one that is not letting me get the dummy into the brake drum. I have 1.5 and you have 1.375 dia.
 
swooshdave said:
rvich said:
rvich said:
I pulled the dimensions off my dummy shaft...just in case it helps (and so I can put it together without guilt). I don't have a decent caliper here at the house so figure the measurements are only reasonably close.

The measurements given are probably within .010. Which should be close enough to identify the correct one. I said I didn't use a "decent" caliper...not that I used a tape measure! :shock:

Some of the measurements are off in the comparison by way more than .01, especially the widest flange (the one that is not letting me get the dummy into the brake drum. I have 1.5 and you have 1.375 dia.

I might be missing something here, but what I was refering to are that the measurements I gave from my shaft are within .010 accuracy. I wasn't trying to suggest that your shaft should be within .010 of mine. If I have misunderstood the problem (which is likely) I apologize for any confusion.
 
Rear Axle Puzzle

Rear Axle Puzzle

Rear Axle Puzzle

Rear Axle Puzzle


Anyone want to confirm that this is a MkIII axle and Dummy Axle? Threads are all 20tpi.
 
So to recap:

I had the dummy axle and axle that my brother sent me. The axle didn't fit the dummy axle. I assumed the dummy axle was wrong. I was the dummy. It's was the axle that was apparently wrong.

I sent GrandPaul my dummy axle and he sent me one. His fit my axle but it didn't fit the brake drum. Very odd.

Rear Axle Puzzle

The original dummy axle fits the brake drum perfectly.

Rear Axle Puzzle

The original dummy allows plenty of room for the bearing.

Rear Axle Puzzle

The one from GrandPaul doesn't.

Rear Axle Puzzle

Rear Axle Puzzle

The difference is minor but the crucial difference is the diameter of the widest area. It won't let the dummy axle seat properly. Also note the thread difference.


So now he sent the original one back to me (I'll send his back too) and it fits the brake drum. I've got what I hope to be the correct axle on order. If that all works out the rear wheel will finally go on.
 
With a little help from our Friends we get by.

While you are the current stub axle expert around here,
I'd like to get the 3 or more stub axles ID's and
labeled in a photo of them all standing together.

So what year/model axle did you determine your bike is?
What year model did grandpaul send?
Pull up my photo and tell us which one of the 3 don't
match the two you have shots of.

hobot
 
hobot said:
With a little help from our Friends we get by.

While you are the current stub axle expert around here,
I'd like to get the 3 or more stub axles ID's and
labeled in a photo of them all standing together.

So what year/model axle did you determine your bike is?

I do not know what year the dummy axle and rear brake are from on my bike. My brother had a pile of parts and grabbed the best ones from the pile.

hobot said:
What year model did grandpaul send?

I have not been able to get an answer as to what the dummy axle grandpaul sent was from. Again, it could easily have been "from a pile of parts".

hobot said:
Pull up my photo and tell us which one of the 3 don't
match the two you have shots of.

hobot

Can you get out your calipers and give measurements of your three? Also tpi for both the inside and outside threads?
 
And finally I might have some closure on this whole thing. Finally you say...

Rear Axle Puzzle

The dummy axle parts in order. They are resting on a surrogate shaft.

From L to R using 1972 plate (from Old Britts) & part numbers:

21 NME5276 Flat Thin Washer (you don't actually need to put this on now as it goes between the dummy axle and the brake plate (not shown yet).
44 062067 Dummy Axle
46 062889 Felt Washer
45 062072 Felt Retaining Washer
48 NM17721 Double Row Bearing
23 062070 Spacer (bearing was pressed to this previously)

Now we can put this all in the brake drum.

Dropped in the brake drum are 44, 45. Next is the bearing and spacer assembly.
Rear Axle Puzzle

A 27mm socket worked great.

Rear Axle Puzzle

Bearing fully seated. Note the circlip slot is fully exposed.

Rear Axle Puzzle

47 062090 Circlip installed.

Rear Axle Puzzle

30 062071 Felt Retaining Washer installed. Note small hole which was drilled to aid removal at some point.

Rear Axle Puzzle

33 NME6885 Felt Seal Washer

Rear Axle Puzzle

32 Dished Washer installed.

Rear Axle Puzzle

21 NME5276 Flat Thin Washer can now be put into place.

Rear Axle Puzzle

14 060334 Rear Brake Plate Spacer is slipped in and the the Brake Plate can be slid into the drum.

Phew. That's a lot of parts. And we still have the other side to go. Rear axle may be here next weekend. If so then the damn wheel is going on!
 
Rear Axle Puzzle

Does this look right?

Should there be that much adjuster hanging off the back?

Note that the shoes are installed but not the springs.
 
Don't forget the spring on the actuating arm. Putting the springs on the shoes is a whole adventure in itself. I found it easiest to take the shoes off , put the springs in place and then spread them as an assembly to fit. The springs have a lot of tension and because of the small area to work in all of my old tricks from my '64 Chevy were pretty useless.

So was the final dummy axel 1.375 at the wide flange?

Re adjuster hanging off the back...don't sweat that until you have your drive chain tensioned...the whole assembly is likely to move back.
 
Status
Not open for further replies.
Back
Top