Progress Report - Ugly!

Status
Not open for further replies.

Tim

Joined
Feb 4, 2009
Messages
67
The new project is almost apart. I can't get the stearing head bearings out. I've sprayed penetrating oil on them, heated them, and whacked them as hard as I dare with a drift and hammer. Does anyone have any good suggestions?
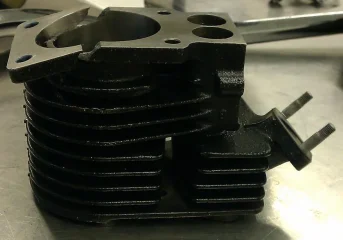
Problem number 2. I removed the head. The pictures show the condition inside the combustion chamber. Apparently some sort of critter made its home in one side. The picture is after removing 1/2 cup of crap. The head is now soaking in penetrating oil and I've alternated soaking, heating and tapping on the pistons to break them loose. I show these pictures just so you can be amazed at the great looking and running Commando this will become (I hope!). It is a challenge.

Progress Report - Ugly!


Progress Report - Ugly!
 
I've seen a lot of things inside old motors, but the remains of something long dead is a first. :lol: :lol: :lol: :lol: :lol: :lol:
 
Tim said:
The new project is almost apart. I can't get the stearing head bearings out. I've sprayed penetrating oil on them, heated them, and whacked them as hard as I dare with a drift and hammer. Does anyone have any good suggestions?

Bigger hammer. You cannot hit them too hard. If you don't have that much aggression to take out, a press will.
 
Tim
Try using 50/50 mix of Acetone and Dextron II ATF as a Penetrating fluid. it doesn't like to mix kind of goes milky red but it works.
I think there is something written in the INOA tech notes somewhere.
Soak that cylinder in a bucket of Kerosene for a day and a night.

CNN
 
Gday Tim, just wondering how you got on with that siezed swampy looking motor?
Foxy
 
Soak cylinder/piston in penetrating oil... do NOT hit it with anything, make up a plate that can be bolted onto cylinder barrels with a hole in the centre of cylinder. Weld a nut on to plate so that you can use a suitable bolt to press down on top of piston, Use a peice of wood to protect piston if you want to re use it. If rings are gummed onto piston, boil it in water to release them. I have used this method loads of times without fail. I've also used the hammer method and always resulted in a broken piston!! Good luck
 
I had the same problem with the steering head bearings. I ended up using a 16 lb hammer, a long drift, and had a friend help. Hit on one side then the other as to not get the bearing tilted. Save the old bearing as they make a great tool when pressing the new ones in. I LIGHTY tapped the new bearings in just far enought to get them started. Then used the old bearings and a 5/8 " threaded rod, two pieces of steel that extended to the outside of the race and then screwed them down and was done in no time.

Chuck
 
OK, thanks for all the good advice. What I've done is soak the piston in Kroil, heat the cylinder until the Kroil begins to smoke, let it cool, and then with a wooden plug I turned just smaller than the piston in diameter and about 4 inches long inserted into the top of the cylinder, whack it with a hammer. Repeat 2 or 3 times each day. After several days of this the piston began to slowly move downward, so far about 3/16". I think it will eventually break loose and allow me to remove the cylinder, which will probably need to be sleeved. I've cleaned the crud from the cylinder head and am spraying Kroil on the valves and valve stems. I haven't tried to remove them yet. The rest of the engine appears to be reasonably clean. The oil was clean (no metal or water) and inside the timing cover looks good. I haven't found anyone to volunteer to hold a drift while I hit it with a sledge hammer to remove the steering head bearings. I think I'll have them pressed out.

Progress Report - Ugly!


Progress Report - Ugly!


Tim
 
ChuckW said:
I had the same problem with the steering head bearings. I ended up using a 16 lb hammer, a long drift, and had a friend help. Hit on one side then the other as to not get the bearing tilted. Save the old bearing as they make a great tool when pressing the new ones in. I LIGHTY tapped the new bearings in just far enought to get them started. Then used the old bearings and a 5/8 " threaded rod, two pieces of steel that extended to the outside of the race and then screwed them down and was done in no time.

Chuck

combat-proddy-build-begins-t4186-30.html#p56178

That's who I got this from. Worked great! Thanks.
 
Tim said:
OK, thanks for all the good advice. What I've done is soak the piston in Kroil, heat the cylinder until the Kroil begins to smoke, let it cool, and then with a wooden plug I turned just smaller than the piston in diameter and about 4 inches long inserted into the top of the cylinder, whack it with a hammer. Repeat 2 or 3 times each day. After several days of this the piston began to slowly move downward, so far about 3/16". I think it will eventually break loose and allow me to remove the cylinder, which will probably need to be sleeved.

Tim

Why do you think it'll need sleeved? Deep pits? Is it standard bore now?
 
Tim[/quote]

Why do you think it'll need sleeved? Deep pits? Is it standard bore now?[/quote]
I haven't measured it yet, but the bike had 17K original miles, so I assume they are standard bore. The bad side is really pitted. After I get it removed and cleaned up, I'll mike it and see what I have. I was just "worse casing" it and assuming it would need to be resleeved. Maybe I'll be pleasantly surprised!
Tim
 

Attachments

  • Progress Report - Ugly!
    low res broken cylinder on bike.jpg
    83.1 KB · Views: 153
  • Progress Report - Ugly!
    Low res broken cylinder.jpg
    77.3 KB · Views: 109
  • Progress Report - Ugly!
    low res braze welded cylinder.jpg
    101.9 KB · Views: 134
  • Progress Report - Ugly!
    low res OHV.jpg
    172.4 KB · Views: 145
Have you opened the primary? Could be a very rusty primary chain keeping it from turning easier. Similar possibility in the timing chest, but not real likely.

Are you sure it's in neutral?
 
On the stearing head bearings make sure you put the force on the outer race of the bearing not the inner race. I just seen the setup by swooshdave and it was just like the way I did it but I made sure I had the OUTER race with the force applied to it. Mine were vere hard to get the last 1/8 in and did not want to mess them up.

Chuck
 
ChuckW said:
On the stearing head bearings make sure you put the force on the outer race of the bearing not the inner race. I just seen the setup by swooshdave and it was just like the way I did it but I made sure I had the OUTER race with the force applied to it. Mine were vere hard to get the last 1/8 in and did not want to mess them up.

Chuck

I figured that there was no way to collapse both the old bearing and the new one. If that happens I need to stop going to the gym :mrgreen: or something else is seriously wrong. The last 1/8 was the hardest but that just meant I needed to turn it more. :mrgreen:
 
Tim,
"I haven't found anyone to volunteer to hold a drift while I hit it with a sledge hammer "

Have you ever heard of a "Chicken stick"? This is a long handle to grip a punch/drift whilst someone hits the crap out of it!
Eye and ear (nuts) protection is highly recommended! Also to stop hitting yor fingers with a hammer, hold the hammer with both hands! :mrgreen:
Foxy
 
When you need help as I did, you may have to be the one holding and let the other person do the hitting. I did have a ½ inch by 24 inch rod so we had a good angle on it, I wore heavy gloves and if he hit me he would not get any beer for the rest of the week that he was here.
 
Foxy said:
Tim,
"I haven't found anyone to volunteer to hold a drift while I hit it with a sledge hammer "

Have you ever heard of a "Chicken stick"? This is a long handle to grip a punch/drift whilst someone hits the crap out of it!
Eye and ear (nuts) protection is highly recommended! Also to stop hitting yor fingers with a hammer, hold the hammer with both hands! :mrgreen:
Foxy
I explained this to my wife, but she wasn't convinced. She hasn't trusted me since I had her ride on the front of my tractor to counterbalance the weight of a large round hay bale I was moving. Launched her right off the front of the thing. I'm still paying for that one.
Tim
 
grandpaul said:
Have you opened the primary? Could be a very rusty primary chain keeping it from turning easier. Similar possibility in the timing chest, but not real likely.

Are you sure it's in neutral?

Thought of that. Engine is out of the bike on workbench - no transmission or primary connected. Timing side looks good. Has to be the corroded piston/cylinder. My method is working, must be patient. Not the time for a 16lb sledge hammer.
Tim
 
Soak cylinder/piston in penetrating oil... do NOT hit it with anything, make up a plate that can be bolted onto cylinder barrels with a hole in the centre of cylinder. Weld a nut on to plate so that you can use a suitable bolt to press down on top of piston, Use a peice of wood to protect piston if you want to re use it. If rings are gummed onto piston, boil it in water to release them. I have used this method loads of times without fail. I've also used the hammer method and always resulted in a broken piston!! Good luck
Do you really think you are going to re-use those pistons? Why save them? After all the banging and pressing to get them to move I wouldn't trust them in my nice new rebuild anyway.
 
Do you really think you are going to re-use those pistons? Why save them? After all the banging and pressing to get them to move I wouldn't trust them in my nice new rebuild anyway.
[/quote]

Ron
I agree. I have no plans to reuse these pistons. I'm concerned that there may not be enough metal in the bores to reuse the cylinders without new sleeves. The one side is badly pitted. I'll know more when they are finally removed.
Tim
 
Status
Not open for further replies.
Back
Top