P11, P11A, 750 Ranger Engine thread

p400 said:
my compression ratio is to be lower than std JS ratio, so thicker head gasket (.062") should lower comp ratio.
engine plates are "as found/takeoff" from this nice P11, I am not refinishing oem clear coat that has yellowed.

now concerned with "piston rock" from heavy exhaust side, WTF?, so looking into this per JSmotorsport.com instructions.
Hi p400
Did you go this way to balance the front heavy side?
Regards,
Tom
CNN
 
BillT said:
batrider said:
It looks to me like the safety wiring on the tappets is backwards. Shouldn't it be trying to pull the bolts tighter?

Probably not going anywhere though.

If you take another look, I think you'll see they're tied properly.

Remember that these wires are on the nose of the screw, so wired like a left-hand thread.

I see it now. Thanks.
 
Back at P11 engine assemble using JS performance parts (rods, pistons, rings, gaskets)-
received and installed .062" solid copper head gasket.
matched all ports/holes in copper gasket with head holes/ports, files and Dremel tool


preformed the three .005" copper wire loops.
an acquired skill to rubber cement these to head, and then follow with .062 copper.
annealed thick .062 copper using oxyacetylene #3 tip , blacked out garage. dark red, air cooled.
 

Attachments

  • P11, P11A, 750 Ranger Engine thread
    CopperGasketInstructionsJS.jpg
    218 KB · Views: 500
Even tho the vintage workshop manual had a recommended torque sequence, I chose to use the following later Norton model scheme.
P11, P11A, 750 Ranger Engine thread
 
The upward facing nuts on a Norton head are all 1/4WW
You can grind the ring end of a 1/4 ring/open spanner to fit these three nuts, use the open end with a 1/2 torque device as the open end 1/4 WW fits 1/2 SAE AF very well, keep at a right angle and achieve a decent torque value.
from the internet a BMW site -
http://home.jtan.com/~joe/KIAT/kiat_3.htm
Torque extensions are sometimes required to tighten fasteners in locations where the torque wrench will not fit such as the drive shaft flange on older airheads. Figure 9c shows the extension I made for this purpose. To work correctly, one must understand how the position of the extension affects the torque as shown in Figure 10c. There is a formula for relating actual bolt torque to the wrench torque based on the length of the wrench and extension and the angle between the two. It is best to keep the two at right angles so the torque will be the same.

I ground the ring end of a 1/4WW wrench to fit the tight applications of the three upward nuts.
The ring end was ground fairly thin to clear the right front cylinder location.
using the other end 1/4WW open end which fit the drive end of a 1/2 torque wrench.
I was able to sequence up in stages of 5 ftlbs the ten fasteners on a P11 head.
kept the 1/4WW at right angles (90º)....only having to use this extension technique on the three nuts.
seems to work very well.
 
engine together and serviced.
timing set, valves adjusted, carbs synced,
 

Attachments

  • P11, P11A, 750 Ranger Engine thread
    20150708_P11together1.jpg
    189.8 KB · Views: 680
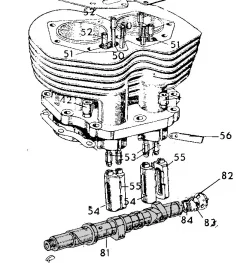
anyone replace the original cam with a new one?
My P11 cam is measuring a little off spec for lift at the valve and I am considering replacement.
I see Megacycle, Johnson, maybe JS
http://www.johnsoncams.com/jc_n_cams.html

I am not looking for a hot rod cam, simply the same as stock, street driven.
Maybe a UK source?
 

Attachments

  • P11, P11A, 750 Ranger Engine thread
    PlateACamCrop.jpg
    119.6 KB · Views: 669
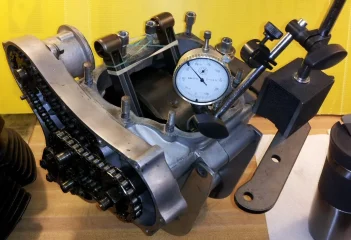
Thanks Thomas, I did another cam check and found, with a direct reading off the cam lobes, that all the lobes were equal with lift at about .333"
I am not sure what I did wrong/right by checking the distance/lift off the valve retainer.
I am happy that the cam seems fine......and I do not have to split the cases!
 

Attachments

  • P11, P11A, 750 Ranger Engine thread
    20160203_CamCheck1.jpg
    196 KB · Views: 591
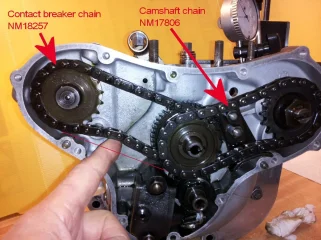
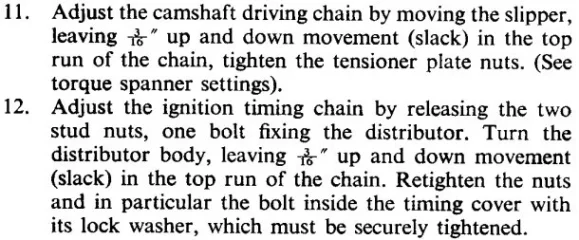
What is the allowable chain slack for the contact breaker and the cam?
 

Attachments

  • P11, P11A, 750 Ranger Engine thread
    20160203_ChainCk2.jpg
    270.1 KB · Views: 682
Camshaft and Magneto Chain Adjustment:

My Norton Manual states minimum 3/16 inch up/down in center of run. I would think distributor chain should be set same as magneto.

Note: overly tight magneto chain can cause AAU to "stick" in advanced position. I usually set mine to 1/4 inch up/down.

Slick
 
Thank you Texas, I do see the Commando contact breaker instructions now.
I think it is too loose right now, but I don't remember "turn" capabilities.
 

Attachments

  • P11, P11A, 750 Ranger Engine thread
    CamAndCBChainSlack2.jpg
    61.1 KB · Views: 547
ordered new chains thru Andover Norton UK
had to phone in payment details at appropriate hour USA/UK -
Part No | Model | Item |Qty| Total
030080 Generic Part CONTACT BREAKER GEAR DRIVE PIN 2 GBP 3.90
067705 Generic Part MAGNETO DRIVE CHAIN NM18257 1 GBP 17.32
067546 750 - 1971 VALVE ADJUSTER SCREW NMT2074, D12/803 4 GBP 25.40
067689 750 - 1971 CAMSHAFT CHAIN NM17806 1 GBP 7.32
NM24252 750 - 1971 PLAIN WASHER, CYLINDER BASE NUT 067872 6 GBP 4.02
Net Total GBP 57.96
 
Tis no suprise one piston is a tad higher than the other. Norton cranks were originally designed (so Mr Hopwood the designer once told me in a letter) such that at least one of the top two fixings by the big ends were interferance fits in the crank halves and flywheel. This ensured that both big ends were correctly aligned. UNFORTUNATELY many (most??) crank replacement fixing kits supply fixings that are undersize.... and have done so for many decades... I have measured a few over the years... Naturally few owners (and probably many others in Norton world) know that interference fixings are required and bung their cranks together leaving the big ends incorrectly aligned. It could well of occured in the factory, Quality Control probably banned from production areas..... My old ex police MK2A had the big ends 0.010 inch out to each other thanks to the help of the police mechanic who bunged it together last whilst employing more Loctite than most of use use in a life time!!
One friend checks custimers cranks and if out corrects them . He puts the crank together with undersize fixings and plays till both big ends are correctly aligned. He then removes one of the fixings by the big ends and breams the hole to 8mm and fits an 8mm nterference fit fixing....or even using a later Norton 3/8 fixing. Then he rechecks the crank and finding it OK does the other fixing. Of course it would CLEARLY be worth checking that correct sized fixings would solve the problem BEFORE doing anything else!! And cheaper!! Dont know about Mk3 cranks with their 3/8 fixings.
I dont suppose many people know to check such things....wonder if the people playing with your crank will??

On another subject. The friend is at present rebuilding a P11 for a customer ...the timing side ball main bearing cage wis in bits ...the big end shells were worn through to the copper.....the pistons had Cord oil control rings fitted and the bores are knackered which when using such oil rings is no suprise. He thinks the engine is as it left the factory. Now it has a 6 start oil pump drive ...this vastly increases the oil to the head especially with a pressure oil feed to the rockers (another tuning must have modification of my youth!!).... the oil return holes from the inlet valve side back to the crank cases are not big enough to return all the oil .....the oil level builds up covering the inlet guides and actually builds up such that it flows over the hump and returns via the cam followers.....oil thus goes down the inlet guides and one has a smoking motor thanks to the brains who decided to fit the 6 start worm to production motors......something Mr Hele apparently only did on his works Domirace motors to maintain the crank oil supply whilst positively pressure feeding the cam lobes to give the cam and followers proper lubrication (so I was informed by a Gentleman working on the project with Mr Hele). Fitting 6 start worms to Dommys became fashionable in my youth and were a 'tuning' must have just like go slower high lift cams..high comp pistons and increased vibration levels etc (the reason those dished low comp pistons were used was an attempt to keep vibration to as low a level as possible .....so most owners removed them fitting high comp ones... another must have tuning mod of my youth.....) On Commandos they cured the smoky motor problem by BODGING it and fitting oil seals to the inlet guides. I suspect the use of Cord oil rings was an attempt to cure the problem before someone came up with the oil seal bodge... I personally on my Dommy tried Twiflex oil control rings and even bored out the oil return holes to cure my smoky motor ....neither of which had any effect ....apart from to my pocket and spare time. I EVENTUALLY ended up adding an external oil return from the side of the head just below the top of the inlet guides running it back into the timing chest. A few race bike people apparently (so I am advised) run a return from the bottom of the inlet area between the guides back into the rear of the crank cases. Clearly valve seals are cheaper providing who ever plays with your head fits the later inlet guides which take the seals. Of course the use of oil seals increases guide wear..........its called a ramification rather like fitting parts that do not work correctly to modern billion pound destroyers that results in them floating around going no where totally useless!! Just what you need as a zillion miles per hour sea skimming missile is heading your way..... Wonder which politician was responsible for that **** up for which they will clearly be promoted upwards thus proving 'The Peter Principle' is still alive and well in the U.K.
 
p400 said:
Thanks Thomas, I did another cam check and found, with a direct reading off the cam lobes, that all the lobes were equal with lift at about .333"
I am not sure what I did wrong/right by checking the distance/lift off the valve retainer.
I am happy that the cam seems fine......and I do not have to split the cases! quote]

Cam lobe lift is usually not a problem, what is a problem is finding an accurate camshaft on the valve timing, you need to use degree disc for this.
Norton SS cams are, as a rule fairly good, what is bad news I have found are a certain P.Dunstall cams.
 
Well back on the P11 renew upper end project.
My P11 has the JS Motorsports longer rods/shorter pistons......and it ran well for 3000 miles, but developed low compression. After removal, disassembly, measurements, .....it is apparent that the headgasket, 'tween the cylinders, was the issue.
This came apart early 2016, I bought a new tour bike, and this sat until now.
I used my surface block (12 x 18 x 3) to resurface the head and cylinder.
There were scratch flaws 'tween the cylinders on both.

P11, P11A, 750 Ranger Engine thread
 
3M wetordry 320, wetted with WD40. paper adhered to granite with just WD40, but it took a while to sort out out how to achieve suitable figure eight on the 9x11 sheets. It takes some time to get the paper "seated" on the granite surface , until you do the paper slides about. Small circular movements, gradually enlarging as you develop a feel for this.

Cylinders took quite a bit more time and probably 6 sheets of paper. Paper not replaced when totally worn out, but when bite seemed like wasting time.
 
Last edited:
Back
Top