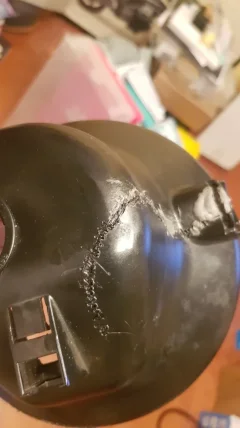
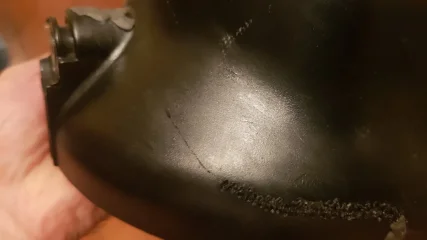
Headlamp fell off

Joined
May 14, 2015
Messages
27
Country flag
Hi Guys

Just wanted to know if anyone had experienced a problem with the headlamp falling off

This happenned to me on a 2010 model, (7500 miles on the clock), fortunately it was not at night or in the evening

Got back after being on a run and the headlamp was just hanging there by the wires

The plastic bucket around the rear of the retaining srews, had disintegrated, (with a lot of small pieces of plastic), leaving no place for supergluing in a steel/ stainless washer, and a big hole where rain could ingress

Just letting everyone know, as it might be worth checking every 1000 miles or so.

It could only be vibration or the crumby British roads for impact damage.......... seem to spend so much time avoiding them

Trying to think how I could insert some rubber dampening in to cushion the vibration

roadrocket1098
 
New shells are steel. Probably no need for rubber etc if you fit one of them.

They do have spacers though between the shell and the brackets, approx 10mm thick at a guess...

So I imagine you could source some 10mm think silent blocks and mount the shell on them if you really wanted to pursue the rubber route.
 
Thanks Fast Eddie

For info new one from Norton........ £90

For info, you have now started me wondering if the fittings are the same..........so am awaiting a reply from Norton ?

Will post reply..........Many thanks once again Fast Eddie

roadrocket
 
I have fitted drilled out tap washers in the past costing a few pence/cents.;)
 
Members on this forum have gone from plastic to steel. Richard-7 comes to mind lets ask Richard .
 
The plastic ones always fall off because when clamping on the mounts it makes the shell OVAL shape. My dad had two fall off during riding and smash. And plenty of times just fall off but the wires hold it. You could imagine the frustration of loosing a light at night.

Anyhow, its an easy fix. Place a washer between the shell and bracket so when the shell is tightened it doesn’t distort the shape of the shell.

I only changed to the new one because the OG light is ugly. But the OG light actually had a glass lens which is better than the cheap plastic the new light has.

Add the washer and you wont have this issue again.
 
Last edited:
Hi Guys

Thanks for the support............unfortunately I cannot see mine being repairable...........like you Guys ....that was my initial thought pattern

For info,

The Norton headlight comes with the fittings enclosed

Apparently you can have an "all black one", or an "all chrome one", but not a chrome front on a black shell as current

There is also I gather, a wire extention, probably to cover the length difference between the rear entry & bottom entry

On another note, just seen a new Norton Californian..........what a BEAUTY!!!!!!!!

Looks a real solid classy piece of engineering!

roadrocket
 
The plastic retaining tab in the bucket that holds the bezel in broke. The new bucket is SO much better. Worth the money. I do have to take an hex key to it once in a while. Everything loosens up a bit if it goes unattended. Any, breaking the old bucket was on of the best thing to happen to that bike. The chain guard too. The CF one is way better.
 
Hi Guys

Mine is a 2010 SE model and I am having mega trouble getting the steel headlamp shell into position

The leads are mega tight (due to the lead entry hole being on the bottom instead of the back...and although I have them all into the shell I cannot rotate the shell rearwards because of the ignition switch unit

Considering taking the handlebars off to give a bit of "slack......or having (hopefully not....to put lead extentions on the wires

Any hints guys???

Roadrocket
 
I had to leave one of the connectors outside the shell. Forget which one, but it was a bitch getting them all to fit. Quite a stretch on the indicator connections too. I'll check and see which one it was. Black plastic, I believe. The one that had been mounted onto the plastic bucket.
 
Thanks Britfan60.........am at a dead loss at present

Got all leads in............unclipped some wire ties for extra flexability.............removed screws on starter motor switch and lighting switch......installed the new head lamp shell......OK............but when tried to reconnect the starter motor switch and lighting switch on the handlebars.......the headlamp shell tilted forward............just not enough "slack" to position them.

I can remove the two terminal blocks for the starter motor & the lighting switch from the headlamp shell.....but they are not waterproof.

I am currently faced with creating a 4 way wire extention for the starter motor.............but something like a 12 way wire extention for the lighting switch

Has anyone found a better solution please

Roadrocket
 
Hi Guys

Thanks for the support............unfortunately I cannot see mine being repairable...........like you Guys ....that was my initial thought

Hi
New one looks better, built better.

But I repaired mine by plastic welding it in case you need to wait a bit to justify. (Solder iron on outside, melted zip tie on inside)

Plus the washers as Mr Coote suggested will hang in there....I've given it a right bashing.


Headlamp fell off Headlamp fell off
 
Nice One GKRyder aqnd thanks for the PIC's

Mine has many long cracks......which could be repaired with an iron......and a lot of plastic around the mounting bolts which has just disappeared, and nothing to seat a washer on

Unfortunately also when mine fell off .... a large piece of plastic broke out of the shell when it dropped off the mountings and just disappeared

With all the members who have switched to a metal shells, I don't know why no one else appears to have had similar problems with the length of the starter motor and lighting leads apart from Britfan60, as the leads would have been measured on a CAD system e.g. Pro Engineer or IBM Catia, and all the harnesses made up the same length.

Maybe I am doing something wrong

The thought of having to put wire extensions on between 16-20 wires in the space available is not something I wish to contemplate at present

I was hoping with all the metal shell conversions, that someone else had also experienced this problem, and could advise a way around it

I wonder if many have just left the connections outside the shell (which I would worry about rain ingress and the engine cutting out)

Also if many have been able to push the original plastic plug into the rubber washer on the new shell (or just left it off)

At the moment the bike has been off the road for a week.....(in the best weather for biking imaginable)

Any help would be appreciated

Roadrocket1098
 
Hi Guys


As you are aware I have been seriously concerned after my headlight fell off

It appeared that drastic surgery via .... soldering iron would not work as there was too much plastic lost on failure

It looked as if I may have had to make up a mini loom extention myself, which I was not looking forward to, and not sure I was capable of!

Enter Rob Jamison Norton Motorcycles.............. stage left!

I discussed the problem with Rob and he felt he may have some old “loom” left

Four days later, the extention parts arrived on the doorstep

The Bike was booked in for it’s Ministry of Transport test the next day and passed

Many thanks Rob......I am back on the road....that’s great Customer Service

Well Done Norton!


Roadrocket

P.S. I may also be able to fit bar risers I want now with the increase in length
 
Hello Great Story and ending . I suppose that your bike being one of the very first 2010 may be more unusual . What does he mean by old loom ? Is that part of a older wiring harness? so were you able to extend or did you replace the wires with the parts sent. ? I re read and you stated extension parts.
 
Hi TonyA

Yes it was part of an older wiring harness.

Rob fitted connectors on each end so that they just snapped together with the parts in situ

The result was that it was easy to install, no stretched wires, headlamp in correct position, I have the length for a "riser" installation and the bike was straight back on the road the next day.
 
Back
Top