First gear jumps out in neutral

Aliexpress DC4127(3C) on it's way from vendor Special Bearing Store, (95% rating) $17.54 USD, with $6.00 discount = $11.54 and free shipping. It said about two - three weeks shipping. The aliexpress site was easy to use, like amazon.com, and I got an email receipt upon placing my order.

After placing the order, it said will ship in 11 days!? I didn't want to wait, but from what I read on the forum, and your reply L.A.B., I believe it was the best option.

Like many others, I too couldn't resist ordering two of them, lol!

It does seem to be the case that this is just one component of a bigger picture which includes upgrading to larger battery cables, having a very good starter, a good charging system and a fully charged powerful battery. Ignition timing setting is even said to be a factor.

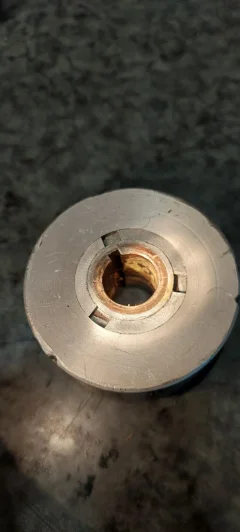
one thing that jumped out to me about this sprag in addition to it's relative reliability and interchangability with original components, is that various forum members are saying the 18 individual sprags or dogs etc... are longer than others and give a very positive "bite". Sounds like a good quality for a sprag to have!

Thanks to all for your help!
 Ed

Now to put my Norton away and get back to the Enfield...
 

Attachments

  • First gear jumps out in neutral
    20240222_184049.jpg
    289.6 KB · Views: 92
Aliexpress has arrived! It only took a few days to ship, as opposed to the 11 days they said it would take. I ordered 2-23-24 recieved 3-7-24 adding the one "leap year" day = 14 days shipping time counting the day that I placed the order.

Dyno-Dave starter is now bolted to bike. I think it looks very good, blends right in. I couldn't believe how small it is! TP cd is placed with it in pic for scale, (and the nice picture). I have to work this weekend, but hope to get things back together soon!
 

Attachments

  • First gear jumps out in neutral
    20240307_155442.jpg
    161.6 KB · Views: 51
  • First gear jumps out in neutral
    20240304_164033.jpg
    161.2 KB · Views: 43
I finally got a little time to put into my primary assembly this weekend which seemed seemed like it would all go together easily but, of course I had to have a couple of problems first, lol!

(Potential) problem #1 is that the aliexpress sprag clutch fits very tightly onto the starter gear. I had to work it for a bit just to get all of the teeth lined up to begin going on, then push firmly with both thumbs to drive it down fully. Does that sound right for one of these sprags? The original 14 tooth sprag drops right on loosely.

I am also having to rotate the starter gear clockwise to get the gear / sprag into the engine sprocket. It does go in fairly easily with clockwise rotation.

Once together, the starter gear rotates clockwise with some drag in the engine sprocket. It does not spin freely. It does not go counter clockwise at all.

The original sprag also dropped right into the engine sprocket loosely, spun Freely clockwise, and locked counter clockwise.

Does that sound right when installing an aliexpress sprag?

I think I may have just solved problem #2.

In looking at the exploded diagrams from Andover, it's a little sketchy because they devide the parts categories into 011 gear linkage, chains, alternator, engine sprocket, and 012 electric start.

In 012 electric start, #21 thrust washer (shouldered) is shown inboard of the sprag clutch. The engine sprocket is not shown.

In 011 the engine sprocket is shown but, not the thrust washer (shouldered).

Using 011 as reference, I was trying to put the shouldered thrust washer outboard of the starter gear, which did not seem right. I was having trouble with that last night.

From what 012 is showing, it appears the shouldered thrust washer goes inside the engine sprocket against the flanged surface of the sprag. Is that correct?

I am at work now, but will have a look at that when I get home, this afternoon.


Attachments

  • First gear jumps out in neutral
    20240317_161836.jpg
    202.8 KB · Views: 37
Thanks again, L.A.B., I've got to remember to check the Old Britts tech articles!

In reading that link I also found that there will be drag between the sprag and the engine sprocket, but it will move freely in the clockwise direction. That's what I've got!

As long as the very tight fit between the sprag and the starter gear is OK, I should be all clear to proceed with assembly.

BTW, in pressing out my old clutch hub, I found what I think should be my original clutch hub bearing. It is sealed with "Italy" stamped into it. Is this stock / original? The replacement I recieved from AN is the open type.

Since the existing bearing was still working fine, I left it in. I figure I could always change it later, unless those ones are known to fail?

Also, of the 3 thin spacer shims behind the clutch hub, the first one which touches the hub was badly galled. In checking the chain gear alignment with a 12" straightedge after hub replacement, it appeared that I needed to lose a shim washer anyway, so that one is now gone, leaving two nice smooth shims, and improved chain / gear alignment. Yay!

And I couldn't believe all of the accumulated grit and fine metallic particles (appeared to be mostly non-ferrous) which were packed into the deep groove at the base of the chainwheel. All clean now, with new stepped washer (clutch location spacer) and circlips. So far, so good! :)
 
BTW, in pressing out my old clutch hub, I found what I think should be my original clutch hub bearing. It is sealed with "Italy" stamped into it. Is this stock / original? The replacement I recieved from AN is the open type.

No, it would be open if original.
 
I also had lots of the metal alloy particles. They were from the chain wearing a groove in the case. My sprag had been replaced a few hundred miles earlier, but had failed again. It was coated in the alloy dust. I think it had not been cleaned properly and the chain tensioner was still faulty, adding to the grinding paste.

Needs a meticulous clean up of everything in the primary case and a check your chain is tensioning after a short run.
My case is all very nice and clean. No grooves or damage. There is some odd clutch history with multiple sets changed and center teeth worn on Barnett disc's.I think that was the culprit. Center hub also was badly worn. Interestingly, the hub bearing had been changed, but not the hub?

I will be cleaning my tensioner and making sure the tiny orifices are all clear upon reassembly.

Last night I noticed that all of the nuts, washers etc... were badly worn from being taken on and off many times, and not very carefully, or while using the right tools! All new hardware has been ordered.

I am seeing some yellowish glue, like locktie maybe, on the inside of my rotor. I could see putting locktite on the threads, but why between the ID of the rotor and the OD of the rotor nut?
 

Attachments

  • First gear jumps out in neutral
    20240318_181751.jpg
    136.4 KB · Views: 33
  • First gear jumps out in neutral
    20240318_181543.jpg
    238.8 KB · Views: 45
I took the pic of the backside to also show the suspected locktite even between the crank OD and the rotor ID.
Almost forgot, the bottom of the nut may have been peened out by the rotor being loose? Or maybe I'm just getting carried away? Lol!
 
Thanks for checking that for me L.A.B.! Knowing how critical it is for a MK III to have a proper charging system, and being a little uneasy about the over-used condition of the fasteners, your help is much appreciated! Not only for me, but for the bike itself.

It is interesting to me, to realize how much goes on in the primary, especially on a MK III. I am looking forward to having mine in top-condition for Kali-Commando's debut this Spring. :)
 
I recommend you use 20/50 or similar engine oil in the primary (which is what it says in the manual) and not ATF as is often used in the pre-Mk3 chaincase now as it does not work too well with the hydraulic primary chain tensioner but that's up to you.

Also, if you remove the nylon spacers from the tensioners then the wide end goes against the spring.
Once again, much gratitude for the further enlightenment!

Wow, there is more to the primary chain tensioner than I thought! I was thinking of using ATF as others have reccomended, but I see now that it not good for the tensioner.

I did know of the plastic rod to spring orientation and how they interact with the small but important orifices, from watching Jessie's Vintage Garage videos, but I did not know of all the other things that can be wrong inside a tensioner, including the big end of the rods going inside of the springs, and incorrectly manufactured replacement parts, OMG!

I'm pretty sure I still don't know it all, but given this new (to me) information, I will now be much more able to thoroughly clean and inspect the tensioner. I will also measure the internal components to assure proper function.

Ultimately, my Norton is the true recipient of this forum's accumulated wisdom, which soon should be resulting in an additional aura of subtle radiance to compliment its natural Norton beauty... Or at least help me to not break down so much, lol!
 
It may be that I have inadvertently "hijacked" this thread. If that applies. Please forgive me, as I didn't mean to, and have been feeling a little uneasy about it lately. If the moderator would like to put my posts elsewhere on a new thread, feel free to do so...

That being said, Holy crap! I thought I'd just take apart my tensioner last night to verify that is all good inside, as I was pretty sure it would be, and look what I found! I don't mean to be a drama queen, maybe I just need to turn those white nylon pieces around and disregard the fact that they are two different types, with unevenly worn plungers, and (suspected to be) different springs?

Input is always appreciated, especially since I'm new, but out of a personnal disgust for wallowing in helplessness, I decided to "bust a move" and ordered all new matching parts from AN.


Interestingly, I also noticed that if you only want the white nylon part, according to the picture, you will get a different part than with the "kit".


Attachments

  • First gear jumps out in neutral
    20240320_180732.jpg
    274 KB · Views: 26
It may be that I have inadvertently "hijacked" this thread. If that applies. Please forgive me, as I didn't mean to, and have been feeling a little uneasy about it lately. If the moderator would like to put my posts elsewhere on a new thread, feel free to do so...

Never mind, just carry on.

That being said, Holy crap! I thought I'd just take apart my tensioner last night to verify that is all good inside, as I was pretty sure it would be, and look what I found! I don't mean to be a drama queen, maybe I just need to turn those white nylon pieces around and disregard the fact that they are two different types, with unevenly worn plungers, and (suspected to be) different springs?

Yes, turn them around. There was a problem with replacement springs being too long (too many coils) so became coil bound.
 
Back
Top