1972 Roadster Rebuild

"We give tools and information out to our qualified specialist suppliers who then manufacture our parts to our specifications. On arrival in the warehouse these components go through inspection, and if and when they are found to be in order they are put into stock."

That's about all I can find on the AN website about in house inspection, which has to be huge job considering the number of different parts they offer, and what must be a large number different suppliers probably located elsewhere in the world. Some parts that should be caught will inevitably slip thru. More thorough in house inspection would raise their selling prices. I needed to replace a bunch of parts on this gearbox rebuild, and they all would have been tough to afford without the recent dollar to pound exchange rate and ordering them straight from AN in the UK. I hated not supporting Old Britts for the same parts. This is the first of many AN parts I've purchased from both sources for this bike so far that has been incorrectly machined, that I'm aware of. I'm not going to jump on AN about this outer cover, but will be a little more critical of any new parts from now on.
 
The replacement outer cover from A-N finally arrived today. Did a quick check and the kick start shaft has no apparent binding and travels full stroke and springs back freely - yay! The gearbox reassembly is back underway.
 
pantah_good said:
The replacement outer cover from A-N finally arrived today. Did a quick check and the kick start shaft has no apparent binding and travels full stroke and springs back freely - yay! The gearbox reassembly is back underway.
Well that is good news. Congratulations- keep the posts coming (I'm really bored out here in Iraq) :D
 
elefantrider said:
https://andover-norton.co.uk/en/pirate-parts/
Does AN have a dedicated quality person? I could not find one on their website.
What Quality Management System do they subscribe/adhere to?
A trained manufacturing engineer has QC methodology as part of the curriculum. If he's worth his salt you don't need ISO2001 or the like to still make good parts. As part of self preservation, even if they don't make/manufacture anything AN should have one on staff, possibly warehouse manager or parts buyer/contracting to oversee product processing.

pantah_good said:
The replacement outer cover from A-N finally arrived today. Did a quick check and the kick start shaft has no apparent binding and travels full stroke and springs back freely - yay! The gearbox reassembly is back underway.

Today I sent a note to AN about the bad parts I got. I will fix the problems here, but I thought they would like to know. Bought anther $400 of ANIL stuff today since I am doing 4 gearboxes of my own and one for a NENO club guy that is not able to do it himself and also putting in a belt drive for him too. Did a lot of gearbox research and was not previously aware I own 23 of them...LOL
 
cjandme said:
I'm really bored out here in Iraq
Jeez, isn't that a good thing in a combat zone?

While waiting on shipping, I pretended I was doing something really constructive by online shopping. This also came today, my new clutch lever. I know it isn't period correct on a Commando, but these Doherty levers bring back such sweet 1960's Triumph and BSA British memories I couldn't resist. And it may help to balance out, period wise, the Magura 11mm radial brake master I have for the other side.
 

Attachments

  • 1972 Roadster Rebuild
    IMG_6077.JPG
    125.7 KB · Views: 1,282
  • 1972 Roadster Rebuild
    IMG_6080.JPG
    228.5 KB · Views: 1,285
My crappy memory is no longer good enough to be working as slow as I am on my '72 Combat engine. The plugged hole shown in my photo is the same hole as mentioned and shown in "The Fix" portion http://www.oldbritts.com/n_c_case.html of the Old Britts tech article - correct?
 

Attachments

  • 1972 Roadster Rebuild
    c_case1.gif
    60.7 KB · Views: 1,068
  • 1972 Roadster Rebuild
    IMG_6082.JPG
    83.6 KB · Views: 1,074
pantah_good said:
My crappy memory is no longer good enough to be working as slow as I am on my '72 Combat engine. The plugged hole shown in my photo is the same hole as mentioned and shown in "The Fix" portion http://www.oldbritts.com/n_c_case.html of the Old Britts tech article - correct?

Yes, the screw plug blanks off the end of the oil scavenge hole gallery.
 
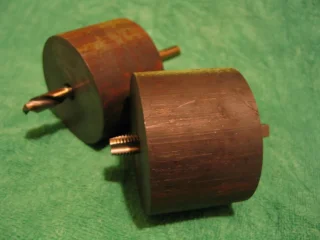
The glacier like progress on the gearbox is almost there, just need to install the gearshift stop plate, springs, and new outer cover, and it should be done. Then engine assembly is next, and I now have the drilling and tapping guides made as suggested by Mr. Comnoz, for Helicoiling the cases to install the CNW stainless head mounting studs as mentioned in the "Cylinder head bolts in stainless steel no or go" thread. I will probably have to shorten up the lead-in on the tap. I had forgotten how really heavy gray iron is, but UPS hasn't.
 

Attachments

  • 1972 Roadster Rebuild
    IMG_6101.JPG
    78.7 KB · Views: 895
I'm declaring the gearbox done. Sorry for any nose bleeds from how fast that went by. Better sit down, engine re-assembly might trigger black outs.
 

Attachments

  • 1972 Roadster Rebuild
    IMG_6106.JPG
    89 KB · Views: 845
pantah_good said:
I'm declaring the gearbox done. Sorry for any nose bleeds from how fast that went by. Better sit down, engine re-assembly might trigger black outs.
No worries pantah _good, thanks for posting the updates. I believe you're gonna love the cNw stainless hardware. The gearbox looks great :mrgreen:
 
Yikes, four months since my last update on this thread. I fell into one of those dreaded progress slumps for which I have several flimsy excuses. I had finished the gearbox, had brought back the semi assembled engine from having been worked on by Nick at The Classic Bike Experience, and was about to get some surgery done on my back, so I was at sort of a natural pausing point. The real stopper was a frame powder coating job that was pretty incompletely taped off, and I just kept putting off dealing with that. Another hold up back in May was Heli-Coiling the head to use the CNW hardware, but dynodave at Atlantic Green got me thru that one safely. Thank you Dave! Then during the summer I easily fooled myself that I was actually making progress by thinking about and researching various ways of setting the bike up, and shopping around for cool parts and stuff. Hah! FINALLY yesterday, I tried a method for cleaning off those powder coated places that grandpaul had described, and realized that it worked pretty good and that I was unnecessarily dreading that job. Thanks GP! So now I'm starting to think I'm back under way. My back is still fucked up and that's depressing, but the VA is slowly but surely working with me on that. Here's photos of the Heli-Coiled head, that dynodave helped me big time with, and the rear engine mount, with the isolastic bore flange getting a little Zip Strip soaking time, along with the Dremel burr that worked good for cleaning off the other places. That burr will be getting a good work out for a day or two. Not as neat and pretty a powder coat job as I had originally pictured....next time I'll be a lot more skeptical when the powder coat guy assures me he knows all the places on a Commando frame and parts that need to be masked off.
 

Attachments

  • 1972 Roadster Rebuild
    IMG_6320.JPG
    135.4 KB · Views: 592
  • 1972 Roadster Rebuild
    IMG_6315.JPG
    91.8 KB · Views: 575
pantah_good said:
I easily fooled myself that I was actually making progress by thinking about and researching various ways of setting the bike up, and shopping around for cool parts and stuff. Hah!

And I thought I was the only one who was self-deluded that way... :mrgreen: :mrgreen:
 
That's mainly what I was worried about, and if it wasn't for grandpaul's post I never would have considered trying it. No, it really doesn't. I set the speed at about 2/3 or 3/4 and just use a light touch. The metal is not real smooth, so I don't shoot for 100% paint removal. I found the burr with the curved side was easiest to use.
 
Finally worked my to the end of the Old Britts frame parts powder coat masking list - the unpleasant way. I'm afraid it's not the best looking work I've ever done, but if they make good electrical grounds, they're pretty enough. Not sure, but maybe I can actually start bolting things together now?? Yikes!
1972 Roadster Rebuild
 
I don't believe the frame is required to do any electrical service at all.
I'd be curious to know if anyone can tell me where, anywhere? what wire or connector or circuit uses the "frame" for electric conduction. IIRC There are 9 grounds in the 71-74 harness all using the red interconnecting wire circuit....
1 headlight bucket (+turn signals), 2WLA, 3engine/head @ headsteady (spark & points current), 4horn, 5battery, 6capacitor, 7rectifier base, 8zener diode stud, 9tail light assy(+turnsignals)
I'll think more on the turn signals but right now I think it is only switched power not grounding controlled.
 
Back
Top