1972 Roadster Rebuild

Picked up the first round of parts at the vapor blaster today.
 

Attachments

  • 1972 Roadster Rebuild
    IMG_5749.JPG
    249.7 KB · Views: 1,096
  • 1972 Roadster Rebuild
    IMG_5746.JPG
    220.9 KB · Views: 1,152
  • 1972 Roadster Rebuild
    IMG_5737.JPG
    265.7 KB · Views: 1,093
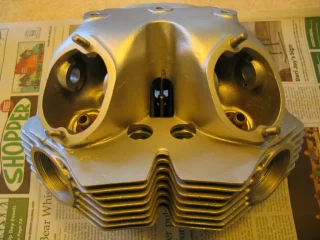
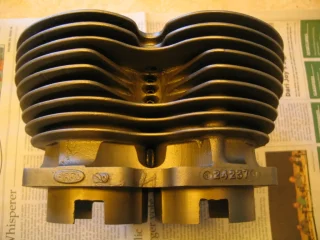
Made a run up to Classic Bike Experience today to have Nick evaluate the cylinder/pistons and the head/valve guides. More mixed blessings. The cylinder bores were in great shape. So were the +030 pistons, but they are the not so good pistons with the nearly full skirt width slots that go up under the oil ring. At a minimum we would need two sets +030 rings. So unless I can find good +030 full sets of pistons and rings, it looks like we'll have to bump it up to +040 regardless. The valve guides actually measured a little under size, which may explain the one broken guide / bent valve. Maybe it seized up in the guide. So on the head, it looks like a minimum of one new guide and honing the others up to size.
Bill
 
I have a piston replacement question. The parts book lists different part numbers for 1972 standard and combat pistons. I've been researching, but can't seem to find out for sure what the difference is. Do combat pistons have and need deeper valve pockets on their tops?

I'm looking at the +.040 JCC / Emgo pistons with Hastings rings for this combat rebuild, but don't know if those will work with the shorter combat cylinder head?
Bill
 
pantah_good said:
Do combat pistons have and need deeper valve pockets on their tops?


Bill

Yes, because their crowns have to take up more empty space in the combustion chamber to increase compression.
 
Got to order some more special tools tomorrow a.m.
 

Attachments

  • 1972 Roadster Rebuild
    IMG_5750.JPG
    244.7 KB · Views: 927
This must be a fairly common dent from the left foot peg on the chain-case outer cover. Is this fixable with that crack along the radius?
Bill
 

Attachments

  • 1972 Roadster Rebuild
    IMG_5754.JPG
    285.8 KB · Views: 912
  • 1972 Roadster Rebuild
    IMG_5753.JPG
    231.9 KB · Views: 859
Any alloy crack (within reason) can be Alloy welded with a TIG welder, or even a MIG (with argon gas and alloy spool) Reynolds Ken Sprayson was Gas welding alloy in the 1950/60s with suitable alloy rods, but this is a refined skill.
If attempting to do this at home with a Mig, DO grind away the outer skin BEFORE welding, Very important.
 
Could be easily fixed with a careful cleanup and roughening with sanding cloth, then a light smear of JB-Weld aluminum.

There is no pressure in that case to leak (it essentially breathes through the mainshaft wicking seal).
 
I like the JB weld fix, basically because I can do it here, thank you. I can live with that minor external dent, as long as it doesn't leak. A good reminder to keep it upright.
Bill
 
I finally cleared off the surface of my u-control model building table down to the top of the piece of 1/4" plate glass to check the flatness of the gasket surface on my damaged chaincase outer cover. There is maybe a 5 inch arch in the area of the clutch bulge at about 1 o'clock where I can slip a .013" feeler gauge under at the widest gap. When I took it apart, there was a lot of silicone sealer all around the gasket and gasket surface. Is this dented cover bent too far out of flat to reuse?
Bill
 

Attachments

  • 1972 Roadster Rebuild
    IMG_5758.JPG
    350.8 KB · Views: 729
All of the issues are repairable, but you have to ask yourself would it be easier and more practical to pick up a solid salvage part with no cracks and reasonable flatness? I think I'd check around before getting that one welded. It would take lots of hand work to getting it up to snuff even after that.
 
I took your advice and won a cover off ebay. It arrived today and is undamaged, as was advertised, and the mounting surface checks almost dead flat.
Thanks, Bill
 
This is what happens to the slotted pistons, when it goes well..

1972 Roadster Rebuild


When it DOESN'T go well, it is catastrophic and you need a whole new engine.
 
We don't want that do we, and I could use a little advice on what to do. My cylinder bores measure good top and bottom for +.030. One suggested option would be to hone cylinders out to +.040. Another is to bore cylinders out to +.040. And a third is to bore cylinders out to +.060. I'm not sure if option one (hone) is even a legitimate method. Option two I've read may not be enough material to properly machine off. And option three is the end of the line for any future re-boring, but I'm guessing would probably give the best results. Does that sound about right?
Bill
 
Step 1: buy a set of decent .040" over pistons & rings.

Step 2: Have a reputable machine shop carefully inspect the worn cylinders and new pistons, and make a recommendation.

My advice would be bore the cylinders. Final step is a light hone to exact finish specs (likely .0045" difference from bore to piston, and .010-.012" ring end gap)
 
Thank you grandpaul. Do you know if the regular off the shelf +.040 JCC / Emgo pistons have enough valve pocket clearance on their tops to work with the combat head, valve, and 2S cam set up?
 
My oil tank just arrived back from Colorado Norton Works where they did their oil tank modification to it. I have to say it looks mint! Very nice job cNw.
Bill
 
Back
Top