New project, but missing VIN plate

There's a pic at the beginning of the thread, but since then I've got a new MK3 frame which has no holes for a VIN plate, nor documentation. I guess when the time comes I will simply glue a new VIN plate on and just use the same number as the engine & gearbox (144531).
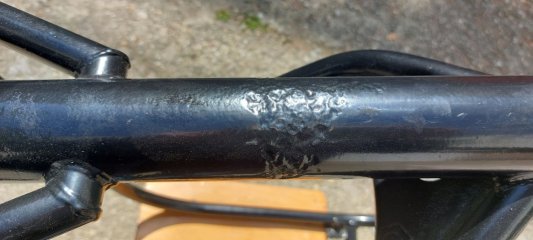
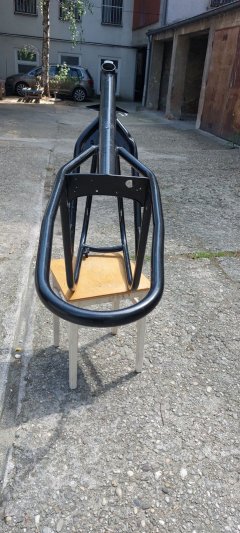
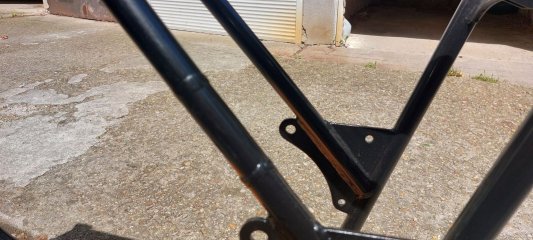
The picture in post #2 shows that the frame has the holes for the VIN plate. I probably missed it but why did you buy a new frame and from where? The only new frame I've ever bought came from Andover Norton and did have the holes for the VIN plate. I would think it VERY hard to glue the VIN plate on. Also, why would you buy a new MKIII frame when Andover has pre-MKIII frames in stock?
 
The frame I got with the package has a dodgy weld and a few dents. I would have used it anyway except I would have had to buy a yoke as the one that came with it was buckled. Then I found someone selling an "unused" MK3 frame with yoke locally for €900. He said he inherited it from the Norton importer in Austria and never used it. It has no paperwork nor even holes for a VIN plate. My plan is to use that one with the cradle and swing arm from the older one.

Here are some pictures of the older frame which I won't use.
 

Attachments

  • New project, but missing VIN plate
    frame 1.jpg
    343.3 KB · Views: 153
  • New project, but missing VIN plate
    frame 2.jpg
    156.9 KB · Views: 152
  • New project, but missing VIN plate
    frame 3.jpg
    207.7 KB · Views: 155
  • New project, but missing VIN plate
    frame 4.jpg
    381.6 KB · Views: 170
Finally some real progress on my restoration project. It is always 2 steps forward and 1.5 back though....


New project, but missing VIN plate
 
After a year of piecing this bike together, I noticed that the timing cover pillar screws have been sheered off. A friend drilled them out for me, but it is not optimal and the new screws don't really fit well. The top hole thread won't catch and the bottom hole is slightly eccentric.

I put the top bolt in with Loktite and filed the bottom slot on the stator to get that bolt in. But not really happy.

Would a decent engineering shop be able to fill the holes and start again, or bore wider and use inserts?

New project, but missing VIN plate


New project, but missing VIN plate


New project, but missing VIN plate
 

Attachments

  • New project, but missing VIN plate
    Timing cover 3.jpg
    220.7 KB · Views: 14
After a year of piecing this bike together, I noticed that the timing cover pillar screws have been sheered off. A friend drilled them out for me, but it is not optimal and the new screws don't really fit well. The top hole thread won't catch and the bottom hole is slightly eccentric.

I put the top bolt in with Loktite and filed the bottom slot on the stator to get that bolt in. But not really happy.

Would a decent engineering shop be able to fill the holes and start again, or bore wider and use inserts?
Pillar screw threads are 2BA, major diameter 4.7 mm. There are 2BA thread inserts available, though not easily obtainable (RGM has them), and the available wall thickness may not allow drilling for a solid insert. The required drill bit for e.g. Helicoil inserts isn't published, I guess it's about 5.3 mm.
If I were you, I'd make new metric pillar screws and fit M5 helical wire inserts.
Either way, I suggest you fix small pieces of aluminum rod (e.g., ø4.5 mm) with Epoxy glue, making ends flush with surface. Then, using an end mill and cover clamped at mill's bed, drill/mill the required holes for inserts at the correct positions. Fit helical inserts as prescribed by maker.

- Knut
 
Last edited:
OK, so this is boing to be challenging for me. Will start to look for how-to videos...
What is an "end mill"? Different from a simple vertical drill?
 
I've order the 2BA repair kit from RGM and will be investing in a small hobbyist vertical drill.

RMG site claims the drill size is 4.5mm yet the screw size is 4.7mm. How can that possibly work? Surely the insert is even larger than 4.7mm.

New project, but missing VIN plate
 
I've order the 2BA repair kit from RGM and will be investing in a small hobbyist vertical drill.

RMG site claims the drill size is 4.5mm yet the screw size is 4.7mm. How can that possibly work? Surely the insert is even larger than 4.7mm.

View attachment 123492
The drill size is always smaller than the tap size. That is a difficult repair - there is very little metal there to work with. I had one like it and finally bought a user cover as the insert broke through part way down on insertion.

When I had one bad hole, I used this:

New project, but missing VIN plate


It worked fine - don't think I would use it for anything heavy or if both holes were bad.
 
What is an "end mill"? Different from a simple vertical drill?
From Wikipedia:

End mills are versatile cutting tools used in industrial milling applications. They can have several end configurations, such as round, tapered, or straight, and are most commonly used in milling machines to remove material and create desired sizes or shapes. End mills are distinguished from drill bits by their application, geometry, and manufacture. They can cut in the radial direction, unlike drill bits, which can only cut in the axial direction. End mills are used in various applications, including profile milling, tracer milling, face milling, and plunging. They come in different categories, such as center-cutting versus non-center-cutting, and can be further divided by specific application and special geometry.

End quote.

The end mill has cutting blades for axial and radial cuts, see picture. You need one with a straight shaft. A drill bit will only deflect into the previous bore. I wouldn't try to perform the milling if I were you. Hand the task over to someone who operates a proper milling machine with an adjustable table, allowing the cover to be clamped properly and positioned accurately X-Y.

1769472299125.png

- Knut
 
Last edited:
Back
Top