Remote purchase of frame

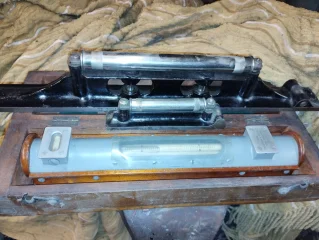
While the photo I posted above was just a joke, note that no two levels are reading the same, and they are sat cleanly one atop the next.

Rule #1 is determining if the surface you are basing your "level" on, is not level, then nothing you check will ever be "level" except with the earth's gravitational forces on the media inside the level.
 
I had to get rid of ALL of these levels, they were all faulty...


View attachment 113242
You have two pairs that agree and no reference. Looks like there's a good possibility that at least two are good and since they all say the surface is not level in the same direction and they are different precision levels, there may be three good.

Yes, I'm picking on you - you know you have to prove everything here :D
 
It's clear to me what he's trying to show. It would seem reasonable that if the bottom tubes are level that the rest of the frame could be checked.

Unfortunately, the bottom tubes are generally not perfectly level on frames with cradle mounted center-stands, and the older frame's bottom tubes are generally a misshapen mess.
 
I asked him if the tubing was indented behind the side stand lug and he said no. M biggest concern is if the head tube is twisted. The downtubes look pretty good.
You need to put a straight edge on the backbone to see if its straight. After being hit by a car, I stripped my bike down to the frame, could see a slight bend in the top tube. Straight edge told me it was off by about 1/4”. I considered bying a new frame from AN, but was told by AN I would be better off having my original frame repaired. I then found Wasco and shipped him my frame in a bicycle box, which you can get for free from your local bike dealer. Glad I did. Try to read “World’s Straightest Norton”, then you may want to have any frame checked by an expert.
 
I love this place. 🍻🤣


If the O.P. has ever shot a rifle (well) with iron sites, them evaluating the steering neck relative to other datums is easy.
A few simple bits can do it for you.
 
Baz is correct- regardless of apparent error place the level on a wall and mark both ends . Turn level end for end keeping same side up and one end on original mark and mark new end - half of total discrepancy in marks is level .
Or a piece of clear soft tubing with water in it -
Or a plumb bob and compass to construct a perpendicular through the plumb line -
Just a few of many ways to establish a level line .​
 
I love this place. 🍻🤣


If the O.P. has ever shot a rifle (well) with iron sites, them evaluating the steering neck relative to other datums is easy.
A few simple bits can do it for you.
These are my most accurate levels
Also 5thou per 10" on the Cooke one
My mate is a carpenter (a very good carpenter) he showed me something that he said was dead level going by his level
I put one of my engineers levels on there and the bubble disappeared!!
He was not amused 🤣🤣🤣🤣
 

Attachments

  • Remote purchase of frame
    IMG_20240320_183657591.jpg
    340.9 KB · Views: 59
Last edited:
Had a siding contractor worked for us for years . He had a
“special level “ for complaining home owners . He made a bubble vial with the bubble cast in epoxy - read level no matter which way it was held .
LOVE IT!!
 
I was buying a lumber rack for my truck years ago.
He told me this story.

The engineer gets out with his caliper, mics etc, measures everything.
The carpenter gets out his tape measure, level etc.
The concrete contractor says, just get it on the truck....:)

Which one are you???
 
So that they conform to architect's rubber rulers and elastic tape measures?
Rubber rulers: an architect had drawn up plans for a house extension just over the fence from our garden. In discussing this with the neighbour, I measured it up with my carpenter’s tape and found it wouldn’t fit. I just waited , about a year, until I informed the neighbour, who had the plans modified….
 
I did use a digital level successfully to line up the two front suspension arms for the centre hub front end of my Norton feet forward chassis. This was to ensure that both arms rose and fell vertically relative to swing arm/ rear wheel. When it was all welded up later and checked , it was spot on. ( all done with shims off the garage floor, no heavy jigs at all.)
 
I did use a digital level successfully to line up the two front suspension arms for the centre hub front end of my Norton feet forward chassis. This was to ensure that both arms rose and fell vertically relative to swing arm/ rear wheel. When it was all welded up later and checked , it was spot on. ( all done with shims off the garage floor, no heavy jigs at all.)
Hi Jan, how about putting some pics of this bike in the build section? It sounds interesting.
 
  • Like
Reactions: baz
Back
Top