My First Commando...

Status
Not open for further replies.
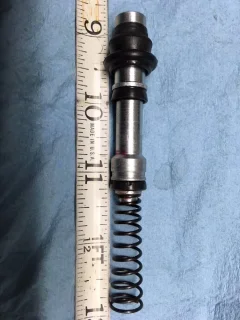
Thanks Mr Rick, will keep in mind. From end of piston to outside end of MC opening, I'd get about same as you...5 or 6 mm, which is comparable to your. 288" if my conversion is good.
Though reservoir vent is possibly an issue, nearly all my testing has been without cap installed. So it is not the immediate issue...not getting any pressure at output end.
I can clearly watch lever pawl as it moves across piston end flat during lever pull. Looks OK. Tried to give the pawl some rounding and angle to better follow the flat surface as pawl rotates across it.
The new pawl profile might give strange inconsistent brake force...won't know til on the road!
 
Forgive me if it seems I'm being argumentative, but as mentioned above, I hope to forestall problems when my own madass kit gets fitted.
Does your piston look like the one in the pic attached to this post? distance from leading edges seal to seal 1.25" ?
If so, there is no way for the secondary cup to cover or go past the filler (larger) port, as far as I can see. On mine, I can watch the primary seal pass the filler port, but the spring bottoms out well before the secondary cup reaches the filler port.
 

Attachments

  • My First Commando...
    MCpiston3.JPG
    145.6 KB · Views: 283
Yes your pic of piston looks identical to mine. With piston under no force in sleeve, the secondary seal is only a mm or two away from first big hole in resevoir....putting just slight movement on lever, I can see the black seal passing through the first hole. No way is that the primary seal, which sits some 30+mm further down towards spring end. Maybe my reservoir holes are not in standard position and this explains the whole issue?
 
Gosh, I don't know what to think now. I have 3 MC's + the one on the bike, and they all have ports drilled as seen here.
The filler port is right next to the wall of the reservoir, just over 2" from the opening, and the bypass port pretty much on the centerline
 

Attachments

  • My First Commando...
    MCports.JPG
    50.9 KB · Views: 267
Those holes look same as mine...first hole right up at reservoir wall, roughly 1.89" from end of MC body.
My First Commando...


Didn't take any shots prior to reinstalling to bike. Did a bench bleed prior, to see effect of modding the lever pawl...still getting 2-3mm caliper piston movement, which completely returns to zero when releasing lever. Madass suggested to put pads in and mount to disk as 2-3mm movement sounds right...just needs something to press against. Initially seemed pads were not reaching to disk...but after vigorous levering for quite a while, I think it's now working better. Lever is firmer, but can still squish nearly all way to bar grip. Tried adding a thick shim to keep MC piston pushed in a bit before lever pull. This got the lever stop point a fair bit away from grip...still feeling firm, not a mechanical hard stop/bottom out...just max 'd out pressure. Doing an overnight gravity bleed with lever held in to see if any further changes.
The shim doesn't stay perfectly square on piston end..b/c modded lever pawl contacts near the edge initially. Tends to try to flip shim off. Might need to try epoxy or something to hold it.
 
Think I may have found the source of my confusion. When you spoke about the "first hole" I assumed you were referring to the filler port, but now I think you were talking about the mirror mounting hole, which my MC does not have, as seen in the above post [HASHTAG]#204[/HASHTAG].
And yes, once you've found the sweet spot and determine you'll need a shim, glue the thing on there for sure!
 
Tornado, if you want to be able to rotate the lever down a bit further, you can swap the positions of the brake hose and brake light switch as the are both 3/8" UNF thread.

If you are still having problem bleeding, what I did was to make sure the pistons are as far back into the caliper as they will go, then with the bars turned all the way to the left start pumping the lever, and at the same time repeatedly tap the brake line with the handle of a screwdriver working from bottom to top. You should see bubbles start to rise in the m/c. You have to be patient - it took me 45 minutes, but eventually you will start to get improved pressure. Next once you have pressure, hold the lever in and open the bleed nipple. Close the nipple, release the lever, and repeat. As soon as you don't see any bubbles, use a cable tie to hold brake on tight and leave overnight.

Hope it helps,

cliffa
 
Last edited:
Mr. R.:
No, you had it correct. In your MC diagram:
My First Commando...


The secondary cup/seal is well to the left of the filler/intake port.


In our MC's, at least with the MadAss sleeve, the secondary seal sits just a few mm to the left of this filler port (the first small hole in the Reservoir...at the "0" mark on the Vernier caliper photo I posted earlier). It is through this hole which I can see the black band of the secondary rubber seal passing when I pull the lever in just a tiny bit. Nothing to do with the mirror mounting hole further left in the MC casting (through that I can see mainly the alloy shoulder of the sleeve plus a bit of the rubber outer dust seal/boot).


*****EDIT*****
I was wrong! The black band I see passing the Filler hole in my MC is actually the Primary seal, not the Secondary as I stated above in red underscored text. Putting this here to avoid confusing to others that come across this in the future.

******END EDIT*****

Now, I came across a thread from a few years back discussing issues with re-sleeve jobs. One owner reported his MadAss resleeve didn't work right and ultimately discovered it was his brake lever...from a '75 MKIII bike. When he tried a '74 MKII lever, everything was better. With my un-modified lever, the "tongue" or pawl or contact point that presses on the MC piston end was so long that it holds the piston so far to the right (in your diagram) that the secondary cup is well past the filler hole before any lever pull is applied. This was why I could not push any significant fluid through with each pull....no fluid was getting into the space btwn sec/primary seals when lever released. That was "solved" by extensive filing away of the lever pawl...nearly 1/4" I estimate...which everyone agrees is extreme...should only need trimming 1/16" max...but maybe I have a MKIII lever and it is different than others.
Found an image of what should be a MKIIa lever:
My First Commando...


The pawl on this is much shorter than what I had originally (outline in red is roughly where mine was)....now after modding, mine is actually a bit shorter than this one and seal is positioned just to left of filler hole by maybe 0.5mm.

Hope that helps you understand.
 
Last edited:
snippedTurn signals which are slow are most often due to someone installing a flasher unit which is not correct for the bulb wattage installed. Most automotive units are designed for 1156 bulbs, which draw more current than the stock Lucas bulbs. snipped

Regarding my post above, an automotive 1156 bulb draws 26.9 watts per

https://www.bulbs.com/product/1156B2

Stock Norton T/S bulbs are 21 watts [at least on the Mk III models] per item 15 below

https://andover-norton.co.uk/en/shop-drawing/154/batteries-battery-tray-direction-indicators

The 1156 will flash brighter, tax your charging system marginally more [unless you do a lot of city driving]. They could also potentially heat warp your nice Lucas T/S lens!:eek:

You can help your charging system out more by fitting a new LED headlamp, rather than an H4 Halogen [20/40 watts versus 55/60 watts] unit. It won't look "period" but you can save the original for times when that is desired. Below is an example

http://www.truck-lite.com/webapp/wc...=15554&parent_category_rn=13089&storeId=10001

Charlie
 
Folks, I've misunderstood my MC situation and now have seen the light ;-) What I thought was the Secondary seal passing by the first fill hole in the reservoir is in fact the primary seal. I've editted post [HASHTAG]#208[/HASHTAG] to indicate this error for the betterment of future readers. I've take Mr. Rick up on his kind offer to donate a MKII brake lever to my project and will be fitting it the day it arrives. Currently the brake feels pretty good/nice an solid (at least as much as my 2013 Bonne front brake) for the last 1/3 of the lever pull...it is weak/sloppy during the initial phase of the pull...due to the extra wasted movement needed before the primary reaches the intake hole in the reservoir.

In the meantime, I've cracked on with fitting the new rear wheel. What a chore that is! I seem to be missing the infamous "Top Hat" spaced under the speedo gear box....not on bike when I took it apart. Also, the left side spindle nut is just a plain nut, not the shouldered one shown on the AN parts diagrams (looking similar to the head section of the right side spindle bolt). There's a fat spacer washer under the left side nut....so likely achieves same spacing as original part would....but I'll likely source a proper one....less fiddly bits to loose! Also, I seem to have a felt washer and wafer-thin retaining washer for it remaining. From studying the parts diagrams, the only place I think it could go is between the inboard end of the brake hub axle and the left side of the wheel hub...but when I tried to place there, the metal wafer washer got crushed/bent concave pretty badly. Note I did not pull any bearings or their dished retaining washers during this wheel build....so no other felt washers were taken out. So, I'll run for a bit without that extra bearing protection....plan to swap out all with new sealed sets I already have on hand but didn't change b/c originals all seem very smooth (more 8500 original mile bike evidence).
Now to fit new Fiam horn, new repro taillight, then on to some fluid changes, primary chain checks and rocker gaps. Waiting on repro Roadster seat and I've scored a repro steel Roadster tank, unfinished (a Norton Specialties version) for a great price from a user here in the classfied section).

She's getting close!

My First Commando...
 
Last edited:
Its tricky to get the right amount/length of lever contact perch so let off retraction gives most effective initial pump stroke yet not restrict-limit m/c piston retraction off pressure relief port so it don't lock up by mere sun heating fluid expandson on first mild lever pull into instant lock up take down. I'd heat the snot out of m/c and clapier to see if still resleases pads or be weary of current set up in only cool shop conditions.
 
Its tricky to get the right amount/length of lever contact perch so let off retraction gives most effective initial pump stroke yet not restrict-limit m/c piston retraction off pressure relief port so it don't lock up by mere sun heating fluid expandson on first mild lever pull into instant lock up take down. I'd heat the snot out of m/c and clapier to see if still resleases pads or be weary of current set up in only cool shop conditions.

I'd like to understand this better, Mr hobot.
Seems like any pressure building in the MC is gonna escape to atmosphere by the hole in the cap, so we don't have to sweat that? Pressure building in the caliper/ line different story, of course, and will push piston back till stopped by lever, understood. But by how much? Id planned to set primary seal just outside the bypass port, but now yer makin me nervous, ya. Can you quantify?
 
Seems like any pressure building in the MC is gonna escape to atmosphere by the hole in the cap, so we don't have to sweat that? Pressure building in the caliper/ line different story, of course, and will push piston back till stopped by lever, understood. But by how much? Id planned to set primary seal just outside the bypass port, but now yer makin me nervous, ya. Can you quantify?

As long as the piston retracts sufficiently for the primary cup to uncover the bleed/bypass port, then pressure shouldn't become trapped in the system.
However, there seems to have been a problem with some of the 'sleeve' kits where the fit of the brake lever has prevented the piston from retracting enough to uncover the bleed port.
 
Hoping to get the first ride some point this week.
With Mr. Ricks donation of a lever and a fresh brake switch, goot front braking all sorted...
Rear mud guard in place, new reproduction tailight mounted/wired. Fresh battery in place with new ignition switch....these, plus a modern flasher relay has improved the wimpy slow flash rate I was getting on stock unit. Roadster rear grab rail arriving soon. Scored a Commando Specialties raw steel Roadster tank...but getting it painted etc can wait...as HiRider tank will be fine for initial test runs etc. Roadster seat still back ordered at Walridge...though might have a shot at a good used one in Manitoba. Will be doing a start up tomorrow to
check my carb cleanup work...then
start thinking seriously about getting a plate and insurance.
 
Money well spent on the new Walridge seat. It'll be an RK Leighton seat.
I fitted one to the BSA and it is ridiculously comfortable.
Wish I had done the same with the Commando . Instead I had an upholsterer install a new cover on somewhat tired seat squab.
Saved $100 at best. I am reminded of my frugality on every ride!
You might verify that the Walridge seat is an RK Leighton. If not , best cancel and order directly from RK Leighton.

Glen
 
Had some troubles attempting a start...first one since Jan when Worntorn came over to help out.
After a few minutes with no joy, checked for spark...strange, only happening with ignition in Park light mode...and hey, the orange ign warning lamp only comes on in that switch position. I'd replaced the switch since Worntorn came by, as we found the start position was inconsistently making contact. Well, seems I'd got the connections wrong and some study of the schematic and a really good write up on the switch at OLDBrits tech notes, I found and corrected the issue. She started after another 5-10 attempts...no pop or bang until it fully came to life. Surprised me.

Not sure why no start when I tried it in the parking light mode prior to correcting the switch issue...it was making spark and orange was on, so all ignition electrics were up, correct?
 
Last edited:
and hey, the orange ign warning lamp only comes on in that switch position.

it was making spark and orange was on, so all ignition electrics were up, correct?

The red should be ignition/charge warning. The orange (amber) is direction indicators.
 
OK...the one on the left is "orange-ish", maybe red. while middle is yellow/amber. on my bike the clocks are sitting directly over the left & right lamps, makes it hard to notice them unless looking at an angle. Will try to move clocks over when I get to messing with the forks.
 
Was just checking the HiRider seat fitment. It tends to rock front to back some. Was looking to see where it hits on the frame. Noted the rear section has rubber pads placed directly over mudguard and will contact mudguard as seat rocks back. Front has pads that contact the frame rails where they meet the large spine member. Now I believe my bike has a typical downward bend in the rear hoop section that many have found on their frames from too much weight/pillion etc. If that is the reason for the seat rocking, why are the rubber pads positioned to hit the mudguard and not the rear hoop? Seems odd mudguard should be tasked to take any kind of seat loads.
 
Status
Not open for further replies.
Back
Top