Clock works

Status
Not open for further replies.

DogT

VIP MEMBER
Joined
Jan 20, 2009
Messages
7,394
Country flag
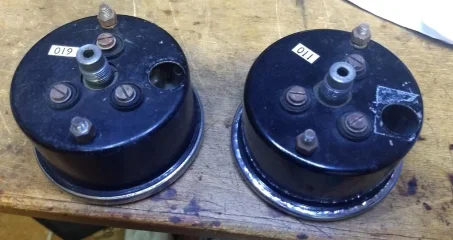
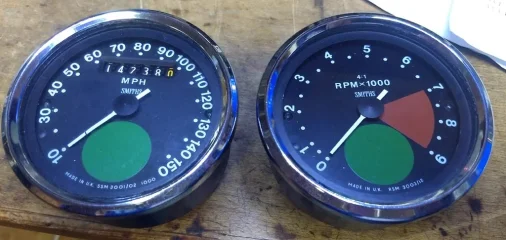
Noticed after years the clock faces are all screwed up in the case. Well of course, they're fifty some year old. I had one apart back in maybe 05 because the chrome bezel was about rotted away so that was a no brainer. I just got a new bezel and used channel locks to crimp it back on. they worked fine. Now they're not. The tach is moving wildly and as I said the faces are bent around in the case.

So, should I just buy the grommets and new screws and not take them apart, hopefully they will re-center with new outside grommets. I see there are inside grommets, but unknown condition since I can't see them except for the tiny bit through the hole. That grey gasket where the cable connects is undoubtedly hard, but that's not accessible unless the bezel is removed. Maybe not a bad idea to clean/lube the innards.

Or I could buy the EuroJambalya kit with the new bezel, glass and full set of gaskets, $40 per. I really don't want to sent them out. I'm usually pretty good at working on this detail stuff. Anyone else attempt their own refurbishments? Seems like I have a bunch of data on it in my Norton folder, I'll look, but any help appreciated.
 

Attachments

  • Clock works
    IMG_20210326_210104303.webp
    80.6 KB · Views: 229
  • Clock works
    IMG_20210326_210053141.webp
    79.2 KB · Views: 230
Buy the kit if you do the job yourself, I had my gauges fully rebuilt about 10 years ago, my speedo was completely damaged by the great fire back in the 80s and thought it was un save able but my smiths repair man did a great job, but a few weeks later the speedo needle came off fix for free and after 10 years now my taco needle has come off but I will fix that myself, on my speedo after the great fire the mileage numbers were all melted, face all damage and glass melted as the fire came up over the bike the tac didn't suffer but my repair man saved the original face and came up like new, was well worth the money to save my original gauge and all new mileage numbers, but I am still running the Triumph speedo on my bike that was given to me after the great fire all those years ago.
If your taco is bouncing all over the place it could be a worn cable as they do wear, $40 for a kit is a cheap fix.

Ashley
 
I think it was bouncing all over because the cable had gotten out of alignment with the rubbers being worn out, but we'll figure that out. I need to get those cables to go into the clocks straighter than they currently do. The halo headlight arrangement makes that a bit difficult. Yeah, I think I'll just get the whole kit and take them apart. The inside of the glass is messy.

Thinking about how to crimp the bezel back on though. Thinking about a tapered PVC pipe of the correct diameter if I can find one. Then just a flat one to press it home.
 
I got the kits today, so I took the one I messed with before, pried off the bezel with a set of small side cutters. The bezel on the new kit is not as nice as the old ones, the top edge is not sharp and the 'chrome' job looks funky in places. I took the works out and replaced the rubbers, the nubs go away from the center, it looks like they'd go towards each other but that way the screw is loose, so they go in away from the center just like I took the old ones out. Not sure if I want to mess with painting the inside of the can. The face is in pretty good shape, I may try a bit of water and cleaning pad on the face in places it looks dirty. Notice the dots below 0, the ones at 1.5 &1.7 also dots between 4.7 & 4.9 and another dot at 7 and 7.4 or so. The mark at 8.6 is a scratch. The speedo has the same dots, just slightly different places, must be some calibration marks, but any info I have doesn't mention them. If I push the stop pin down and let the needle rest it does go to that dot below 0. Not sure if I want to use any sealant on the glass/gaskets, probably not. I'll read my info more before I go much farther. The screws/nuts/washers are SS which is nice.

The new rubbers do tighten up where the face sits in the can. I though I'd have to make a new gasket for around the cable connector, but it looks good.

I may whine about the bezel and chrome job, I haven't looked at the other one yet.

Also need to figure out about calibration rpm vs numbers.


Clock works
 
Uhg, the other bezel looks even different. At least it has a sharp edge on top, but not like the original. Now I will whine.
 
Warning. The glass is shockingly thin and will crack if any external pressures hit it. That includes final Bezel crimpings.
 
My Tacho was jumping around madly. Proved it was the Tacho by driving it with a drill set on reverse.
I got it repaired and rebuilt by Ashley Pople in the UK for £70. Looked like new when finished and new bezel is an exact match. Hardly worth doing it yourself at that price.
Ashley told me that my Tacho had been damaged by the cable that was originally fitted. The drive section of the cable that goes into the Tacho should not be longer than 1/2 inch. If it is longer it hits some of the brass internals and shaves away the workings. Certainly, when I took mine off I could tap out a lot of brass flakes and dust! So check your cables when fitting a new one!
 
I haven't decided on how to crimp the bezel on yet. I may try a few things before I get it right. I don't notice it's 'shockingly' thin, it's not as thick as glass window however.
EuroJ told me to send the one bezel back. I'll have to send along a profile of the good one to make sure it's right, maybe I should send both so they can make sure to send 2 the same. I don't care so much that they don't exactly match the originals, but more that they're the same and at least not funky.
There was a thread on the cables being too long years ago, I'm careful about that, but it may help to get new cables. Might help to get the cables lined up right with the clocks too.
 
The worst part is getting the bezels off and back on without the proper dedicated tool. I replaced a glass once and it took quite a while to worry the crimp out of the bezel edge and then reverse the process. Fortunately the cup covered up my "trademarks" and it turned out ok, but when the Titanic needed gauge cleaning and refurb, I sent them out. Marc Boman is the man.
 
You can duplicate the glass with glass from a cheap picture frame from the dollar store and a glass cutter from the hardware store.
 
Euro is sending me a new bezel, hopefully it's like the good one. There's actually a tool to install the bezel. I've seen a picture of it here once. The metal is pretty soft and if you had a way of turning it stably, you could probably use a roller bearing to roll it on by hand. Hopefully I won't break the glass installing things, I didn't before. I ain't got no lathe.

But I need to lube them correctly and make sure the input connections or cables are not worn/too long.

Yeah, if you mess up the underside, it's not seen in the holder.
 
My brother is a machinist, worked in an instrument shop. I asked him to put new bezels on a few Smith gauges and he made the fixtures for a lathe same as in the video. The first gauge he did the glass broke. Then he got the hang of it. Clearly this is fiddly shit.
Re: Batrider's comment: The glass in a dime store picture frame is ridiculously thin and would tend to break, just as you finish the job. In which case the bezel is junk and you get to buy another and start over gain. I would use thicker glass from a glass shop.
 
Status
Not open for further replies.
Back
Top