74 MkIIA Resto/Mod

Joined
Nov 5, 2014
Messages
146
Country flag
I thought I had already started this thread, but oldtimers is setting in, I guess, cuz I looked and couldn't find it. So, here it is.

Got this bike a couple weeks ago and wasn't going to start tearing into it until my Gold Star was finished. But, I am waiting on parts for the GS, and idle hands....

So, I decided to tear the Norton down and get the process started.

Here it is as received. Ran, but needed everything, obviously.

74 MkIIA Resto/Mod


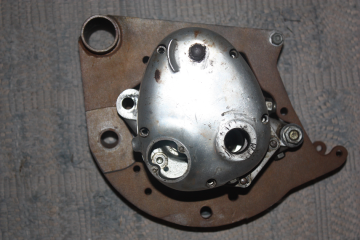
Here he is after removing most stuff yesterday (note rusty primary. Yuk. Must have been sitting in the rain. Good thing I took him apart!)

74 MkIIA Resto/Mod


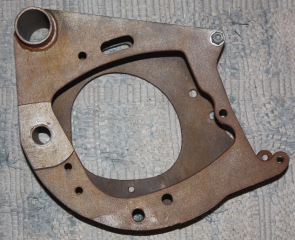
And, today after removing primary bits:

74 MkIIA Resto/Mod


Now, I'm a bit stuck. Shop manual indicates there are 10 head fasteners, but I only can find 7. I have three in a triangle at the front, and two on each side of the spark plugs.

Any help appreciated.
 
In the middle in the rear.... in the front from underneath the rocker covers.....

The rear is pretty challenged, space wise... grinding the box end wrench (ring spanner) to clear the cylinder is reported necessary by some.
 
3 from the bottom up. 1 in the middle back and 2 up front inline with the exhaust ports.
 
Here is the head from the face, you can see all the 10 holes, so based on your description you need to find the one in the centre at the back and 2 more at the front, note they can come up from underneath so the are 2 accessed at the front through the barrel recesses.


74 MkIIA Resto/Mod
 
I think I found 9 out of 10. The one in the center at the rear is escaping me. Here is a photo of what I see from the rear. Where is the bugger? On top or underneath. Anywhere near the arrows with the '?' 's ?

74 MkIIA Resto/Mod
 
rockitdoc said:
I think I found 9 out of 10. The one in the center at the rear is escaping me. Here is a photo of what I see from the rear. Where is the bugger? On top or underneath.


Should be a nut (1/4W hex), underneath. It's not there in your photo and either the stud is too long or has unscrewed?
ncjasen said:
 
L.A.B. said:
rockitdoc said:
I think I found 9 out of 10. The one in the center at the rear is escaping me. Here is a photo of what I see from the rear. Where is the bugger? On top or underneath.


Should be a nut (1/4W hex), underneath. It's not there in your photo and either the stud is too long or has unscrewed?
ncjasen said:

Must have unscrewed. I could not find the No. 7 stud, either. Just a hole where the stud/nut should be. Old bikes are great for stuff like this, right?

I have included a few pics of where the other studs can be found just in case anybody else has questions. The numbers are those referenced in the 850 Workshop Manual.

74 MkIIA Resto/Mod


74 MkIIA Resto/Mod


74 MkIIA Resto/Mod
 
The No. 2 stud was unscrewed. The No. 8 was missing, completely. The guy I bought the bike from said it had just been serviced at a local shop and compression was good! Maybe Commandos only need 8/10 head studs to make good compression? Doubtful.

Tried pulling head off with bottom end in frame. No go. Won't clear pushrods. Manual shows this can be done, but not for me. I'll pull the whole lump out now that the head is loose and then separate them.

Can' t wait to get the head back with the new stelite valves, seats, tapered springs, Ti keepers and new guides. Gonna be like Christmas in February! :D
 
rockitdoc said:
Tried pulling head off with bottom end in frame. No go. Won't clear pushrods. Manual shows this can be done, but not for me.

What you do is feed the pushrods up into the head as far as they will go, and hold them there as you remove the head.
 
Getting the head off is a fight but can be done - the pushrods need to be held as far into the head as possible - as LAB has just said!

I retain them by wrapping elastic bands around them and hooking the bands onto the front rocker cover studs, unseating them from the rockers and holding them into the head. This should give enough clearance.

Watching your thread is bringing back a whole heap of memories!
 
L.A.B. said:
rockitdoc said:
Tried pulling head off with bottom end in frame. No go. Won't clear pushrods. Manual shows this can be done, but not for me.

What you do is feed the pushrods up into the head as far as they will go, and hold them there as you remove the head.

Excellent! Thanks for that. It'll make removing motor easier with only two hands.
 
" The No. 2 stud was unscrewed. The No. 8 was missing, completely. The guy I bought the bike from said it had just been serviced at a local shop and compression was good! Maybe Commandos only need 8/10 head studs to make good compression? Doubtful. "

I guess the words "just", "serviced" and "good" can mean different things to different folks :shock:

These studs - especially the front ones - have a bit of a bad habit of pulling out. Check carefully before reassembly because you may need to helicoil them. There is a recent posting on here about that. The threads are I think BSF ??? - but the other posting will confirm that.

Found it. This one

stripped-stud-quandry-t23842.html
 
rockitdoc said:
L.A.B. said:
rockitdoc said:
Tried pulling head off with bottom end in frame. No go. Won't clear pushrods. Manual shows this can be done, but not for me.

What you do is feed the pushrods up into the head as far as they will go, and hold them there as you remove the head.

Excellent! Thanks for that. It'll make removing motor easier with only two hands.

Thanks very much for taking the trouble to post up this thread. It's going to be very helpful for many of us!

Lannis
 
johnm said:
" The No. 2 stud was unscrewed. The No. 8 was missing, completely. The guy I bought the bike from said it had just been serviced at a local shop and compression was good! Maybe Commandos only need 8/10 head studs to make good compression? Doubtful. "

I guess the words "just", "serviced" and "good" can mean different things to different folks :shock:

These studs - especially the front ones - have a bit of a bad habit of pulling out. Check carefully before reassembly because you may need to helicoil them. There is a recent posting on here about that. The threads are I think BSF ??? - but the other posting will confirm that.

Found it. This one

stripped-stud-quandry-t23842.html

Yeah. My plan is to Timesert all of them.
 
this is the factory tool for the front and rear head nuts that fit on the three head studs.
After you get the fasteners loose, the next issue for you will be to lift the head slightly, shove the push rods into the head then rock the head backward so the push rods clear the cylinder while sliding the head assembly sideways out of the frame. Holding the pushrods can be a trick as they are slippery from oil.

74 MkIIA Resto/Mod
 
fabricated a puller to get the ignition advance plate off the end of the camshaft.

74 MkIIA Resto/Mod


Then, I ran into a snag. Got the cam chain off ok with another fabricated puller, but then I was faced with the pinion gear removal. Very tight quarters and requires a special factory tool which I don't have, of course. Anybody have a solution to getting the pinion gear off?

74 MkIIA Resto/Mod
 
In what part of the world are you located? I have a pinion gear puller you can borrow. PM me.
 
When you fit the pinion gear puller make sure all 3 arms are fully seated deep behind the gear preventing any slip off and rounding of the sharp 3 hooks ,this happened to me ,had to order in a new puller.
 
Engine Out. Now, for the gearbox. Shop Manual says rotate anticlockwise from right side, pull gearbox out to right. Yeah, right. :?

Any suggestions on how to do this appreciated. I did the above and can not see how this lump is coming through the hole in the mount. More perseverance needed?

74 MkIIA Resto/Mod
 
Easier to show in pictures- worth a thousands words and all. As you say the manual points out, one has to rotate the tranny counter clockwise. The following shows a tranny turned in the cradle and half removed toward the reader from the right side. The top and bottom parts that the fixing bolts go through have to line up just right. So if the top is normally at 12 o'clock, and the bottom at 6 o'clock, the top ends up at a little past 9 o'clock and the bottom at a bit past 3 o'clock when it is all lined up for removal.

This is important. I had to take the tranny drain bolt off, too. In my rebuild I just installed the tranny - no way it would clear if the bolt was in place. However I have a non-stock tranny shell, but I think the stock tranny shell still requires that bolt to be off for removal or install. Also, that bottom fixing bolt would be out for removal. So if this photo is a bit misleading...sorry, I just grabbed a bunch of bits from the land of misfit parts to make pictures.

The following shows the empty cradle from the right side, one can see how they cut that side of the plate so the top bit where the bolt goes through is on the left side and the bottom bit that juts out that the lower bolt goes through has cutout on the right. I think that the wallowed out hole at the bottom of the cradle is where the center stand attaches, and the hole right next to it at the upper right of it is where the lower bolt that fixes the tranny goes, so one can see one has a bit of rotation to make. Same at the top the slot is where the top bolts goes through, and one rotates the top to get the the tranny lined up right. Not quite a 90 degree rotation.


Not much room to spare, have to line it up just right so one can pull it straight out. If I remember correctly, the top will tilt back toward the rear wheel fairly easily, and the trick is to get the whole thing to rotate. And the top has a spacer removed with the top bolt so it is more loose than the bottom, the bottom is a tight fit so it don't want to rotate as easily - might need a little persuasion. Once it is turned correctly, it will slip right out.

Does this make sense?

Keywords: gearbox, transmission, removal, installation, fitting, picture, photograph, photo, mounting, 1974, 74, 850. (Added to help future searchers.)


rockitdoc said:
Engine Out. Now, for the gearbox. Shop Manual says rotate anticlockwise from right side, pull gearbox out to right. Yeah, right. :?

Any suggestions on how to do this appreciated. I did the above and can not see how this lump is coming through the hole in the mount. More perseverance needed?

74 MkIIA Resto/Mod
 

Attachments

  • 74 MkIIA Resto/Mod
    cradle1.png
    661.7 KB · Views: 735
  • 74 MkIIA Resto/Mod
    gearbox.png
    971.2 KB · Views: 790
Back
Top