gortnipper
MEMBER
- Joined
- Nov 2013
- Messages
- 5,461
Use Type F, and soak them.

Not sure what you mean by Type F? Could you be more specific?Use Type F, and soak them.
") )
)I’m planning on installing my clutch plates tomorrow and would like to know if I should install them dry or soak them in 20/50 oil?
I’m going to install new Barnett plates. Soak or no soak? My ignorance knows no bounds.The original bronze friction plates shouldn't need soaking in oil if they're what you are installing now one plate has been used to make a holding tool.
I’m going to install new Barnett plates. Soak or no soak? My ignorance knows no bounds.
Yes, I believe Barnett recommends soaking their friction plates in ATF, however, that would be for when ATF is used in the primary case as that is now the generally preferred lubricant for primary chaincases (although it wasn't originally) with the possible exception of the 850 Mk3 because owners have found that the Mk3's hydraulic primary chain tensioner doesn't work well with ATF (too thin?) so I suggest you soak them in 20W/50 if that is the oil you intend to use in the primary chaincase.
Yes, ATF Type F. But i missed that you have a mk3, so probably shouldnt use that, as LAB pointed out.Not sure what you mean by Type F? Could you be more specific?
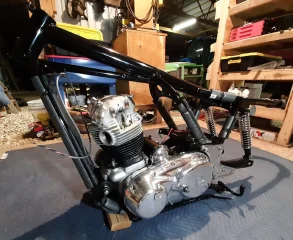
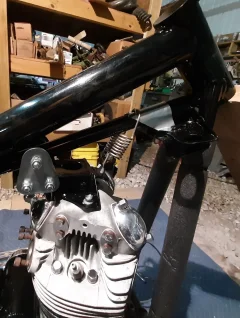
Go with Glen's [worntorn] method described in the first post linked below.Installing my head steady the manual says to use the forward hook for the spring. When I disassembled the head steady it was on the rear hook. My concern is that the spring is almost touching the frame tube and I am wondering if I should use the rear hook to gain more clearance. I'm pretty sure I've got the spring oriented the correct way, at least that is the way the parts breakdown shows. Thoughts, comments?
Installing my head steady the manual says to use the forward hook for the spring. When I disassembled the head steady it was on the rear hook. My concern is that the spring is almost touching the frame tube and I am wondering if I should use the rear hook to gain more clearance. I'm pretty sure I've got the spring oriented the correct way, at least that is the way the parts breakdown shows. Thoughts, comments?
Point taken on jumping the gun. Other than moving the head steady as far forward as possible, is everything else correct?I think perhaps you are jumping the gun attempting to set the spring at this stage before the bike is on its wheels and almost fully built.
One thing I would suggest is to move the head steady as far forward on the head as possible.
Yes, and the front hook position is the one I use to get correct spring adjustment (although it's a Tayor head steady).is everything else correct?
Thank you. I’ll move the head steady forward and leave the final adjustments for a proper time.Yes, and the front hook position is the one I use to get correct spring adjustment (although it's a Tayor head steady).