1972 combat gearbox removal request

Status
Not open for further replies.

BERT

VIP MEMBER
Joined
Nov 23, 2020
Messages
667
Country flag
Can the unit be removed without moving the engine on this model? The manual states it can be removed after removing the 3 rear engine mount bolts and forcing the cradle assembly to the rear ."Only in isolated cases will it be necessary to take out the front mounting main bolt to provide still further working space." Is the combat one of these certain models? It would be nice for a heads up on what other components would need to be removed. Any advice would be appreciated. Thanks in advance.
 
Last edited:
The combat is no different than any other ‘72. That said I have never been able to remove the gearbox case without removing the engine on my ‘72 combat. You can get the gear clusters out without removing the cases.
 
Can the unit be removed without moving the engine on this model? The manual states it can be removed after removing the 3 rear engine mount bolts and forcing the cradle assembly to the rear except for certain models. Is the combat one of these certain models? It would be nice for a heads up on what other components would need to be removed. Any advice would be appreciated. Thanks in advance.
You can get it out without removing the engine, but you do have to remove the engine mounting studs and move the engine slightly. If I remember right, it's easier if you partly remove the head steady. The instructions say it in an odd way. It's a matter of turning the gearbox just right and moving the engine enough to get it out. I generally leave it in to work on it unless I must remove the gearbox case.

AFAIK, 71-74 are all the same. Not sure about 75 and before 71.
 
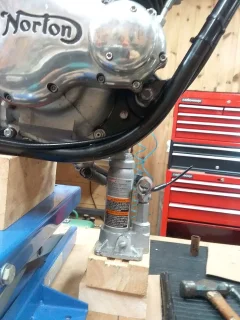
Little fiddly but can be done with a bit of work. Support engine and remove front Iso bolt and also the head steady for clearance. First lift engine to remove bottom 5/16" rear cradle bolt normally blocked by frame rails. Loosen the rear top 3/8" cradle stud but do not remove. This is your pivot point. Remove the middle 3/8" rear cradle stud and the engine will pivot on the top cradle bolt and give you that little bit of clearance you need at the bottom of the gearbox cutout that's normally got some engine case (by the oil junction) in the way.

Oh yeah, you'll probably want to remove the gearbox adjuster as the stud and nut on the back side will get in the way of rotating the gearbox to the right magical location to come out. You really do have to have the gearbox "clocked" exactly right before it will clear the cradle and come out.

Edit:
Crankcase breather is also probably in the way. Jeltz has a 71 and didn't think about that.
 
Last edited:
You can strip the gearbox completely whilst still on the bike and even get both bearings out by taking the primary off, so unless the shell needs taking out for welding or such then work on it in the bike.
 
You can strip the gearbox completely whilst still on the bike and even get both bearings out by taking the primary off, so unless the shell needs taking out for welding or such then work on it in the bike.
I realize this but will be travelling with it, hence the inquiry.
 
The manual states it can be removed after removing the 3 rear engine mount bolts and forcing the cradle assembly to the rear except for certain models. Is the combat one of these certain models?

Where are you reading "except for certain models"?
 
Where are you reading "except for certain models"?
My apologies, I used the wrong choice of words there. The manual (in front of me now) states "only in isolated cases will it be necessary to take out the front mounting main bolt to provide still further working space". I should have been more accurate with my quote rather than relying on recall. Thanks L.A.B. for bringing this to my attention and I have edited my original post.
 
Last edited:
I removed the gearbox without removing the engine.
And......... How did you do that? Any tips learned?

There shouldn't be any need to remove the engine as it says in the factory manual, Section D7;

"Removal of Gearbox Complete

Though not normally necessary during overhaul, we recognise that circumstances may arise which make it desirable to remove the gearbox without disturbing the engine...
".
 
And......... How did you do that? Any tips learned?

And......... How did you do that? Any tips learned?
As Peavy pointed out in post#4 , and on this model, the rear bottom engine mount bolt will not clear the r/h bottom frame rail without removing the front iso bolt in order to raise the power unit to provide the clearance. This one didn't need much. One has to remember there is pivoting and mechanics at play so be gentle. Perhaps this model is one of the "isolated cases will it be necessary to take out the front mounting main bolt to provide still further working space" as the manual states.
After the rear wheel, fender&fairing, top shock mounts(tie up the rear forks)
20211030_114607.jpg
20211030_114624.jpg
20211030_114646.jpg
,clutch cable,engine breather,oil filter housing bolts(housing left dangling)were removed, the swing arm/ cradle assembly was separated from the engine, pivoting on the rear iso mount,and held at the point where the special cradle cutouts were clear. The gearbox was unbolted and rotated forward to access removal of the primary chain tensioner. The gear box came out easily rotating it anti clockwise and thru the special cutouts. After the gearbox was removed,the cradle was bolted back to the engine so nothing is left hanging. Edit: It is important to mention I am not an expert with these machines, but I have rebuilt this one and I know that the power unit and drive train are in good alignment. This worked for me, on this model. I could see it being a very tricky job to do if things were askew and very easy to do damage to the motor mounting points with the weight of the engine and pivoting involved.
20211030_120738.jpg
 

Attachments

  • 1972 combat gearbox removal request
    20211030_114702.webp
    233.1 KB · Views: 144
Last edited:
Thanks very much for the details. I have a '72 and did my layshaft bearing with the inner case still in the bike. But if I ever have to take the gearbox out, it's good to know what to expect. Really appreciated!
 
I have the gearbox back in, the replacement was a bit trickier than the removal. It took a bit of jimmying of the components to get the engine mounting bolts in alignment without using any force. How can I lock the drive sprocket to torque the nut without the rear wheel brake? Tips would be appreciated. Thanks in advance.
1972 combat gearbox removal request
 
I have a 2' long 3/8" diameter (hardware store) rod that I drilled a hole in and using the master link, attached an old chain. Wrap the chain around the sprocket and tighten with the rod braced against either the table or frame.
 
I have a 2' long 3/8" diameter (hardware store) rod that I drilled a hole in and using the master link, attached an old chain. Wrap the chain around the sprocket and tighten with the rod braced against either the table or frame.
Where is the chain attached to the rod?
 
About a 3/8" from the end. If you hold the rod vertically, the chain hangs straight down.
 
I got near berated for it but simply machined the bits to make that job easy with no stress to the gearbox.
Torqueing the nut to the 70 ft/lbs was almost Zen like. (Maybe 'Magic carpet ride was playing at the time )

1972 combat gearbox removal request


A locking split collar that fit over the rotor using the same sprocket holding tool became part of the rotor holding tool that made that 70 ft/lbs easy also.

1972 combat gearbox removal request


Just to make it a little more over the top the M6 locking cap screw turned CCW opens the collar when it hits the small grubscrew for easy fitment then CW to lock the collar.

1972 combat gearbox removal request


Said many times but I will never forget the struggles to do the most simple job (without a bodge or risking breaking something) way back in the beginning. (mid/late 1970's)
Nothing is to much trouble these days having the machine tools to do so.

That bike is coming along nicely to live on for another 40 years.
 
Status
Not open for further replies.
Back
Top