850 Electrical upgrades

Status
Not open for further replies.

Yorkie

VIP MEMBER
Joined
Jun 14, 2017
Messages
209
Country flag
i am in the process of building up an 850 MK2 and could use some advice on what upgrades the braintrust recommends for the electrical system. I plan on installing a new harness along with either a Tri-Spark or Pazon ignition systems. What other changes are recommended? Thanks.
 
Yorkie, I am in the same situation as you. I plan to make my own simplified negative ground harness. Tri-spark ignition and 3 phase alternator. To regulate it I am going with a used Yamaha mosfet rectifier regulator. Throw in some fuses and led lights and I hope that does it. I await others to chime in with improvements, reasons why it won't work etc.
I almost forgot ground wires. I will not be relying on the frame for ground.
 
Last edited:
i am in the process of building up an 850 MK2 and could use some advice on what upgrades the braintrust recommends for the electrical system. I plan on installing a new harness along with either a Tri-Spark or Pazon ignition systems. What other changes are recommended? Thanks.
I did wiring harness from British Wiring, Trispark, 3phase lucas stator with Podtronics regulator. It all works great. Had a problem with Trispark in beginning, but was replaced under warranty and has worked flawlessly since.
 
The single most important upgrade to do is replace ALL the female bullet (aka "snap") connectors. They break inside the rubber and you don't know. What you do know is chasing all sorts of gremlins, many are from the intermittent/high resistance connections.

http://www.britishwiring.com/category-s/266.htm

My '74 is still working great, 34,000 miles in, original zener, rectifier, single phase alt.
 
Last edited:
just to add IMHO nothing made by sparks is an upgrade in fact i feel it is a few steps backwards in reliability.
Made by sparks? As in Sparx? Nothing mentioned in this post made by Sparks, Sparx.
 
yea my misspelling of SPARX JUNK. as to the trispark i am on my 3rd stator and i carry a spare in the tank bag. i have had and seen on others to many of them fail and when this one fails it will be a pazon as the cost of a replacement stator from trispark will pay for a complete pazon. comstock aptly named it a shake and bake ign. to trisparks credit he has discounted the stator to me and claims the reliability issues are resolved but there is still a spare in my tank bag .
 
I agree with concours, however i'm going to go one step further and completely remove all the Lucas connectors and replace them with Japanese style 3.9mm tinned bullet connectors.

Cheers,

cliffa
 
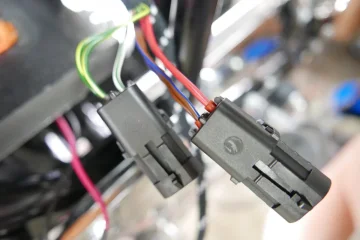
For my 74' rebuild I ended up replacing all electrical components as mentioned above while eliminating all bullet connectors and replacing them with a modern weather proof type of connector.
Along with new wiring throughout, LED lighting was installed at all light sources and an LED flasher module replaced the original flasher unit. Tri-Spark ignition along with coil conversion module, all wiring and switches from hand controls reworked or renewed, a single phase rectifier was added and a battery tending connection was introduced as well.

With some pretty solid testing I could not find any faults with the original stator so it will be used.
I am retaining the positive ground application.

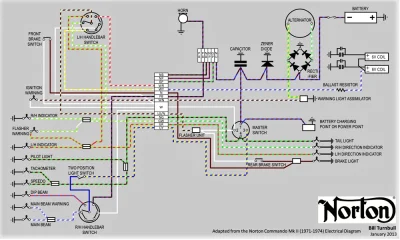
I did change the designation of the prism indicators on the headlight to give me a direct view of which turn indicator R/L was on (or off) with the center prism indicating the ignition status. The headlight and gauge lighting is controlled though the (new) headlamp switch.

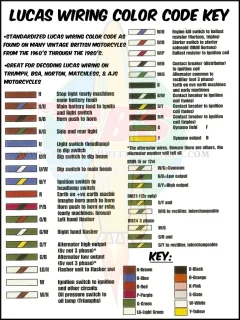
Over the years I have dealt with Lucas electrical systems on MG's,. Austin Healey's, Jaguars, BSA's, and Triumphs (car and motorcycle). The Commando I am restoring was located in a barn in Nevada where a tarp was thrown over it in 1977. It was discovered last year still covered and I was able to purchase it. I think most would agree that a 41 year old Lucas electrical system might need a bit of renewing so I settled in and really took my time routing new wiring and double checking each connection as I rebuilt the system.

Good luck with your project.

These diagrams really helped me when the frustration gremlins came to visit.
 

Attachments

  • 850 Electrical upgrades
    L1080608.JPG
    110 KB · Views: 646
  • 850 Electrical upgrades
    Lucas-Wiring-Color-Code-Key.png
    646.3 KB · Views: 972
  • 850 Electrical upgrades
    Norton Commando Mk II Electrical Diagram - Full Color - Bill Turnbull Jan 2013 - Medium.png
    307.4 KB · Views: 1,699
when i rewired mine i eliminated all unnecessary wiring, replaced the antiquated retifier and zener with a modern R/R, and wired from point to point with the intention of eliminating as as many connector, since they become the biggest source of problems and failures... and for simplicity sake neg ground
 
Status
Not open for further replies.
Back
Top