MK3 Front Brake,Master Cylinder and Caliper Rebuild with Photos

Status
Not open for further replies.

jimbo

VIP MEMBER
Joined
Sep 25, 2004
Messages
1,923
Country flag
I am no expert, but heres are some photos of my recent MK3 front brake rebuild. I am on a budget , so I need to save money as much as possible. In a perfect world I would buy many more new parts ,such as master cylinders ,calipers ,discs, hoses etc. I will test everything out to make sure of correct function, I might have to replace some items afterwards.
 
MK3 Front Brake,Master Cylinder and Caliper Rebuild  with Photos
Here are my caliper cleaning tools, I pay close attention to seal grooves, there seems to be a lot of calcified buildup in the groove edges( where water accumulates?), The pick hook cleans the areas out well , using the mirror to see around
 
Here are the pistons I am going to use, There is a tiny little pit in one ,I make sure the there no protrusions or plating flakes by stoning carefully. I like to polish the pistons up nice on my lathe , I think it helps the feel of the brakes.
MK3 Front Brake,Master Cylinder and Caliper Rebuild  with Photos
.
 
I make sure all the lines and passages are clear , threads are OK, and trial fit all connections. If the hoses work I keep an eye on them and I use them.

MK3 Front Brake,Master Cylinder and Caliper Rebuild  with Photos
 
Note you can test the pressure switch with air pressure and a meter. I got one working by spraying cleaner in it and working it.
 
Cleaning the master cylinder bore I of course clean it out as best as I can . Inspect the bore. If the threads are bad its trash. If it is serviceable, but with some marks from corrosion, I will try to reclaim it with oil, 600 grit sandpaper on a wood dowel. followed by a good long polish. Again a super polished bore makes for a good brake feel .

MK3 Front Brake,Master Cylinder and Caliper Rebuild  with Photos
 
Last edited:
Now I have not tried this before so it might be a waste of time , but I tried to resurface the discs. I might have made a mess of them and they might pulse from being uneven, but I will not know until its on the road. They do not mic out too bad. My little lathe could not swing them in the proper way:rolleyes:

MK3 Front Brake,Master Cylinder and Caliper Rebuild  with Photos
 
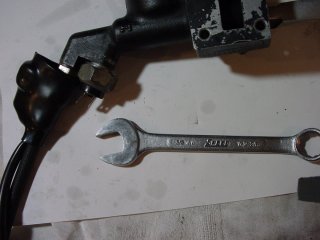
Here are photos of the front master cylinder rebuild and assembly, most should be self explanatoryo_O

I polished the piston end in the hopes of making a smooth place for the lever tongue to land ,less friction? , those OEM pistons are made of very hard steel .


MK3 Front Brake,Master Cylinder and Caliper Rebuild  with Photos
 
Last edited:
final assembly, I mounted the MC and the rebuilt caliper on the bike. Then tightened all the fittings but left the caliper line loose, the oil flowed by itself down to the loose fitting . I then tightened it up and bleed the brake, it took all of three or four bleeds, getting hard pretty quick! I will not know how well everything works until the bike is rolling on its own .
MK3 Front Brake,Master Cylinder and Caliper Rebuild  with Photos
 

Attachments

  • MK3 Front Brake,Master Cylinder and Caliper Rebuild  with Photos
    DSC07537.JPG
    145.5 KB · Views: 333
After noticing -none-all the after market master cylinder upgrades have No restrictors in them like factory Lockheed, I used red hot 6 penny nail to remove it to find out that made more difference than smaller dia. m/c, as far as actually getting pilot grip to slow wheel. i now think that m/c pressure acts on outside of rubber restrictor 'valve' to collapse the hole down so applying more lever grip does not increase caliper pressure to matter. All other upgrades only serve to make it easier to lock tire but does not increase the ability to slow up but does increase skill needed to avoid surprise lock up at speed - especially on 90 & 100 size front tires. As I hear no one else ever mentioning their tire profile/compound as limiting factor I am convinced Lockheed restriction removal is single most effective mod PLUS 110 tire to stop on.

Must retain the Lockheed rubber 'valve' as part of piston / spring return spacing or replace with a spacer. Also a bit tricky trial/error to get piston length right for most effective stroke of piston w/o being so long summer sun expands fluid to lock up w/o touching lever. This can also involve fiddling with the contact area/thickness of lever on piston.

https://www.accessnorton.com/attachments/dsc07515-jpg.3505/
Good to know, and also very easy to do, on the bike.
 
I've been stalling the install of my madass kit, as this 6 penny nail idea nags at the back of my mind.
Ordered a valve assy 06 1944, gonna poke a 3mm hole (6d nail described as .012 inch dia = 3.05 mm ) in the tip with a hot drill bit, see what happens down at the Avon 90/90.
As for 110 fronts, this means new wheels, big project. And I've read (forgive me forgetting the source -Lino Tonti? John Wittner? ) that the surest path to slowing down the steering is to fit a wider front...
 
Last edited:
I've been stalling the install of my madass kit, as this 6 penny nail idea nags at the back of my mind.
Ordered a valve assy 06 1944, gonna poke a 3mm hole (6d nail described as .012 inch dia = 3.05 mm ) in the tip with a hot drill bit, see what happens down at the Avon 90/90.
As for 110 fronts, this means new wheels, big project. And I've read (forgive me forgetting the source -Lino Tonti? John Wittner? ) that the surest path to slowing down the steering is to fit a wider front...
It is sure easy enough to do and if you don't like easy to undo as the poked rubber part is available.

https://www.ebay.com/itm/1972-77-No...d=401003711571&_trksid=p2047675.c100005.m1851

MK3 Front Brake,Master Cylinder and Caliper Rebuild  with Photos
 
As for 110 fronts, this means new wheels, big project. And I've read (forgive me forgetting the source -Lino Tonti? John Wittner? ) that the surest path to slowing down the steering is to fit a wider front...

Mr. Rick, I tease thee not, the slighter ease of 90 or 100 tire handling delight is totally shredded on crisis brake needs compared to 110 on WM2 rim. The only thing no restriction provides is ability to squeal loudly down from 100 mph w/o much worry of lock up till below 60 then need skill letting off some so not to lock up or fly over bars.

Parts manual describes this restrictor as a valve which preplexed me why till removing it. With restriction valve, at some point even white knuckle panic grip did not slow any more but w/o it i could always lock tire if scared enough but rather easier to control that than not stopping a bike length or more shorter.

Wider profiles only feel better planted in turns till at limits then they get unpredictable for sudden let downs. If not exploring luck pressing un-tammed isolastic rubber baby buggy into escalating 'hinging', or need to slow as good or better than moderns - (which I find stopple limited), then
go with the normal wisdoms of tire/rim matching. For up to Combat power I like 110 both ends but if nearing 70 hp, 120 on WM3 hooks up better on max leans than heated 160-170 size race only compound on on 6" wide rim on my modern SV650, WHICH let me down so many times I gave it away last summer to ex-racer along with 4 soft race tires. Its 120 front made just curising more effort than a front 110 Commando that spoiled me. 120 rear on factory power Commando feels like heavy boot vs tennis shoe, until enough power to spin at will on leans over 70's, or swinging out into traffic lane, then feels like cleat-ted sports shoe.

Getting brake innards corrected or modified is fairly straight forward but I've run into the lever side of m/c bore not holding the retaining winged jam washer to hold seal in so weeps fluid out, more on road use unseen than parked at home. Do not know a solution but maybe JBW fill and rebore or modified washer or give up and try another Lockheed m/c or non Norton replacement.
 
Status
Not open for further replies.
Back
Top