Grant's Featherbed Special

Keep talking said I...

Well, my German guy had taken this engine with a few other bits and pieces as a bad debt, but he had not been able to sell it on, because of what had been done to it and because it was a Combat engine.
He had approached a few Commando riders, and no-one was interested.

"Could you believe that some idiot had thought about putting it in an old frame, and had got the crank re-balanced at 78% to do it."
The engine needed some work, but the basics were all there - the bottom end had been built up by Mick Hemmings (balanced, superblends, case drilled for breathing/oiling), and the head had come over from Norman White who'd lapped in new valves, repair one of the exhaust threads and done some gas flowing on the internals.
The engine had been loosely assembled, and had been sat under a bench for almost ten years.

Needless to say I bit his arm off, and bought the engine straight away!!!!

My project had just taken a new turn!
 

Attachments

  • Grant's Featherbed Special
    077.jpg
    138.2 KB · Views: 465
gtiller said:
..................Needless to say I bit his arm off, and bought the engine straight away!!!! My project had just taken a new turn ....
One of life's little curves right :D So now you're at the fork in the road :wink: is a TTI gear box in the cards to go behind such a deserving wayward commando engine.....How much money ya got. :roll: This is one fine thread brother. However you've made that ES2 so beautiful and done such a fine job on it, I for one vote that it goes back into it's frame and you wait and see what turns up in the way of frame / chassis for your next build, a bitsa with a combat motor :mrgreen:
 
gtiller said:
Keep talking said I...

Well, my German guy had taken this engine with a few other bits and pieces as a bad debt, but he had not been able to sell it on, because of what had been done to it and because it was a Combat engine.
He had approached a few Commando riders, and no-one was interested.

"Could you believe that some idiot had thought about putting it in an old frame, and had got the crank re-balanced at 78% to do it."
The engine needed some work, but the basics were all there - the bottom end had been built up by Mick Hemmings (balanced, superblends, case drilled for breathing/oiling), and the head had come over from Norman White who'd lapped in new valves, repair one of the exhaust threads and done some gas flowing on the internals.
The engine had been loosely assembled, and had been sat under a bench for almost ten years.

Needless to say I bit his arm off, and bought the engine straight away!!!!

My project had just taken a new turn!

You won't be disappointed I have been running my hot 850 in my Featherbed frame for 35 years now and love riding it in all that time, every time I ride it its like riding it for the first time and the best thing its so stable on the road wheather its in a straight line at high speeds or being pushed hard in the tight corners and it always draws a crowd when stopped anywhere and mine is no show pony to look at, its always untidy but it don't drop no oil and is well maintained, looks can be very deseciving.

Ashley
 
So with the excitement of the new branch in the road before me, i ordered up a set of gaskets - ready to assemble the new engine!


As i mentioned before, i like to paint the paper gaskets with a good coat of Wellseal, and hang them up for as long as possible to give the stuff a good chance of fully impregnating the paper with sticky goodness!

Wellseal is one of those non-setting jointing compounds, so letting the paper soak it up like a sponge, renders the gaskets one-use only.
However, on the flipside, it seems to be a great method of promoting an excellent seal and preventing leakage


It's a good job that my Dad has a lot of hanging space around his workshop!
 

Attachments

  • Grant's Featherbed Special
    078.JPG
    500.2 KB · Views: 372
  • Grant's Featherbed Special
    079.JPG
    536.2 KB · Views: 405
  • Grant's Featherbed Special
    080.JPG
    534.3 KB · Views: 397
The next job was to fit the drive side oil seal.


This is the correct Imperial size one, NOT the metric equivalent that most people sell.

It is a nice, tight, interference fit and doesn't need trimming or shaving.

I'm hopeful this will stand up to the job in hand!!!
 

Attachments

  • Grant's Featherbed Special
    081.JPG
    488.8 KB · Views: 367
We made a relief on part of the case using a rotary burr


I plan to use ARP nuts and bolts wherever possible, and have a mission to build the entire bike in such a way that i can service and maintain it with a set of AF spanners and imperial hex keys.

I like the look of stainless - but don't trust the quality of the grades used by most of the parts suppliers.
With stainless, either they are too stretchy or not up to the forces exerted on them.

ARP http://arp-bolts.com are awesome, and well up to the job.
I have been buying ARP bits whenever I go out to the United States for work, as it is much cheaper to buy over there.

I have also bought quite a few of Matt Rambow's kits - CNW http://coloradonortonworks.com need's no introduction.
Matt is an awesome guy to deal with and the combination of Matt and Jim Comstock is a force to be reckoned with. Anything from CNW is perfect.
 

Attachments

  • Grant's Featherbed Special
    082.JPG
    522 KB · Views: 360
Here is the ARP kit for the crankcase halves


the ARP bolts have smaller heads, and because they are 12-point, it is much easier to get a spanner on them.
 

Attachments

  • Grant's Featherbed Special
    083.JPG
    400 KB · Views: 377
Next job is to fit the oil junction block - i'll be using stainless braided hoses with AN fittings throughout the bike


No need for my Dad to waste any more of his big lump of aluminium, because luckily for him, these are available from Steve Maney http://www.stevemaney.com off the shelf and ready to go!


Gave the area around the mating surface a really good clean with a coarse scouring pad, and made sure there were no burrs around the locating spigot.


Made sure the gasket was placed correctly - there is a right and a wrong way!


Then bolted on the junction block - note that i swapped out the original bolt for a nice little countersunk one!
 

Attachments

  • Grant's Featherbed Special
    084.JPG
    361.1 KB · Views: 352
  • Grant's Featherbed Special
    085.JPG
    502.8 KB · Views: 343
  • Grant's Featherbed Special
    086.JPG
    495 KB · Views: 378
  • Grant's Featherbed Special
    087.JPG
    487.6 KB · Views: 353
Now it was time for the Comstock/CNW breather!


Because it is a Combat engine - there is already a breather tower on the back of the engine - so no additional machining is needed.
I modded the new breather by shaving off the hosetail, and fitting an AN fitting - sorry Jim!!!


I wanted to fit the CNW breather anyway, but actually even if i didn't, i would have had to think about moving the breather to the back of the timing case and not using the standard tower - because the very limited space between the gearbox and engine would make it a pretty major challenge!


Besides - this is functionally the absolute best solution available in my opinion.
Note - once again, i fitted allen head bolts rather than use the stand items.
 

Attachments

  • Grant's Featherbed Special
    088.JPG
    408.4 KB · Views: 353
  • Grant's Featherbed Special
    089.JPG
    472.2 KB · Views: 341
  • Grant's Featherbed Special
    090.JPG
    515.1 KB · Views: 363
ARP takes care of the barrel studs


The studs are Loctited into the cases


Placement of the gooey, Wellseal covered papergasket
 

Attachments

  • Grant's Featherbed Special
    091.JPG
    419.1 KB · Views: 369
  • Grant's Featherbed Special
    092.JPG
    544.8 KB · Views: 360
  • Grant's Featherbed Special
    093.JPG
    555.2 KB · Views: 373
Here are my two Weapons of Mass Destruction!

Steve Maney's high compression pistons are made by JE Pistons to his design spec and are forged.
The are things of utter beauty!


Pistons labelled up - double and triple checking i have them in the right way round!!!
The wrist pins (gudgeon pins) were left in my freezer overnight so the slide through the piston and conrod nice and easily!


The piece of wood holds the pistons up ready to receive the barrel, and stops anything messing up my nice sticky gasket!
 

Attachments

  • Grant's Featherbed Special
    094.JPG
    428.4 KB · Views: 362
  • Grant's Featherbed Special
    095.JPG
    574.5 KB · Views: 346
Next up was getting prepared to lower the new Maney barrel into it's new home


First up was to give the barrel a really good clean, and make sure it was free from swarf, burrs and rough edges.
To be honest, not a lot of attention was needed here, as Steve does a great job, and the finish of the items he ships is first class!


The cam followers just dropped into place with no trouble at all, and the holes lined up perfectly.
A nice big glug of oil around these made sure that everything went together smoothly.


Of course it is important to lockwire these bolts into position - you don't want these working loose and falling out!
A lot of people use Loctite instead of lockwiring these days, but since the bolts were already drilled, i used the holes that were there!
 

Attachments

  • Grant's Featherbed Special
    096.JPG
    435.2 KB · Views: 318
  • Grant's Featherbed Special
    097.JPG
    557.7 KB · Views: 302
  • Grant's Featherbed Special
    098.JPG
    528.6 KB · Views: 316
  • Grant's Featherbed Special
    099.JPG
    477.2 KB · Views: 294
now I could carefully lower the barrel down onto the pistons

the piece of wood across the studs works really well, and gives plenty of room around the pistons to make sure the ring compressors are sliding down smoothly, and the rings are going into the bores with no issues or snagging.


with the barrel nicely lowered into place, i could loosely fit the four long studs that screw from the top all the way through to the crankcase.
I really like this stud/bolt configuration - it gives me confidence and security


the only downside in my mind, is that once the head is fitted, you can't tighten these four up, without pulling the head off
 

Attachments

  • Grant's Featherbed Special
    100.JPG
    489.5 KB · Views: 285
  • Grant's Featherbed Special
    101.JPG
    517.5 KB · Views: 296
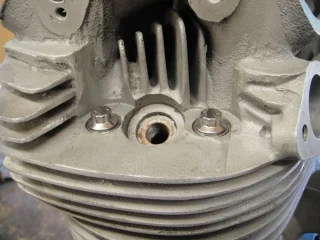
The head had been helicoiled preciously, but the studs felt really slack on the threads, so we pulled the helicoils out.


I picked up a Timesert kit when i was over in the US - they are really good value for money, and I think a pretty good investment given the piece of mind that you will be better protected against over-tightening the studs and pulling them out.

A Fullauto head is definitely on my wishlist - but budget won't allow me to buy one - perhaps a nice upgrade one day in the future.


Here are the Timeserts ready to be installed
 

Attachments

  • Grant's Featherbed Special
    102.JPG
    572.4 KB · Views: 296
  • Grant's Featherbed Special
    103.JPG
    565 KB · Views: 292
  • Grant's Featherbed Special
    104.JPG
    528.7 KB · Views: 316
Grant, It's your project, dont be swayed by others. It looks good with an ES2 engine in there and there are some good tuning options available for these. It will also work with a Commando or other Norton twin engine, or a Triumph, or a Vincent, or a Harley or ..... Take your pick.

If you turn up with a Vincent or a Brough Superior your motorcycle mates and your dear old dad will still take the piss - it's the law!
 
Cheers Dave!

Anyone that knows me also knows that i'm a bloody-minded, stubborn bastard.

And actually going up the bitsa route (albeit a Norton bitsa) has really allowed me to step outside the 'norm' and do a few interesting, and exciting mods.

For me, this is as much about an engineering project as anything else - and lots of little challenges and hurdles are what makes it interesting.
Building a special lets me do that!

...i will just need to steer well clear of the rivet counters in the future. Could you imagine what would happen if i blogged about my project over on the Norton Owners Club forum!!! :wink:
 
With the head prepped and ready to be fitted, i could turn my attention to the head gasket.


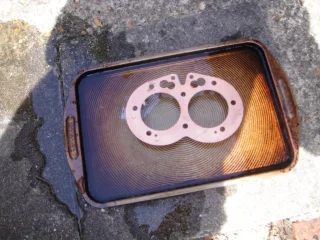
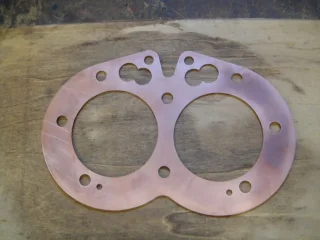
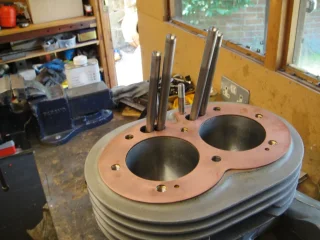
I went for the copper jobby in the end - it seems that there are an equal number of good and bad experiences for solid copper and composite gaskets

I went for the 'prop the gasket up over a tray of cold water using coach bolts' method, and heated with my blow torch until i got a nice cherry red all over.


Then i knocked the bolts over so that the gasket was cooled evenly across it's surface.
The idea of this method is that it limits the amount of scale that forms on the surface, and makes it easier to clean up prior to fitting.

It works pretty well!
 

Attachments

  • Grant's Featherbed Special
    105.JPG
    425.1 KB · Views: 377
  • Grant's Featherbed Special
    106.JPG
    705.6 KB · Views: 418
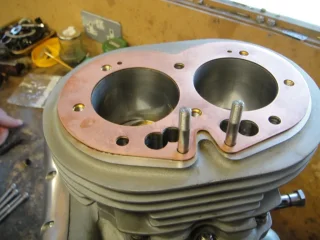
With the copper gasket quenched, i could go over it with an abrasive pad to make sure it was clean and smooth


Then fit it to the barrel

I used a coat of Wellseal each side of the headgasket.

This was given around a week to go tacky - i then used a loop of kevlar thread around every hole.

It's something that I have heard about that car race engine boys do so thought i would try it - it seems to work for them, so why not!
The idea is that the kevlar is crushable, and forms a good seal.

I know that Jim Schmidt recommends silk around the pushrod tunnels and oil hole when using his high compression gasket rings.
This is a similar concept, and i'll let you know how it works out!
 

Attachments

  • Grant's Featherbed Special
    107.JPG
    503.3 KB · Views: 392
  • Grant's Featherbed Special
    108.JPG
    501.6 KB · Views: 365
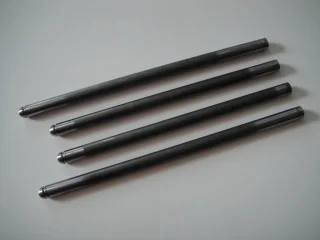
I opted for these Maney pushrods

They are really nicely made, and interestingly are chromoly rather than aluminium .
They are featherweight, and are apparently 30% more rigid than the ally ones.


Something i plan to do in the future, is play around with lightening and polishing up a set of rockers - but thats for another day.

Here are the new pushrods set in place
 

Attachments

  • Grant's Featherbed Special
    109.JPG
    394 KB · Views: 383
  • Grant's Featherbed Special
    110.JPG
    530.9 KB · Views: 378
Finally i could put the lid on!


I buttoned up the head using ARP bolts.

An interesting note - ARP make studs and parts for the Mini (the legendary small car from the 60s)
And because of the era, most of the engine parts are a mixture of UNC and UNF - so the mini is a perfect source for high performance upgrades for our Commando Engines!
Because there is a huge market for parts upgrades for the Mini, the cost is much lower compared to sourcing other specialist parts from elsewhere! :D

Of course, Matt at cNw now has a lot of specialist parts for these applications ready to go - but if you need any other bits, the good old British Mini is a great place to look!!!
 

Attachments

  • Grant's Featherbed Special
    111.JPG
    602.9 KB · Views: 430
Back
Top