
You are using an out of date browser. It may not display this or other websites correctly.
You should upgrade or use an alternative browser.
You should upgrade or use an alternative browser.
Get out the straight jacket
- Thread starter Schwany
- Start date
Schwany
VIP MEMBER
- Joined
- Apr 22, 2020
- Messages
- 3,824
Correct you are.Don’t use copper washers under those !
You’ll be adding a soft material into the joint. The design intent is for those though bolts to clamp up 100% solid because you cannot re torque them.
I had a different expansion contraction metallurgy theory I made up, but I probably won't use them, due to being softish. They are super thin. I'm using some sealant that isn't likely to let go of the barrels once torqued down. However, it will be a first with sealant only on the base, and with this Permatex MaxTorque sealant. Supposed to be good for high vibration and heat applications.
Schwany
VIP MEMBER
- Joined
- Apr 22, 2020
- Messages
- 3,824
They can be retorqued, but the head has to come off which as you have pointed out elsewhere is zero fun in the frame.I agree , the copper washers seem wrong here.
Why is it not possible to retorque these bolts?
Glen
")
Schwany
VIP MEMBER
- Joined
- Apr 22, 2020
- Messages
- 3,824
I doubt this is my last ever rebuild of this engine. As I stated earlier I'm going to use the MAP pistons and log rods because I have them, and want to see how they work. There will not be a huge weight penalty on top of the rods because the pistons are lighter weight. (Another made up theory.) Not using high comp pistons this go round. The high comp pistons have more weight at the crown, and I didn't really care for how hot the motor ran with the high comp pistons without an oil cooler. Might get one on the next overbore when I switch back to the JSM parts.... if I ever do. I'm going to try not to beat on this motor. I've geared the bike up a bunch, so the HWY and puttin won't be as frantic on the RPMs.
Not moving as quick as I had hoped, but getting there.

The timing side inner bearing race slides on the crank with very little resistance. It also spins on the crank. Yikes!! I think I might have over heated it and it stayed expanded after cooling unless that is common. Will make shimming it easy. lol

I remembered the safety wire on the tab screws this time. Made my own tabs out of 1/8" aluminum flat stock. No sense ruining the stock ones. Never know when one might go back to the stock tappets.
Not moving as quick as I had hoped, but getting there.
The timing side inner bearing race slides on the crank with very little resistance. It also spins on the crank. Yikes!! I think I might have over heated it and it stayed expanded after cooling unless that is common. Will make shimming it easy. lol
I remembered the safety wire on the tab screws this time. Made my own tabs out of 1/8" aluminum flat stock. No sense ruining the stock ones. Never know when one might go back to the stock tappets.
Fast Eddie
VIP MEMBER
- Joined
- Oct 4, 2013
- Messages
- 23,056
Looking very posh there sir!I doubt this is my last ever rebuild of this engine. As I stated earlier I'm going to use the MAP pistons and log rods because I have them, and want to see how they work. There will not be a huge weight penalty on top of the rods because the pistons are lighter weight. (Another made up theory.) Not using high comp pistons this go round. The high comp pistons have more weight at the crown, and I didn't really care for how hot the motor ran with the high comp pistons without an oil cooler. Might get one on the next overbore when I switch back to the JSM parts.... if I ever do. I'm going to try not to beat on this motor. I've geared the bike up a bunch, so the HWY and puttin won't be as frantic on the RPMs.
Not moving as quick as I had hoped, but getting there.
The timing side inner bearing race slides on the crank with very little resistance. It also spins on the crank. Yikes!! I think I might have over heated it and it stayed expanded after cooling unless that is common. Will make shimming it easy. lol
I remembered the safety wire on the tab screws this time. Made my own tabs out of 1/8" aluminum flat stock. No sense ruining the stock ones. Never know when one might go back to the stock tappets.
Can’t quite believe you’re putting all that nice shiny posh stuff into grubby old cases tho.
")
Schwany
VIP MEMBER
- Joined
- Apr 22, 2020
- Messages
- 3,824
Yeah, I know. My P11 cases are ugly old under engineered things not designed for what I am doing. Fortunately, I'm not racing it so it should hold up. Will get it on a dyno this summer to see if I'm making 47 HP.Looking very posh there sir!
Can’t quite believe you’re putting all that nice shiny posh stuff into grubby old cases tho.
You could subject your cases to vapour blasting and a paint job, as NV did on late Commando models. If you can find the proper paint (possibly a 2K paint), it will seal the surface and protect it against weathering, also makes cleaning a lot easier.
- Knut
- Knut
Decided to make a modification to the JSM lifter blocks. Theory behind the mod is get oil to the cam lobes a little quicker in a straight up motor. The lifter blocks are angled in the barrels in a way that puts the oil holes in the lifter blocks in a high position in the bore. Higher than it would be in a canted forward Commando engine. Oil has to fill above the top of the lifter to overcome the angle before it starts flowing down the oil holes.
Those small bores cause a lot of friction to the tiny oil flow eventually entering the pushrod tunnels. The accruing oil is actually pressurized in the pushrod tunnels by gas leaks, resulting in oil mist blowing off in all directions at the bottom of lifter blocks, I fear, rather than a continuous flow directed at cam lobes.
There is just one method of ensuring proper lubrication of camshaft lobes IMHO - a pressure feed from the camshaft end, as demonstrated by Dave Sundquist, and I believe Jim Comstock also had this feature in some of his engines.
I'd like to see an oil flow experiment on how those tappet blocks actually drain oil. A real time video of what's going on would be very interesting! Will there be an oil flow at the perimeter of tappet blocks, as the barrel heats up? Maybe an O-ring is called for.
- Knut
Schwany
VIP MEMBER
- Joined
- Apr 22, 2020
- Messages
- 3,824
Small step forward.
The pistons are flat tops with valve reliefs. 8.5:1 compression when using with a .041 copper head gasket, so I'll be running with a thinner head gasket. Might use a fire ring composite since I have one coming from AN. Or order a .021 copper gasket from JSM. Decisions decisions....

The pistons are flat tops with valve reliefs. 8.5:1 compression when using with a .041 copper head gasket, so I'll be running with a thinner head gasket. Might use a fire ring composite since I have one coming from AN. Or order a .021 copper gasket from JSM. Decisions decisions....
Schwany
VIP MEMBER
- Joined
- Apr 22, 2020
- Messages
- 3,824
I never did install the thread inserts for the barrel through bolts in the crank cases. I was able to torque the bolts down to 25 ft lbs no problem. Nothing but clean studs have ever been in those 3/8-16 holes and the threads are all in excellent condition. I talked to Andy about it before making the decision to give it a try. He said he'd try it before going to the trouble of installing the inserts. Worst thing that could happen is I would have to install the inserts. (He must be a kindred spirit.) With the JSM through bolts I'm not worried about it. I figure one of you guys can worry about it for me. Remember it's only a little 750.
Supposed to finally get a package from AN today. 15 days door to door. About 2X what it used to take before the crisis craze started. The parts in the box will let me button up the timing side hardware. Nothing special just replacing the cam chain and chain adjuster foot. I will be running the JS2SS cam straight up like I did last time. Then on to the head.
The package will also have a Commando gearbox mainshaft in it. I want to find out if that is what it takes to bolt on a NEB clutch without going through all the BS I did to get it to work on shorter pre-Commando mainshaft. Long term goal is an NEB belt clutch.
Yeah I know I'm likely repeating myself.
Schwany
VIP MEMBER
- Joined
- Apr 22, 2020
- Messages
- 3,824
The keyway for the alternator rotor on the Molnar crank is correct for a Commando I guess. When doing a crank swap from an Atlas based crank like that of a P11 the timing mark on the rotor ends up around several degrees out clockwise. For example, if the timing mark on the rotor was straight up at 12 o'clock when the pistons are at TDC with an Atlas crank, the mark on the rotor is at 3 o'clock when mounted on the Molnar crank. I could be and more than likely am wrong about the exact clockface degree difference, but whatever it is it is kind of shocking when first noticed. I'll be getting out the chisel and degree wheel to set new marks on the rotor. Although I actually don't use the rotor for timing anymore. I do it the old fashioned way through the spark plug hole with one of the gizmos shown below. The TriSpark makes it easy to get in the ballpark when the red LED lights up.

Currently starting on the gearbox pre-Commando to Commando mainshaft swap. Did a quick mock up of the clutch basket on the commando mainshaft in a vice. Looks like the Commando mainshaft will work for the NEB clutch. It won't work for the old 3 spring AMC clutch though. Puts the AMC clutch sprocket too far out of alignment with the engine sprocket. Robbing Peter to pay Paul.
Currently starting on the gearbox pre-Commando to Commando mainshaft swap. Did a quick mock up of the clutch basket on the commando mainshaft in a vice. Looks like the Commando mainshaft will work for the NEB clutch. It won't work for the old 3 spring AMC clutch though. Puts the AMC clutch sprocket too far out of alignment with the engine sprocket. Robbing Peter to pay Paul.
Schwany
VIP MEMBER
- Joined
- Apr 22, 2020
- Messages
- 3,824
If I don't get too sidetracked, I should be firing this thing up today. Might even get a couple of miles in if it warms up. Not a big fan of riding in mid-30's F degree weather.
Of note is how much lighter weight the engine feels. Might be how the weight is redistributed with the lighter weight crank and barrels. Anywho, I had no trouble picking up and moving the motor from the assembly table to the frame by myself. If I had cleaned off one of those wood stools sitting there which are about the same height as the frame rails I could have slid the motor in from the timing side alone. I got my son to help me get it in the frame. Kids are amazing when they get into their 30's and you still get along, but I digress. For the last 50 years I never thought I could get the motor in the frame completely assembled. The NV scramblers Red book gave me the impression the head had to come off. Must be something lost in translation. Anyway, it looks impossible, but was relatively easy to do using a floor jack to get the motor positioned in the plates. I did not cuss at all, which is really different.
It looks kind of agricultural with the engine being all alloy on the outside. Black barrels do look better on a pre-Commando to me.

Yes my garage is a mess. And if you look closely at the rear fender under the seat section, you can see some of my nobody will ever see this metal reforming skills. Doing that with the wheel and tire on is not the way to do it. Might be irreparable.
Of note is how much lighter weight the engine feels. Might be how the weight is redistributed with the lighter weight crank and barrels. Anywho, I had no trouble picking up and moving the motor from the assembly table to the frame by myself. If I had cleaned off one of those wood stools sitting there which are about the same height as the frame rails I could have slid the motor in from the timing side alone. I got my son to help me get it in the frame. Kids are amazing when they get into their 30's and you still get along, but I digress. For the last 50 years I never thought I could get the motor in the frame completely assembled. The NV scramblers Red book gave me the impression the head had to come off. Must be something lost in translation. Anyway, it looks impossible, but was relatively easy to do using a floor jack to get the motor positioned in the plates. I did not cuss at all, which is really different.
It looks kind of agricultural with the engine being all alloy on the outside. Black barrels do look better on a pre-Commando to me.
Yes my garage is a mess. And if you look closely at the rear fender under the seat section, you can see some of my nobody will ever see this metal reforming skills. Doing that with the wheel and tire on is not the way to do it. Might be irreparable.
Schwany
VIP MEMBER
- Joined
- Apr 22, 2020
- Messages
- 3,824
Wife walked into the garage today and said it looks like a motorcycle again.

Did not finish up when I thought I would. I got sidetracked making a couple of things and making sure the NEB clutch actually fit inside the primary with the longer mainshaft. Engine and clutch sprocket alignment is not perfect, but real close. The clutch needs a 5/32" spacer instead of the 7/32" spacer that comes with it. Basically, it's about 1/16" out flush against the engine sprocket to front edge of clutch sprocket. Will take care of all that when I put a NEB belt clutch in it. It should be OK with the single row chain for a few hundred miles.
It sounds good, motor is quiet for a Norton, but I suspect that will change a little with time and miles. I did not take it for a ride. I warmed it up to too hot to touch barrels using varying RPM to see how the oil pressure was. 64psi cold start and holds at 45psi semi hot idle. It's cooling off now until I can get out for a good ride. Maybe next week or sooner depending on weather.
Still have to weigh it, but I know it weighs less than it did when I started the rebuild.
Oh and it did not start on the first kick. It never starts on the first kick. When the carburetors sit around for a month, the combustion chambers and intake manifolds have no fuel film on them, it takes a few kicks to get enough fuel in the motor to light it up without flooding it with accelerator pump fuel. That and my intake tracks are longer and at a less steep angle than they are on stock Norton Commandos. Does not bother me. The ride more than makes up for the cold start procedure.
gortnipper
Basic
- Joined
- Nov 11, 2013
- Messages
- 5,421
Looks like a shit ton of Cascade fun!
Longtimegone
Basic
- Joined
- Sep 16, 2017
- Messages
- 101
Your garage is immaculate compared to mine.Yes my garage is a mess.
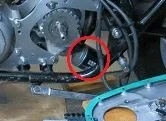
 Where might I find some info or detail photos about the item I've circled in the attached?
Attachments
Schwany
VIP MEMBER
- Joined
- Apr 22, 2020
- Messages
- 3,824
I will find out eventually. Too wet and cold to head for the Cascades right now. I did gear it up so I can do some distance without all the RPMs, so it will take some getting used to in the mountains.Looks like a shit ton of Cascade fun!
I might take a short 9 mile ride today if it doesn't start drizzling. I really want to see how it all works. I doubt it will pull as hard as it did with the high CR pistons, but it will be considerably more reliable, and a real pleasure if it stays quiet.
Schwany
VIP MEMBER
- Joined
- Apr 22, 2020
- Messages
- 3,824
I put that oil filter on there early late 80's or early 90's. I bought it and 6 Crosland oil filters from Bob Raber. I made the bracket, and plan to make another thicker one using it as a pattern. I can use the thicker bracket to replace the spacer used at that location behind the gearbox mounting plate. It is plumbed in the return side of the oil circuit.Your garage is immaculate compared to mine.
It came with the filter threads for the Crosland oil filter (same as what Norton uses), but I installed the cNw oil filter thread adapter when I brough the P11 back to life last year so I can use oil filters readily available at local auto parts stores.
The remote adapter is the same as this filter adapter from Andover except mine does not have the barbed hose fittings. My guess is the Andover unit uses Norton oil filters they sell. You would need the filter thread adapter if you wanted a larger selection of easy to find filters.
An inline oil filter that screws apart with replaceable filter elements might work just as well.
baz
VIP MEMBER
- Joined
- May 26, 2010
- Messages
- 8,684
Morgo supply top and side fitting oil filter heads now https://www.morgo.co.uk/product-category/morgo-oil-filter-kit/Your garage is immaculate compared to mine.
gpzkat
Basic
- Joined
- Sep 15, 2020
- Messages
- 859
Looks good, congrats! I use a chain hoist like shown... some bikes I've worked on would be a complete back breaker with 4 cylinder monsters, and I'd scar up the frame paint as well. Since i didn't know how my N15 bolts/plates went together from experience, it was good to be able to make fine adjustments with it on its side. I also use the hoist for working on front end, I once tried one of those small lifts a friend loaned me, and I'm not really a fan.

Similar threads
- Replies
- 5
- Views
- 1,211