Atlas charging system upgrade options

Knut- I couldn't locate a correct sprocket, I tried asking a couple of recommended places but nobody had one or wasn't sure what I needed - it's been a while so I can't remember the details. I bought a contact breaker sprocket from Andover that was wrong. It is 03.3007 and requires a pin and doesn't work (anyone need one?)

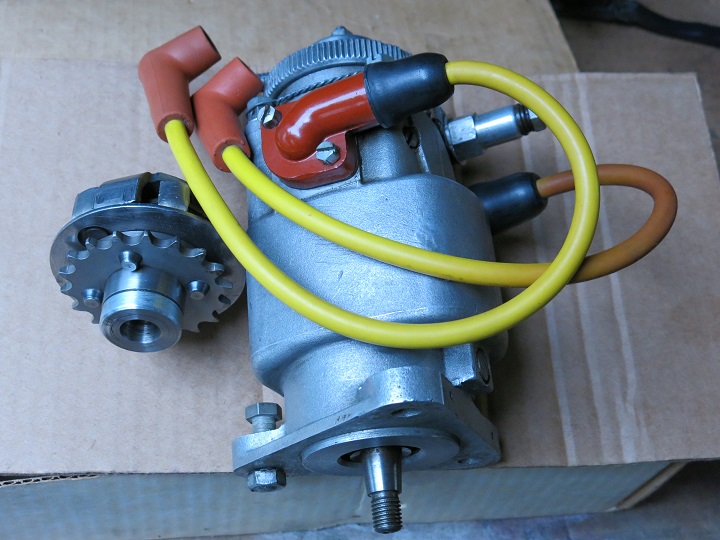
So I am not sure what to ask for, is it from another model 750 so I could look up the part number? I don't want to use the advance wired into locked position. As for waterproofing, the only point of ingress I can see is at the mating of the cap to the body or possibly the screws holding it, and those seem simple to seal up.
 
Knut- I couldn't locate a correct sprocket, I tried asking a couple of recommended places but nobody had one or wasn't sure what I needed - it's been a while so I can't remember the details. I bought a contact breaker sprocket from Andover that was wrong. It is 03.3007 and requires a pin and doesn't work (anyone need one?)


If using the AMC-type points housing there is no need for the external auto-advance.

You have an aftermarket points/EI housing, not the "AMC-type" (link, below), therefore, the pinned 03.3007 sprocket doesn't fit.


Maybe?:
"1269A - 18 TOOTH TWIN CYLINDER MAGNETO SPROCKET"
 
gpzkat - you will need an 18T sprocket with a tapered bore. t looks like RGM 12669A is your candidate, but please verify with Roger.
The problem with tapered shafts is, you can't adjust sprocket location axially, so please make sure sprocket is located at the same distance to the mating flange as was the case for the K2F.
I no longer trust RGM fully on dimensional stability - you will be better off by specifying your requirements.
Additionally, the taper has to be spot on. There is no guarantee the delivered sprocket provides the correct taper, so make sure you specify the desired taper & order a sprocket with a soft (non-hardened) centre allowing rework, if necessary.

- Knut
 
Curious if there are any differences between the total timing and advance curve for the AAU used in the timing case vs. the AAU used in the points housing. Same total timing? Does one come in sooner than the other?
 
Curious if there are any differences between the total timing and advance curve for the AAU used in the timing case vs. the AAU used in the points housing. Same total timing? Does one come in sooner than the other?

The one mounted in the timing case has 12 degrees uf advance.. One-can easily measre the range with a protractor .

Slick
 
Maybe?:
"1269A - 18 TOOTH TWIN CYLINDER MAGNETO SPROCKET"
Looks like the RGM part is only the sprocket and missing the rotating tapered insert that the AAU version utilizes to connect to the magneto shaft.

So I am not sure what to ask for, is it from another model 750 so I could look up the part number? I don't want to use the advance wired into locked position.

gpzkat,

Maybe you will get lucky and find what you are looking for. Feked might have what you need. Give them a call or send an email.
 
You have an aftermarket points/EI housing, not the "AMC-type" (link, below), therefore, the pinned 03.3007 sprocket doesn't fit.


Maybe?:
"1269A - 18 TOOTH TWIN CYLINDER MAGNETO SPROCKET"
Yes I know it doesn't fit and thanks for that link. I will take another look, it seems that one may be right but am wondering if that is one that bolts up with the auto-advance somehow? I remember looking at it and thinking hmm, can I separate the sprocket from the advance? Been too long but think I struck out. But it sure would make sense. Many small things on the Norton take a lot more thought than would seem necessary!
 
Looks like the RGM part is only the sprocket and missing the rotating tapered insert that the AAU version utilizes to connect to the magneto shaft.


The RGM sprocket is tapered...
"IMPROVED MATERIAL AND MADE A CHANGE TO THE HEAT TREATMENT, INDUCTION HARDENING THE TEETH ONLY SO THE TAPER REMAINS "SOFT" ALLOWING IT TO ENGAGE BETTER AND AVOIDING THE SLIGHT DISTORTION THAT HEAT CASE HARDENING CAN CAUSE."

...and the housing shaft is tapered.
"machined from solid alloy
tapered shaft to fit magneto pinion"
I knew the mini-housing had a tapered shaft. The sprocket does not look like it does to me. Hole looks larger than the stock AAU for magnetos. Optical illusion caused by the angle of the image and the RGM design, I guess. I am wrong if that helps.

This is the only example I have in my pile of similar parts. Image shows a magneto AAU and a magneto that is not a mini-housing obviously.

Atlas charging system upgrade options
 
Looks like the RGM part is only the sprocket and missing the rotating tapered insert that the AAU version utilizes to connect to the magneto shaft.
No rotating tapered insert required, as sprocket in intended for magnetos with manual advance/retard, or EI, where a computer takes care of advance/retard.

Going by pictures of different scales and view orientations, it's very difficult to assess dimensions of a bore.

Great info by Alan Osborn in the reference LAB provided: Sprocket taper needs to be 11 degrees.

- Knut
 
Last edited:
No rotating tapered insert required, as sprocket in intended for magnetos with manual advance/retard, or EI, where a computer takes care of advance/retard.

Going by pictures of different scales and view orientations, it's very difficult to assess dimensions of a bore.

Great info by Alan Osborn in the reference LAB provided: Sprocket taper needs to be 11 degrees.

- Knut
Arrgh

Just to be perfectly clear, I never said the insert was required. I said the sprocket did not look like it was tapered like the insert is. Agree it is hard to determine what the dimensions are. The description did not mention what it was good for. I know what gpzkat was looking for. Your suggestion that gpzkat contact Roger about the part is good.

I also know how EI works, what a locked out (no AAU) magneto is, and tires work best when inflated.

I wouldn't ask for advice doing any of this. I'd just make it work and let you guys tell me it can't as usual. 🤣
 
Sorry Schwany, your wording above (#26) confused me. I am not here to teach you or anyone else the obvious.

- Knut
 
At this point I'm going to try it out with the wired-up advance unit. I don't weld, but I do have proper safety wire and it is most definitely secure. Locking up bob weights from moving due to centrifugal force is not a high load, as far as I can tell. I've double/double wired it on opposite sides, and there's no way I can see it's gonna budge. Wish me luck!
 
Sorry Schwany, your wording above (#26) confused me. I am not here to teach you or anyone else the obvious.

- Knut
Not important. It's all good. I just wanted to make it slightly clearer. I can see how somebody would misinterpret almost anything I have to say/type up.
 
On my 1965 Atlas I replaced the magneto with a commando distributor and sprocket but put used a Boyer instead of the Commando point set up. Like others have said the charging system then becomes critical so I replaced the original unpotted three wire alternator with a later potted two wire alternator and mounted coils on the back side of the oil tank like they did on the 67 Atlas's. The kill switch I used was a normally closed switch which opens up the circuit rather than grounding it. The old selenium rectifier was bad, so I used a four-way bridge I bought from Radio Shack for $2.67 a few years but I'm still using the zener diode. The wiring was an abortion with lamp cord modifications, so I bought a new wiring harness. I've been riding it for about eight years and have never been stranded, had a voltage issue and have never had the cover off the distributor.
 
First off, I am biased towards magnetos. I disagree with those who say they are too fiddley. Once set up, they run and run, ..... no more reliable ignitions available.

I do admit refurbishing a K2F is costly, one has to consider applying the cost to refurbish a K2F to the purchase of a Joe Hunt, currently $795 US for the flange mount JH. That is practically a wash. Replacing a Lucas K2F with a Joe Hunt is a simple bolt up procedure.

Keep your K2F's as long as they are functional. The archilles heel of the Lucas K2F is the internal capacitor, as it ages it shorts out when hot and will kill the engine. If refurbished, new capacitors are of the polystyrene type that have an indefinite life. Changing out the capacitor is not a DIY project, and will most likely result in an off center rotor at least and internal damage at worst, when attempted by a novice.

Refer to Resources Page 7 for a tutorial on setting up and timing a K2F.

Slick
The Joe hunt is definitely superior to the K2F
 
At this point I'm going to try it out with the wired-up advance unit. I don't weld, but I do have proper safety wire and it is most definitely secure. Locking up bob weights from moving due to centrifugal force is not a high load, as far as I can tell. I've double/double wired it on opposite sides, and there's no way I can see it's gonna budge. Wish me luck!

Might work as a temporary experiment.

Eventually the wire will come off and get chewed up in the chains/sprockets/pinions in the timing chest.
 
Might work as a temporary experiment.

Eventually the wire will come off and get chewed up in the chains/sprockets/pinions in the timing chest.
Thanks that's scary. Feked replied saying they can't provide anything suitable. RGM looks promising but their order form is broken and won't accept my USA address. I've heard issues (Schwany) with them lately but am hopeful, I sent an inquiry.
 
At this point I'm going to try it out with the wired-up advance unit. I don't weld, but I do have proper safety wire and it is most definitely secure. Locking up bob weights from moving due to centrifugal force is not a high load, as far as I can tell. I've double/double wired it on opposite sides, and there's no way I can see it's gonna budge. Wish me luck!

Why not take it to your local welding shop and have a couple of tacks put on it?

Slick
 
Back
Top