Assembly Sequence?

Status
Not open for further replies.
Joined
Dec 28, 2008
Messages
2,035
Country flag
I am right on the verge of reassembling a 1975 Mk III Roadster, when the lower end comes back from I'll be there. The wheels are done the frame and Isolastics are done the forks, shocks,brakes, Z-plates all finished. I have new stainless fasteners (Rocky Point)...

I am sure that the motorcycle can be reasembled a number of ways, but I am virtually certain that knowing the proper sequence saves time and frustration. For example: which would you install first the forks or the rear iso/swingarm? Do you put the engine in sans the head or as a completed assembly? When do you add the center stand? I could go on; the horn was very difficult to remove, the battery box...

Does anyone have a proceedure sheet on major reassemble operations?

RS
 
The way I did it was to put the trans in the cradle and then bolt the engine to it and lay it on the floor sideways and then lower the frame onto it. First put the bolt for the rear iso in and then bolt the front iso tube in place. It was someone here that gave me this info and it worked great, I only needed a little help from the wife. If I had a bigger bench maybe there would have been a better way so get more advice, I did it this way because the frame is a lot lighter than the motor and when it is bolted in place it is easy to turn upright, Then do the swing arm and so on. Chuck.
 
Oh just be sure to lay a large scrap piece of carpet and then a blanket on top of that to protect the new paint and motor parts, Chuck :D
 
Doesn't the shop manual give the sequence?

The "lay the frame on it's side, over the laid down engine" trick is a great one.

I use a bike lift and assemble the top end in-situ.
 
No! No! you've got it all wrong.

First you start with the horn :wink: :lol:

Cash
 
I really enjoy that kind of humor, Cash.

As I was laughing I got to thinking where the horn is located and how difficult it is to get into place. Maybe you weren't joking after all.
 
cash said:
No! No! you've got it all wrong.

First you start with the horn :wink: :lol:

Cash

..unless you have a black box air filter in which case the frame has to be jigged around it...
 
Beep, beep

The horn is a large consideration, I like the idea of a lay down; is this done with the swingarm on or off at this point?

I asked the question because I have invested a ton of money in paint and do not want to be moving heavy pieces around un-necessarily and risk beating up good paint work.

Assembly Sequence?


My initial plan has been to assemble the transmission cradle into the frame at the rear isolastic mounting point with the frame upright and resting on fresh carpet/towel, next to add the motor--completly built--then follw-up with the front isolastic coming in from the bottom.

From there I thought, bolt in the rear shocks, mount the triple clamps and forks, bolt on the head steady.

Next the battery box and the horn, then rear fender, front fender.

Front wheel, then center stand, carbs, oil filter, oil tank, oil lines, then rear wheel, its a roller

Transmission, 520 chain, side stand, primary drive. populated Z plates.

At this point, if I haven't missed anything glaring I start wiring the beast.

Instruments, tank, seat, battery.

Fuel

Off I go...

Have I missed anything? Is my sequence gonna pull this off?

RS
Code:
 
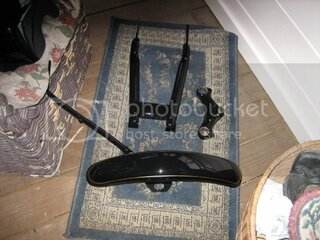
A few more pics

Code:
[ATTACH=full]23504[/ATTACH]
Assembly Sequence?


Code:
[ATTACH=full]23506[/ATTACH]
 

Attachments

  • Assembly Sequence?
    NortonParts004.jpg
    143 KB · Views: 52
  • Assembly Sequence?
    NortonParts003.jpg
    146.4 KB · Views: 46
Since I put my early 850 together solo, I assembled it into a rolling chassis first, then put the engine and transmission in.
Assembly Sequence?


The guy I bought my bike from said he got the red triangular piece from CNW. It allowed me to assemble the chassis without the crankcase in the frame.
I don't know if its the proper way, but it worked for me, especially as I had spent four months cleaning, painted and putting together sub-assemblies, and want to see some real progress.

Assembled crankcase was not too heavy for me to install, then went the transmission, barrel and head. Tranny was tricky to get into the cradle, but it was basically rotate it until it fit through the hole, then rotate it back into position.
 
The frame weighs about 25 lb and the engine and tranny assembly probably about 70 lb. At my age I find it much easier to control 25 lb than 70, so I prefer to lay the cradle assembly (complete with head and tranny, but no swiingarm. on its side on the floor (well padded) and carefully slide the frame over it until I can slide the rear mounting stud through. Then assemble the front mount and lift the entire assembly upright. A lifting strap around the center tube and a cable come-along attached to the ceiling allows me to lift the frame to get a stand under it. Then hang the front end and rear swingarm, shocks, and wheels.

If you have a couple buddies to help you can guide the engine assembly into the frame fairly easily, but without help chances are great that you will scratch the frame.
 
The on-the-side method sounds good to me. I didn't know about that when I did mine, so I assembled the rolling chassis first then got a couple of friends to help with putting the engine (all assembled except head) into place. They did the heavy lifting, I stuffed bolts in. Worked great! :)

You do have to be careful to avoid scratching the frame though. I used duct tape and pipe insulation to help protect it.

Debby
 
As my bike sits, I am thinking of pulling the front fender off and waiting till the end to bolt it on. I am thinking I might damage it and this could go on last, Same for the rear. I know what your talking about when it comes to money and not scratching it, I have spent a little time myself trying to figure the safest ways of doing things. I have so far been real lucky and no damage, (knockin on head). Just take your time and think it through first that way works well for me. I put the trans in the cradle first and then bolted the motor to the cradle, Then me and the wife lowered the frame over the assembly and put the stud thru the rear iso. I had a few short 2x4's that I used under it to get the right height for the frame. Next the front iso bolted to the motor and frame, At this point it was easy to get upright and onto a stand. (Not too heavy yet) Then I did the swingarm, Shocks, Triple tree, forks and so on. I also wanted a rolling piece so this was the way that worked for me. I don't take any credit for this method as I think it was here that someone suggested it. I wrapped in canvas as much of the frame as possible to avoid dings or scratches. Just go slow, It works. Chuck.
 
Status
Not open for further replies.
Back
Top