Amal Stay up float. Version 1 and 2. Wheres the photo?

johnm

VIP MEMBER
Joined
Feb 26, 2008
Messages
1,734
Country flag
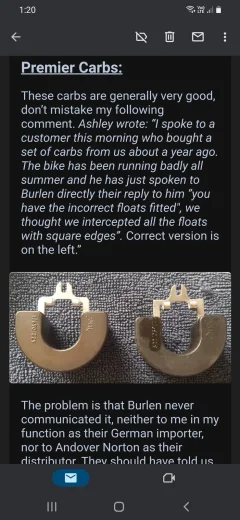
Sometime in the past maybe three years I recall reading a note with a photo describing the updated version of the stayup float. I'm not talking about the original plastic float versus the stay up float but an update of the stayup float which prevented the sticking of the float needle and erratic fuel levels.

I'm pretty certain it was in the Andover newsletter but I have been through the archives and checked about 20 editions and not found the note yet.

I remember it was written by a proprietor of the shop. Probably Andover and he said something like "Amal have updated the float but didn't tell anyone. Would have been nice had they mentioned it to their suppliers so they coukd check their stock."

Can someone please point me to this note? I have been searching for sometime now and cannot find it.

Thanks John
 
I like posting questions. Because about 15 min later with further searching you find the answer yourself.
 

Attachments

  • Amal Stay up float. Version 1 and 2. Wheres the photo?
    Screenshot_20230726-132049_Gmail.jpg
    215.9 KB · Views: 285
Thanks for this.
Makes me want to pull the bowls and have a look..
 
You can make the earlier ones work by filing the edges and especially gently smoothing the punching flash in the slot for the float needle.

But I have been fighting float levels for the past two weeks with erratic results so I have just ordered a pair of the new ones. Definitely new stock. I plan to carefully compare the versions to see exactly what has changed.
 
According to a Burlen tech, it was an issue with a batch of floats not being finished properly.

There is no version 1 and version 2.

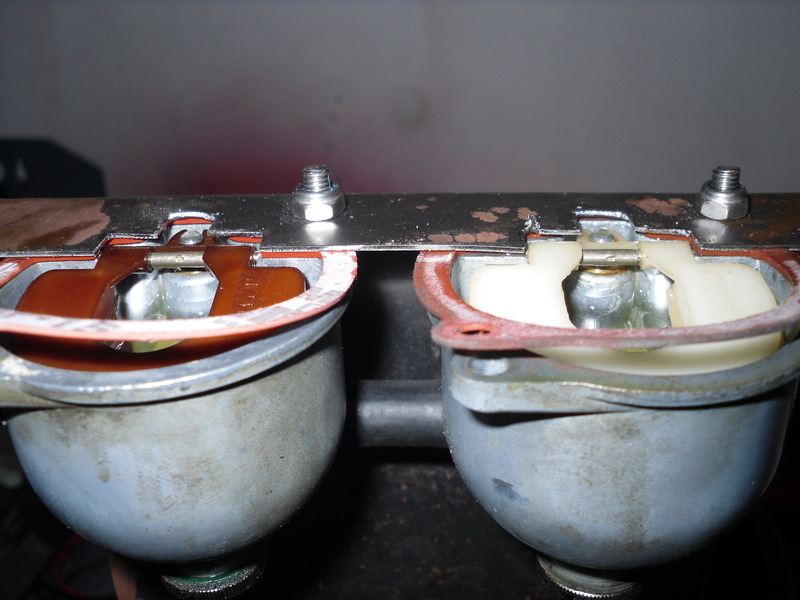
I had this problem around two years ago (stay-up floats purchased from Burlen as part of their "major repair kit" that had rough, square edges on the tang.
I simply rounded the corners with a file, and they were good to go.

The earliest stay-up floats - I'm talking ten or more years ago definitely have squarer edges than the ones you buy today.
However, the 'problem' ones were clearly not finished after being stamped out, as the edges were janky in comparison.
 
On your other note - ignore float levels, and concentrate on fuel levels.

several friends have gone back to the white plastic floats, as they can't get the stay-up ones to work on their Commandos.

I adjust the brass seat in the float bowl to get the right fuel level, rather than bend the plastic float on the tang.
It works a lot better for me.
Thanks for your info re Burlen. Version 1 and 2 was my terminology.

And I should have specified fuel level not float level. I'm using a plastic tube to measure fuel height in the bowl. I'm still interested to see what the "new" ones look like.

I have adjusted the brass seat way back in the past maybe 20 years ago but was hoping not to do it this time. I'll see how I get on with the new floats. Should be here in a couple of days
 
Last edited:
I had problems with a stay-up float. It behaved like the float was sticking open, but only when it was all sealed up, back on the bike. I finally noticed a tiny nodule on the spindle that goes through the carb and float. I filed it smooth and all was fine from then on.
 
I had problems with a stay-up float. It behaved like the float was sticking open, but only when it was all sealed up, back on the bike. I finally noticed a tiny nodule on the spindle that goes through the carb and float. I filed it smooth and all was fine from then on.
Thanks. I going to go over these floats very carefully. Seems there is much to learn.
 
I have Premiers but use the plastic floats from my OEM Concentrics and adjust float level as per the original Norton/Amal specs. With the stay ups, the "float-ness" is different from the plastic OEMs and it varies from float to float so you have to measure fuel level to end up with the correct level in each carb. The plastic floats are consistent so measuring float level per OEM method works fine.
 
So I received my new stayup floats and indeed they looked like the float on the left in the Andover note I photo I posted above. Ie the rounded corners. I very carefully measured them and the only other difference I could find was perhaps the slot for the needle was 2 thou wider.

The underneath of slot did however still have the very small ridge of flash from the punching out of the metal shape. You could feel it with a fingernail. The top of the slot was smooth and polished. So I carefully removed the flash with a fine file.

I also checked the new bowl to body gasket. Tan in colour and carrying an Amal logo. Fitted to the bowl and trimmed it with a scalpel where it overlapped the inner bowl.

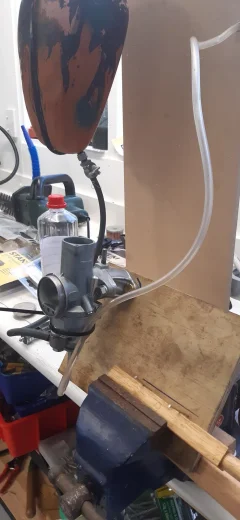
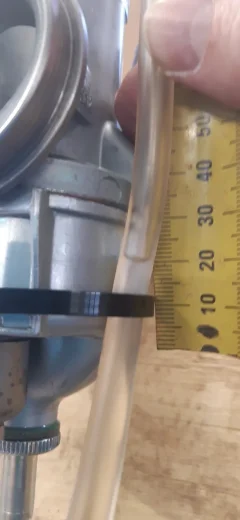
I set up a test jig as per the attached photo (carbs angled about 10 deg as per inclined manifold) and as per the second photo the fluid level is 9 mm.

Amal recomend 4.33 mm to 6.35 mm.

Same on both carbs.

Very frustrating. I shall attempt to correct tomorrow. I recognise some posters recomend going back to the old plastic style float but really this ought to work. 😤😤😤😤
 

Attachments

  • Amal Stay up float. Version 1 and 2. Wheres the photo?
    20230729_165114.jpg
    163.8 KB · Views: 198
  • Amal Stay up float. Version 1 and 2. Wheres the photo?
    20230729_165236.jpg
    106.5 KB · Views: 207
I set up a test jig as per the attached photo (carbs angled about 10 deg as per inclined manifold) and as per the second photo the fluid level is 9 mm.

Amal recomend 4.33 mm to 6.35 mm.

Same on both carbs.

But, how does the reading compare with the 'white' float fuel levels?
Also with the carbs inclined then the reading will obviously change according to the position of the tube along the float bowl. The measurement in your picture with the tube closer to the intake, therefore, would appear to show a low reading. Are the float needles alloy or brass because the fuel height with brass needles will be lower than with the alloy needles?
"Needle Valve...".

Personally, I set the carbs upright or just the float bowls using a jig to clamp the float pins (and it's easier to make adjustments without having to remove the bowls from the carbs each time).

Amal Stay up float. Version 1 and 2. Wheres the photo?
 
Last edited:
But, how does the reading compare with the 'white' float fuel levels?
Also with the carbs inclined then the reading will obviously change according to the position of the tube along the float bowl. The measurement in your picture with the tube closer to the intake, therefore, would appear to show a low reading. Are the float needles alloy or brass because the fuel height with brass needles will be lower than with the alloy needles?
"Needle Valve...".

Personally, I set the carbs upright or just the float bowls using a jig to clamp the float pins (and it's easier to make adjustments without having to remove the bowls from the carbs each time).

Amal Stay up float. Version 1 and 2. Wheres the photo?
I have not checked with the white plastic floats but can do that tomorrow.

The float needles are alloy. They came with the new float kit.

I measured the fuel height at the main jet location. With an inclined carb there is several mm difference front to back but I reasoned under normal running conditions it's the fuel height at the needle and main jet location that will be most important. This could be an issue for the idling pickup however.

I may try a further experiment tomorrow using just the float bowls as in your photo.
 
I assume you have the correct aluminum float valves?

They found the brass ones (which are heavier) result in the bowl not filling to the correct fuel level, so brought in the lighter aluminum ones.
 
I assume you have the correct aluminum float valves?

They found the brass ones (which are heavier) result in the bowl not filling to the correct fuel level, so brought in the lighter aluminum ones.
Yes. That's what I meant by alloy float needles. Should have said aluminium.
 
Last edited:
So I have installed the older style white floats and measured the fluid heights. Back of bowls 9 mm. Centre 7 mm Front 5 mm.

I also used LABs bowl alone measurement and got about 8 mm for the white floats and 9 for the stay up type.

I'm aiming for an ideal 5 midpoint so now need to decide to try bending the stay up floats or moving the needle seat for the white floats.

I tried the stayup floats first using LABs method. It's actually not that easy to measure the fuel height in the bowl with the float in place but I found the float needle aluminium surrounds on the bowl was 5. 15 mm below the bowl top and that's easy to see so used that as a reference. One bend on one stay float and two on the other and I got 5 mm.

So now the carbs go back on the bike and I have both balancing gauges and a mercury nanometer so will see how that goes. Never actually used them before.
 
Last edited:
IMHO The mercury manometer is easier to use and more accurate.
Yes I beleive that's correct. I just want to experiment with the gauges first to see how they go and then use the manometer to finish. I have it on loan and do not want to damage it so taking it slow.
 
Yes I beleive that's correct. I just want to experiment with the gauges first to see how they go and then use the manometer to finish. I have it on loan and do not want to damage it so taking it slow.
What for?
How do you use it?

Excuse my ignorance
 
What for?
How do you use it?

Excuse my ignorance
Definitely not an expert on this as I haven't done it yet.

Basically you connect the pipes from the guages or nanometer to the balance pipe connectors on the inlet manifolds. You then tune the bike using throttle stops and maybe air screws to match the pressure on both manifolds. This will synchronise the carbs and give a good even idle.

Lots of videos on you tube.
 
Back
Top