850 BucketList rebuild

Ctefeh

VIP MEMBER
Joined
Jun 21, 2020
Messages
45
Country flag
All,
Lurking for a while here. I have been Commando-less for about 20 yrs but decided to finish off my MK111 that I bought back in the day. I had a MK11 (bought at the same time) for riding around on as I knew the MK111 was going to be a ground up resto-mod job. A pic here of the MK11, a poor abused child when I originally got it that I slowly fixed up over the course of three 1/2 years.

x7Q7Nva.jpg


I wound up flogging this off due to the fact it spent about 2 1/2 years spread over my garage floor and 1 year actually going. Every time I went to do any routine maintenance, things just blew out. Some examples :

Went to check chain tension and noticed rusty blotches around the rim...? Decided to have a look at the Hub and lo and behold - rusty water out of the hub bearing in the sprocket. Bearings & seals all around.

Isolastics - pulled back the rubber boots to discover the PTFE's had crumbled....replace both - epic job seeing as how said rust above had worked it's way into the whole rear isolastic assembly and froze up the through stud.

Lot's of those kinds of episodes.

An interesting side note : the blokes who bought it were my local parts man (ute provider) and his mate - whose name I recognised as a Jag dealer. A couple of years later I offloaded some paddock
stands via FleaPay and same bloke bought them. I only found out when I dropped them at his shop - and in the dim recesses were his Brit Racebike collection that I had seen in action - including a very brutal J.A.P. powered twin I'd
admired at some classic race events. He'd on-sold my Commando to his brother after throwing a few more electrical components (coils etc) at it.
 
Last edited:
So, star of this show. The MK111 was a California import missing its mufflers. Did it start? Yes - but kicked back ferociously. Here's a partly disassembled shot :

850 BucketList rebuild


Accompanied by this :

850 BucketList rebuild


I realised some PO had fitted a Harley 4 brush conversion and "done some mods" to the electrical system - big time.

I stripped it to the last nut & (The amount of 262 loctite used should have been a warning shot) bolt then spent some time figuring out what I wanted to do. I got the head off and
thought I had a 920 conversion. This actually turned out to be one of the 940 conversions I've seen mentioned in my Clymer manual & here.

Casting about I spent some time with the fella who ran Village Bike. I wound up driving up there and spending hours chatting. A big chunk of coin & months later I received this :

850 BucketList rebuild


The cage & stand I whipped up to send him the donk. I asked for the headers and he did some wheeling/dealing with the original MK1 concentrics and it now wears a pair of 34mm Amal smoothbores.
 
Last edited:
In the intervening years I have done various things. I dismantled the gearbox and sure as eggs found the nasty Portuguese bearing sitting inside the housing wearing an admirable split
in the shell between it and the larger bearing. Also - despite low miles (6 odd thousand), 2nd gears were toast. I sprung for a new GB shell and full set of C/R gears, with kickstart on 1st from RGM.
Also got a full bearing kit, gaskets etc. I have a magazine article (old school back in the day - think internet explorer just went to version 3 and choked the Mac I had use of) that detailed a how-to
so I did and wound up with a reco gearbox. Speaking of Loctite 262 - the upper and lower mount bolt threads were literally dipped in it. No fun at all getting them undone. I then (after that experience) relied
on applying heat before I tried others that showed any red staining.

The frame (above) had that Earl's cooler fitted and I carefully removed it. The hoses etc were binned as well as they had gone quite hard. I also laid a small bead of weld where the original tank had been.
This motor must have been very bad for vibrating stuff loose as the oil tank tried pounding the frame and the bottom mount was fractured and repaired and fractured again (PO). I also removed the front
tubes oil tank bracket (not all the way) as the carbs interfered. Speaking of that - I fitted Dellorto angled cable adjusters as the straight spigots were terrible for cable routing. The frame, swing arm, isolastic mounts, bottom fork legs, external primary cover and timing side cover (as piccie above) were all powder coated after a fair bit of suitable prep work and blasting followed by cleaning.

Tank & sidecovers went off for painting as per original colours (Black with Gold Pinstriping <- he didn't use decals for the tank, just on the side covers).

Lots and lots of polishing, fitting up and removing of various bits & pieces and purchasing stuff ensued.

Now - 22 odd years later I do have a quandry or three. I had fitted a Mark3 Boyer. Will it last? I guess I'll find out but I'll need to sort my electrics out. These have been re-done/re-wired but am unhappy with
the result and I'll modify the harness from what I came up with.

By this time (about 2005) life interfered badly. Fast forward another 15 years and two houses, the bike is again on the rebuild agenda again. My wife and I were discussing when we should retire and that sparked me into action. I want to see the bike up and running again at least one more time.
Not sure what you're asking here Ctefeh?
It's good you're making progress with your Mk3 - do you want input/advice?
 
gQYMSlT.jpg


So why this? I have decided that after the first disastrous styling exercise on these (black anodised rims) to throw those away and invest in some Buchanans kit. Namely Excel rims (alloy) with spoke kits to match F&R wheels. They are currently at a local wheel rebuilder getting the rear rim trimmed toward the disc side, and a remove & replace rim at the front. Got tires, tubes & rim tapes to be fitted by said rebuilder
as well. When I get them back, I will re-fit them and have a rolling chassis again. Then I can get on with re-wiring and a whole host of sundry things. For the brakes, I have stock ones, reco'd with new pistons & seals as well as braided lines. The braided front line made a huge difference to the old MK11 - but a re-sleeve of the front is on the cards.

Probably the biggest challenge for me will be the oil tank/battery area. I have a custom (well, home made) tank but after reviewing this site and there being 23 yrs of accumulated knowledge later - I'll fab a pattern for the tank and battery and turn it over to be welded up. The bike no longer has the electric start - converted to a plate-with-breather where it used to mount.

More musings and such when I have a rolling chassis again.


Ctefeh (badly transliterated cyrillic name on my Russian visa's)
 
Last edited:
Well, I'll definitely check when I get them back. I think this will be on the to-do list for sure.

Thanks
Ctefeh
 
If you are replacing the wheel bearings, machining the front internal spacer allows off the shelf 2RS bearings both sides.

A correct (16mm) width 2RS double-row bearing is available.

Confirmation on the circlip Mk111 wheel needed even though the wider bearing is on the off side.

Did I miss something as the front wheel in the photos is the pre-Mk3 (RH disc) lockring type?
 
A correct (16mm) width 2RS double-row bearing is available.


Did I miss something as the front wheel in the photos is the pre-Mk3 (RH disc) lockring type?

Not in Australia off the shelf unless you mean the DP china bearing (yes I have a set sitting on the shelf somewhere ) but elected to use known quality non chinese brands instead and the extra width is going to do no harm.
It is a half hour modification at best and from the factory the hub is bored to a depth to suit that 17.5 mm bearing having a 1.5 mm ish space under the stock bearing with wider spacer to suit.
That is on a pre Mk111 wheel.

The OP said he has a Mk111 (with pic) and the two wheels shown are at least showing a cush drive rear.
It must have a pre Mk111 front wheel in backwards then ?

As far as the topic of the bearings it might not matter.
 
Last edited:
Not in Australia off the shelf unless you mean the DP china bearing (yes I have a set sitting on the shelf somewhere ) but elected to use known quality non chinese brands instead and the extra width is going to do no harm.
It is a half hour modification at best and from the factory the hub is bored to a depth to suit that 17.5 mm bearing having a 1.5 mm ish space under the stock bearing with wider spacer to suit.

Yes, although I'm perfectly content to continue using a standard bearing and grease seal.

The OP said he has a Mk111 (with pic) and the two wheels shown are at least showing a cush drive rear.
It must have a pre Mk111 front wheel in backwards then ?

The rear wheel is certainly Mk3 but the front looks like a pre-Mk3.
 
In the intervening years I have done various things. I dismantled the gearbox and sure as eggs found the nasty Portuguese bearing sitting inside the housing wearing an admirable split
in the shell between it and the larger bearing. Also - despite low miles (6 odd thousand), 2nd gears were toast. I sprung for a new GB shell and full set of C/R gears, with kickstart on 1st from RGM.
Also got a full bearing kit, gaskets etc. I have a magazine article (old school back in the day - think internet explorer just went to version 3 and choked the Mac I had use of) that detailed a how-to
so I did and wound up with a reco gearbox. Speaking of Loctite 262 - the upper and lower mount bolt threads were literally dipped in it. No fun at all getting them undone. I then (after that experience) relied
on applying heat before I tried others that showed any red staining.

The frame (above) had that Earl's cooler fitted and I carefully removed it. The hoses etc were binned as well as they had gone quite hard. I also laid a small bead of weld where the original tank had been.
This motor must have been very bad for vibrating stuff loose as the oil tank tried pounding the frame and the bottom mount was fractured and repaired and fractured again (PO). I also removed the front
tubes oil tank bracket (not all the way) as the carbs interfered. Speaking of that - I fitted Dellorto angled cable adjusters as the straight spigots were terrible for cable routing. The frame, swing arm, isolastic mounts, bottom fork legs, external primary cover and timing side cover (as piccie above) were all powder coated after a fair bit of suitable prep work and blasting followed by cleaning.

Tank & sidecovers went off for painting as per original colours (Black with Gold Pinstriping <- he didn't use decals for the tank, just on the side covers).

Lots and lots of polishing, fitting up and removing of various bits & pieces and purchasing stuff ensued.

Now - 22 odd years later I do have a quandry or three. I had fitted a Mark3 Boyer. Will it last? I guess I'll find out but I'll need to sort my electrics out. These have been re-done/re-wired but am unhappy with
the result and I'll modify the harness from what I came up with.

By this time (about 2005) life interfered badly. Fast forward another 15 years and two houses, the bike is again on the rebuild agenda again. My wife and I were discussing when we should retire and that sparked me into action. I want to see the bike up and running again at least one more time.
I have been riding a Mark 3 for about the last 18 years and the main thing that stands out in your rebuild, is your chose of ignition box. Save yourself a lot of pain and change the mark 3 Boyer for an updated ignition, such as a Mark 4 Boyer , last generation Tri-spark , or Panzon . The Mark 3 Boyer really screws up the advance timing when the battery voltage drops below 10 volts , this will in turn destroy your starter sprag clutch. Also use a good strong AGM battery along with upgrades in the starter cables. When you have all the upgrades done , you will have a very dependable bike.
 
@L.A.B & Timewarp - the wheel was positioned for the photo op - not in the running position. After all these years, I only fit qual bearings - if the supplier can't supply at least an NTN (Japanese) bearing - I'll order one from the UK.

@grandpaul - yeah, it was a looker - but a heartbreaker too...

@Deluxe 60 - I have seen the posts about the Boyer MK111 all over the forum. Given I am a bit of a way from having it start - just something else to keep in mind. Starter bit's and pieces won't be fitted back when the primary is finally buttoned up. I figure I'll keep it (Boyer) through the first starts just to get things going. I also think I'll be trying for Club Rego. The engine/cam/carb combo is not the best for city riding.
 
@L.A.B & Timewarp - the wheel was positioned for the photo op - not in the running position. After all these years, I only fit qual bearings - if the supplier can't supply at least an NTN (Japanese) bearing - I'll order one from the UK.

I think the query was the wheel itself.

Does it have a threaded retaining ring (pre Mk111) or a circlip (Mk111)

I doubt it would happen myself, but a retainer ring might undo in use when used on a Mk111 (hence the circlip) with the wheel reversed.
 
@L.A.B & Timewarp - the wheel was positioned for the photo op - not in the running position.

This photo shows the front wheel in the running position for a Mk3 with the disc on the left but appears to be a reversed pre-Mk3 wheel? Mudguard/fender is also pre-Mk3 as it has holes for a front stay.
So, star of this show. The MK111 was a California import missing its mufflers. Did it start? Yes - but kicked back ferociously. Here's a partly disassembled shot :

850 BucketList rebuild
 
L.A.B. - Please explain? What is it you are looking at, and for me anyway - when I get it back, what am I looking for? I know nothing of it's past history - the yokes & fittings are MK111 - but are the fork legs incorrect to your eyes?
 
L.A.B. - Please explain? What is it you are looking at, and for me anyway - when I get it back, what am I looking for?

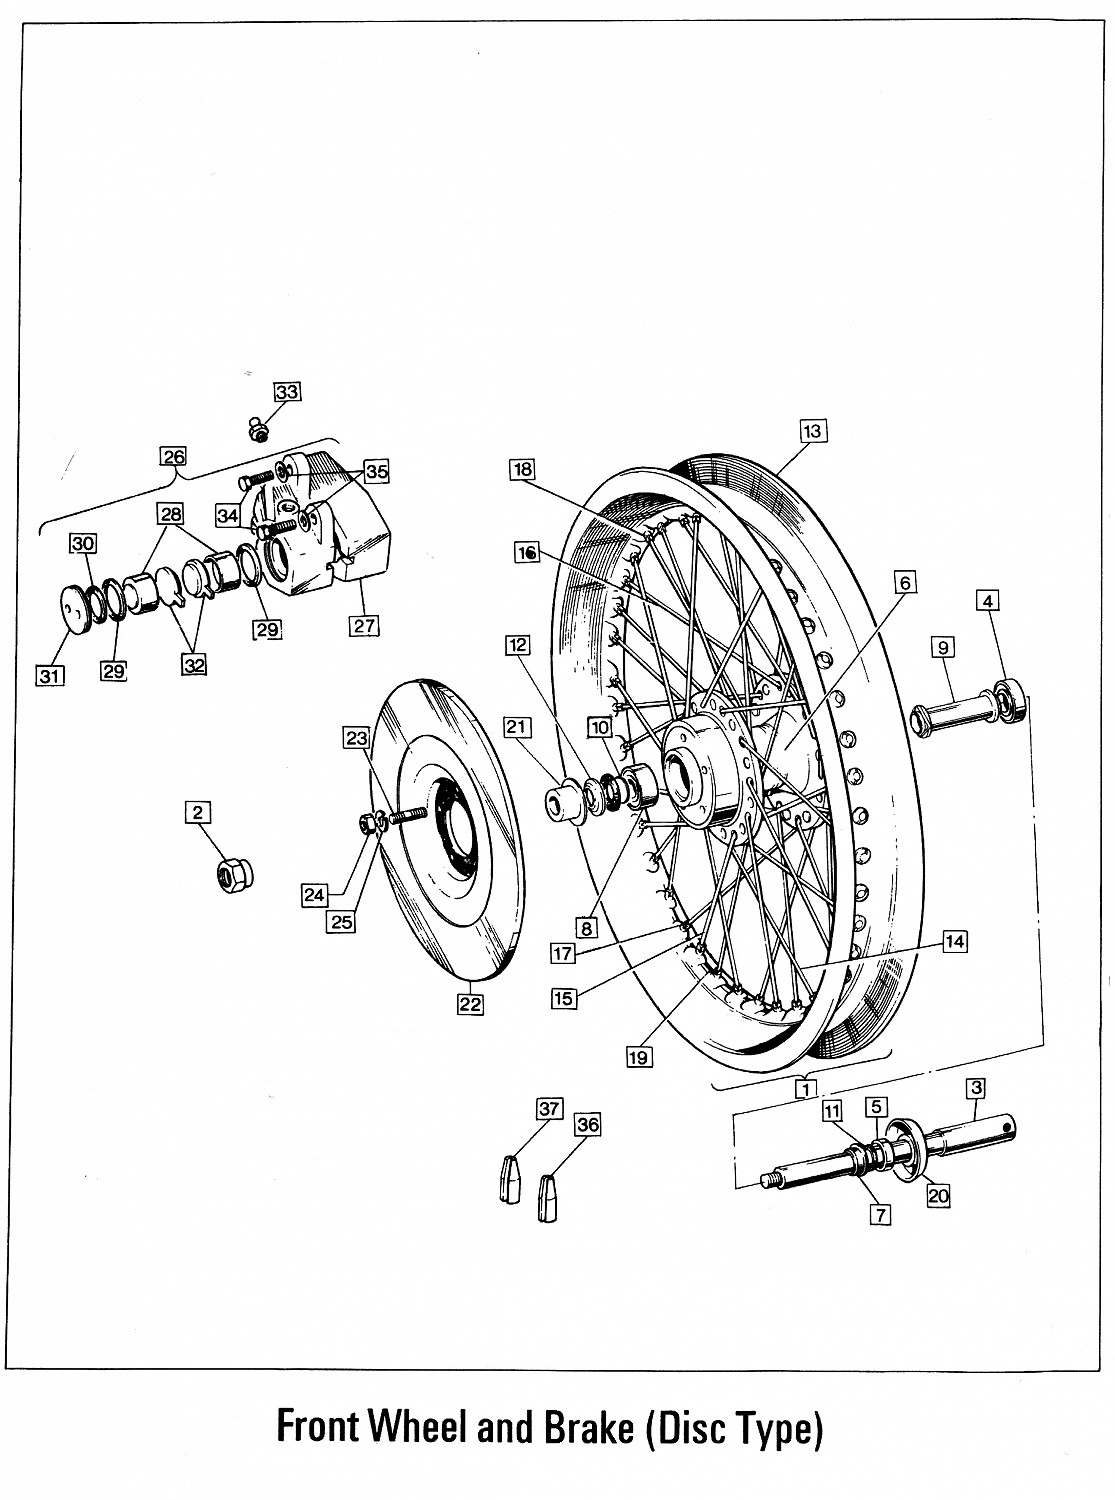
Moving the disc over to the left-hand side on the Mk3 didn't simply involve turning the wheel assembly around as it required a modified hub with a circlip bearing retainer instead of the previous threaded lockring so pre-Mk3 (062867) and Mk3 (066064) front hub assemblies are not the same.
Pre-Mk3

Mk3


If a pre-Mk3 wheel is reversed (and forks) placing the disc on the left-hand side then there's a possibility that the lockring could loosen.
Also although of less importance is the spoke pattern is different between pre-Mk3 and Mk3 wheels.
 
Last edited:
Ahhh...I see, sorry guys must have been everyone posting. When I get the wheel back I'll check whether it's a retaining ring or circlip. I notice now the front guard, which got replaced years ago. Checking my workshop manual - the fork drain holes appear reversed.
 
Checking my workshop manual - the fork drain holes appear reversed.

Yes, the factory simply reversed the existing forks/sliders on the Mk3 due to the brake change so the Mk3 spindle is inserted from the right and the drain holes are at the front.
 
Back
Top