750 Crankcase Deck Height?

TJBaker57

VIP MEMBER
Joined
Jul 5, 2025
Messages
96
Country flag
Try as I might I have not been able to find any published dimension for the factory height of the crankcase deck where the cylinders mate up.

In other words how would one determine, by measurements, if a set of crankcase halves had been previously machined, altering the height of the deck?

Thought I may have found a good source in a post on October 14 2025 in this thread below. But I cannot pin down the deck height in what looks to be a factory blueprint.

 
I recollect someone asking the very same question a while back. Was it you?

Why don't you have your cases measured by CMM? One pivotal question is, how do you set a plane of reference?

- Knut
 
Last edited:
I recollect someone asking the very same question a while back. Was it you?

Why don't you have your cases measured by CMM? One pivotal question is, how di you set a plane of reference?

- Knut

Nope, Not me, or at least I don't remember doing so !!

The fellow in the referenced thread used references of the camshaft and crankshaft centers. But he wasn't looking for deck height. Though he was preparing to skim the deck.

The drawing someone there sent to him gave him what he needed.
 
Perhaps it would, if you can be absolutely certain nobody had machined/altered the barrels.
It’s very easy to measure the barrel height to confirm that.

Seeing as the actual importance of deck height is the piston position, I’d suggest assembling and measuring to be the best method, especially in the absence of specific data points to check against and a CMM to check them with.
 
Inspection of the deck for machining would be the first clue to whether it had been decked, a test assembly would be easier than taking measurements against unknown datum points. The likelyhood of it being decked is low, its is not included in the Factory Tuning notes, reducing the head thickness is as it running without a barrel base gasket.


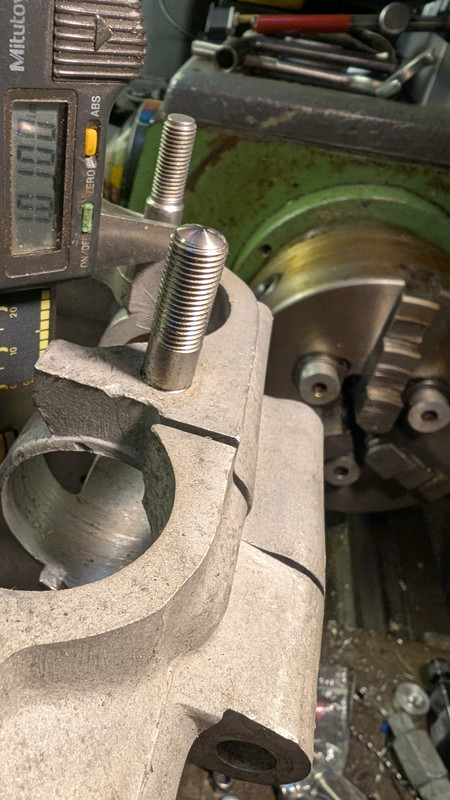
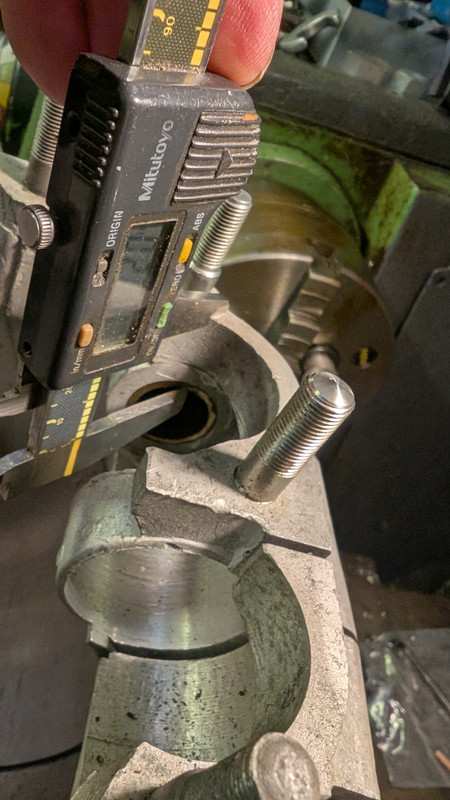
I took one measurement on an unmolested set of 70 cases between bore of bush and top of deck on the driveside, the calipers could not get into 90 to the bore so the reading will be slightly higher than the real figure but when you check you will no doubt be in the same position.

Reading is 1.0100"

750 Crankcase Deck Height?


Angle of caliper

750 Crankcase Deck Height?
 
Two test bars needed. One to take the place of the crank shaft with a diameter of the inner races (or if the bearings are removed from the case a bigger one with a diameter of the outer race) and another to replace the camshaft with a diameter of the cam journals. Then measure from the test bars to a straight edge clamped to the base flange face using gauge blocks (sometimes called slip gauges or Johansen blocks) Do this at each end of the bars as close to the inner wall of the crankcase, quite fiddly to do with the cases bolted together but it is accurate and will tell you how true the flange face is to the crank/cam. Deck height is taken care of by either machining the head face or adding/subtracting base/head gaskets. Getting the crank/cam axis truely parallel to the base flange face is only really relevant if you are chasing every last fractions of horse power. These engines will run quite happily as they are.
 
Last edited:
Inspection of the deck for machining would be the first clue to whether it had been decked, a test assembly would be easier than taking measurements against unknown datum points. The likelyhood of it being decked is low, its is not included in the Factory Tuning notes, reducing the head thickness is as it running without a barrel base gasket.


I took one measurement on an unmolested set of 70 cases between bore of bush and top of deck on the driveside, the calipers could not get into 90 to the bore so the reading will be slightly higher than the real figure but when you check you will no doubt be in the same position.

Reading is 1.0100"

750 Crankcase Deck Height?


Angle of caliper

750 Crankcase Deck Height?
I'm intrigued with the three 'buttons' between the jaws of the chuck on your lathe. is that so you can hold thin parts true with having to use a D.T.I. ?
 
I'm intrigued with the three 'buttons' between the jaws of the chuck on your lathe. is that so you can hold thin parts true with having to use a D.T.I. ?
I picked it up off of Youtube,

It was from this channel


This is the video


Its to improve parallelism on 3 jaw chucks when facing both ends.
 
Stock cylinder height varies from 4.542 – 4.553" on iron 750 to 4.555 for Maney. Call it 4.55" for all.
750 std pistons protrude .050 to .055” above cylinders with no gaskets. Call it .052"
piston protrusion plus cyl height = 4.602"
750 std piston compression height 1.54"
stock rod length 5.875"
rod length plus compression height = 7.415"
89mm stroke divided in 1/2 = 1.752"
If these specs are correct then you can calculate the case deck height.
 
Crank center to case deck according to calculatios shown above comes out to 4.565"
Actual measurement of an Atlas case comes out to 4.575"
 
Thank you kindly for all the suggestions and details.

I was sort of hoping someone had access to factory drawings that documented the dimension used in manufacture. I took another look at the image contained in the web post I referenced and the dimension may indirectly be there.


There in that image someone has cloud-bubbled a dimension of 4.187 from the crankshaft centerline to the center on a 3/8 case fixing stud. That case fixing stud location has a detail showing a radius of 0.375 that appears to be to the deck height ??

Adding those two yields 4.562"

On my cases I made measurements twice several weeks apart. The first time I used a digital caliper to measure from the deck surface down to the top of the crankshaft bearing bore (bearing removed). Then I measured the same bearing bore OD and added half that to the first measurement to arrive at a deck to crankshaft centerline value.

Some weeks later I acquired some micrometers etc. and decided to attempt measuring the same thing. I forgot all about having done it previously with the caliper so the second test is relatively independent of the first test. I used a micrometer, a surface plate, some reference blocks etc. to do the measuring.

The 2 measurements I got varied by 0.0014" so I think I got as good a measurement as I can get with limited equipment.

My average value for the distance from crankshaft centerline to my case deck height is 4.5603".

That's just 0.0017" less the figure I get from the engineering drawing linked above, assuming my interpretation of that drawing is correct.


Now then,,, WHY am I fixated on getting a factory dimension for comparison?? Some may recall in my thread about resurrecting a 1972 Combat Commando Interstate I discovered the my 2S camshaft intake lobes had at some time made contact with the skirts of the tappet tunnel bores. Nothing else could make these marks.

It was confirmed that the camshaft intake lobes indeed made contact if the camshaft was rotated by hand when the cylinder barrels were installed without a gasket. The contact was strong enough to prevent hand rotation of the camshaft once contact was made. Otherwise the camshaft rotated freely.

20250808_172319.jpg
20250808_172328.jpg


How can this be possible??

(A) someone decked the crankcases.

(B) Someone machined the cylinder barrel base gasket surface.

(C) Some required factory machining of these cylinder barrel tappet skirts was not performed.

(D) Camshaft bore misplaced (seems highly unlikely)

Edit: The link(s) seem to fail more often than not so I attached the drawing file locally here.

750 Crankcase Deck Height?
 
Last edited:
Thank you kindly for all the suggestions and details.

I was sort of hoping someone had access to factory drawings that documented the dimension used in manufacture. I took another look at the image contained in the web post I referenced and the dimension may indirectly be there.

TJBaker57,
Please be aware that the picture shows an M3 engine, and the drawing appears to originate at Plumstead, which means it may or may not be valid for a Commando 750, or an 850, and certainly not an 850Mk3. I have detected a measurement inconsistency in this drawing, which may date back to tooling for the Atlas engine in 1963.

As deck height is a dependent variable, the deck can't form a reference plane, so my question remains, where and how do you set a plane of reference? If the bottom of the crankcase had been machined, it would have made a perfect plane of reference. Unfortunately it is not. The technician creating the drawing thought the lower bolt centers could form a plane of reference, but they are too inaccurate in manufacture for their centers to serve as plane of reference. Lack of a proper plane of reference may explain the deviation in deck height observed, although I would like to add that I have just assembled a non-matching set of M3S / # 137xxx cases where deck height matches very well.

- Knut
 
@TJBaker57 I just emailed you all the numbers to check to see if the crankcase has been decked

@mdt-son I took apart a Combat engine only about 400 away from his and measured the crankcase deck where the cylinders sit to the lobes of the 2S cam with each lobe straight up. That's the only reference needed for his issue. I doubt that the crankcase has been decked as that would cause other things like the pistons being too high, but I do come across weird stuff pretty often. I don't see any way that he has the problem that he reports, but he has tried really hard to document it so there's something odd there. Basically, the cam hitting the pushrod tunnel where the cam not should even align.
 
Simply measure from the case deck to the top of the oil seal recess on the outside of the Left case with a caliper. Then add .875" Tell me what you get and tell me which model case it is.
 
Simply measure from the case deck to the top of the oil seal recess on the outside of the Left case with a caliper. Then add .875" Tell me what you get and tell me which model case it is.

I don't have the cases right now, they are with Jim Comstock.

These cases are a 1972 750 Combat S/N 208482.


How can this be possible??

(A) someone decked the crankcases.

(B) Someone machined the cylinder barrel base gasket surface.

(C) Some required factory machining of these cylinder barrel tappet skirts was not performed.

(D) Camshaft bore misplaced (seems highly unlikely)

I just emailed you all the numbers to check


And the answer seems to be..... based on numbers @marshg246 emailed me...

Option (C) above!!

My cylinder barrel tappet bore skirts extend further below the deck into the cases considerably further than the engine greg has measured.

One example is where gregs skirt extends 0.573" below the deck mine goes down about 0.709".
 
The 2S cam has a higher lift than the stock cam. When installing an Atlas cylinder on my 1972 Combat, the 2S camshaft lobes hit the bottom of the tappet bores, just as you were describing. It was a simple matter to remove a small amount of material from the bottom of the tappet bores. It does not need to be done precisely. I may have used my mill, but it easily be done with a hand held grinder.

You may want to add a couple more possibilities as to why your engine displays contact marks.
E). Assuming the original cases, cylinder, and cam, inadequate clearances were machined at the factory.
F). The cases, cylinder, or cam were changed later and the tappet bores were not machined.

Meanwhile, back in the real world, it probably doesn't matter. Get out the grinder. It's a 5 minute job.
 
The 2S cam has a higher lift than the stock cam. When installing an Atlas cylinder on my 1972 Combat, the 2S camshaft lobes hit the bottom of the tappet bores, just as you were describing.
Good point. on the base of the cylinders it should say Birco and there should be a string of numbers - what are the numbers. I don't know if the Atlas and Commando had the same castings so the number may be the same for both buy it's worth a look. I'll check my cylinders when I get to the shop later today.

Sort of like my nightmare when I was working on a Commando that had an Atlas crank and I didn't know it - the rotor woodruff key slot is WAY off in an Atlas from a Commando so I could not get the timing marks to even come close to aligning until I changed the crank.
 
If you're going to mill the case deck the most important thing is to correct the desaxe it so the centerline of the bore intersects the centerline of the crank. Its backwards as stock and that creates more stress, piston skirt wear and vibration. Better yet to mill it so the cylinder centerlne lands one or two mm in front of the crank centerline.

750 Crankcase Deck Height?
 
Back
Top