Inner Primary,Clutch shims.

Status
Not open for further replies.
Joined
Oct 10, 2018
Messages
153
Country flag
Have looked long & hard for this answer guys.Cant seem to find a definitive answer.Im paranoid about firing the old girl up, and the chains foul on primary case.
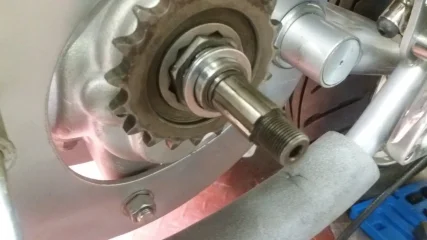
Ok Please see picture.Without those two shims, the inner primary, doesnt sit nicely.With them it does.I presume Ive got that right.Pic 1.
So inner primary installed,I then fit spacer(with recess inboard).
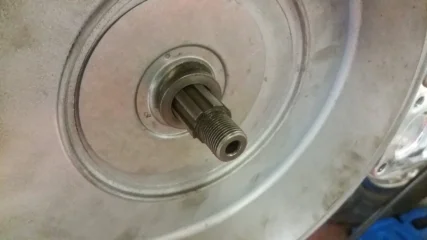
Do I require any shims next to spacer? If not how do I assure that chains do not foul inner primary case? Pic 2.
I have two shims next to spacer on stator/engine shaft.
 

Attachments

  • Inner Primary,Clutch shims.
    shims 006.jpg
    103.6 KB · Views: 795
  • Inner Primary,Clutch shims.
    shims 007.jpg
    91.6 KB · Views: 822
you need to take shims OFF
put primary on, felt seal slips over smooth sleeve gear shaft

install clutch location circlip 060752 in groove (might be there in pix 006) at end of splines
then put clutch location spacer 060747 hardened washer with counter bore fitting over 060752

then clutch basket
do sprocket alignment
then shims if needed they fit behind clutch basket
 
Last edited:
Without those two shims, the inner primary, doesnt sit nicely.With them it does.I presume Ive got that right.Pic 1.

As dynodave says the shims do not belong there.


Do I require any shims next to spacer?

Yes. Edit: NOT those in the first photo.

https://andover-norton.co.uk/en/shop-drawing/207/chaincases-chains-sprockets-clutch-alternator

[53] Clutch cirlip, [54] Spacer, [55] Shim, [56] Shim, Clutch.

If not how do I assure that chains do not foul inner primary case?

Shim [11] the primary case stud [8] as required.
 
You shouldn't have any shims on the 4th gear sleeve. (If i see the first l/h photo right), nothing but the sprocket the sprocket lock washer retainer with screw and the gearbox sprocket nut. And make sure the gearbox sprocket spacer is in place before you put the sprocket on.
Cheers,
Thomas
 
Thanks guys.Strange Those shims were on bike somewhere when I stripped it? Ive 4 shims that fit the engine shaft.None for gearbox,ones i have are slightly smaller. However, the reason bike broke down in 1972,(and hasnt run since) was due to gearbox mainshaft bolt failing,which lead to it stripping and losing drive.
Ok So its two shims on engine shaft & two if required on g/box shaft got it!
 
coomo,
When you say "on the bike somewhere" are you sure they were there?
pretty sure.They were replated.So they must have come from bike.They are perfect fit for gearbox shaft.However, they may have been fitted in distant past by some erstwhile mechanic?
 
pretty sure.They were replated.So they must have come from bike.They are perfect fit for gearbox shaft.However, they may have been fitted in distant past by some erstwhile mechanic?
This is what I am thinking.
What year Commando? If its a mk3 then L.A.B. or dyno take it from here as my experience with the 1975 is limited and a guess at best.
Thomas
 
Bike left factory in May 1970.750 Roadster.Gearbox mainshaft thread stripped about 2 years later.Hasnt run since.
 
pretty sure.They were replated.So they must have come from bike.They are perfect fit for gearbox shaft.However, they may have been fitted in distant past by some erstwhile mechanic?

Possibly rear Isolastic shims?
 
This is what I am thinking.
What year Commando? If its a mk3 then L.A.B. or dyno take it from here as my experience with the 1975 is limited and a guess at best.
Thomas
Hey Thomas
I knew it was a 68/69/70...no centerstand hole just to rear of bottom tranny bolt. In the last two weeks I've had a high intensity crash course on TTR commando's.:eek:
 
Hey Thomas
I knew it was a 68/69/70...no centerstand hole just to rear of bottom tranny bolt. In the last two weeks I've had a high intensity crash course on TTR commando's.:eek:
Well I saw the Fig. C46 (MkIII) and wasn't too sure, so I backed off. Plus you are correct in your keen eyed assessment.
 
coomo,

back to your first question.

Here is how I would approach this job assuming nothing is bent or damaged from accidents.

  1. Make sure that you have the spacer for the upper lug of the gearbox, part-no: 03.0023 and it is in the correct location. Inside of the engine/gearbox cradle on the portside upper lug. Believe me, I have seen rebuilds that had this spacer on the outside at the lollypop adjuster under the bolt. Correct if not.
  2. Tighten top and bottom gearbox bolts to spec and engine through nuts/studs. Worry about the primary chain slack latter.
  3. You need to do a dry fit of the inner primary to make sure it is parallel with the crankcase-mating surface. Use part-no: 06.0711 chain case to engine gasket, dry for now. With the part-no: 06.0376 chain case center stud in place with the plane washer part-no: 60.2322. Now dry fit the inner Primary case using the three fixing bolts with the tab washers but don’t bend the tabs to lock the bolt heads.
In order to not influence the inner primary from movement when other components are tightened up, Measure the gap with a feeler gauge to get the inner center stud shimmed correctly with a feeler gauge. Take up any gap with the correct amount of shim washers to the crankcase center stud , part-no: 06.0399 once you got that correct, then carry on and apply your favorite Wellseal or Hylomar to the gasket, bolt up to spec and pull up the tabs on your lock plates. Blue Locktite is your friend, and then turn your attention to dealing with the rest of everything inside the inner primary, once you fit the new felt washer to the inner chain case sealing disk in first.
 
Hey Thomas
I knew it was a 68/69/70...no centerstand hole just to rear of bottom tranny bolt. In the last two weeks I've had a high intensity crash course on TTR commando's.:eek:
Hi Dave,
Forgive my ignorance but what is a TTR Commando?

Ed
 
coomo,

back to your first question.

Here is how I would approach this job assuming nothing is bent or damaged from accidents.

  1. Make sure that you have the spacer for the upper lug of the gearbox, part-no: 03.0023 and it is in the correct location. Inside of the engine/gearbox cradle on the portside upper lug. Believe me, I have seen rebuilds that had this spacer on the outside at the lollypop adjuster under the bolt. Correct if not.
  2. Tighten top and bottom gearbox bolts to spec and engine through nuts/studs. Worry about the primary chain slack latter.
  3. You need to do a dry fit of the inner primary to make sure it is parallel with the crankcase-mating surface. Use part-no: 06.0711 chain case to engine gasket, dry for now. With the part-no: 06.0376 chain case center stud in place with the plane washer part-no: 60.2322. Now dry fit the inner Primary case using the three fixing bolts with the tab washers but don’t bend the tabs to lock the bolt heads.
In order to not influence the inner primary from movement when other components are tightened up, Measure the gap with a feeler gauge to get the inner center stud shimmed correctly with a feeler gauge. Take up any gap with the correct amount of shim washers to the crankcase center stud , part-no: 06.0399 once you got that correct, then carry on and apply your favorite Wellseal or Hylomar to the gasket, bolt up to spec and pull up the tabs on your lock plates. Blue Locktite is your friend, and then turn your attention to dealing with the rest of everything inside the inner primary, once you fit the new felt washer to the inner chain case sealing disk in first.


Thanks for that.Yes I also missed out the spacer! Had to strip down and refit today.Its all buttoned up now.All seems well!
 
Last edited by a moderator:
Great Stuff. Remember that the torque value for the Clutch fixing nut should be reduced to about 45-50 ft/lb when you install a new 06.0752 Clutch location circlip. Section C34 .13, calls for 70#s but its too much so use blue loctite and 50#. Or you can use the MkIII starter Circlip Item 06.8702....These are a bit too wide so... https://andover-norton.co.uk/en/shop-details/17464/circlip
...YOU will have to do some elbow work with a granite plate or glass plate and 180 grit sandpaper doing a circle of 8 pattern to remove a few thousandth of and inch, until you can get it to fit into the groove of the mainshaft. You can do a search here on the forum for that mod.
https://andover-norton.co.uk/en/shop-details/17381/washer-nm24948-21-7024-
These star washers are a "one shot deal" and don't be tempted to reuse your old one. I buy them 1/2 a dozen at a time as I need. Remember loctite 243 is you friend. Keep Calm and Carry On as they say.
P.S. You may look into Belleville washers for the Rotor and the clutch fixing nut. Again search or contact comnoz here a forum member.
Cheers,
Thomas
 
Last edited:
Thanks.Yes I recall reading about torque values.I bought myself a new torque wrench just for the job.Locked it up, and went to 40lbs.Doesnt seem much, but my "Is it going to strip?" paranoia began!
The circlip etc, was fitted by my engine builder,so that was all good.He will inspect my work prior to getting her fired up.Glad its starting to look like a bike.
 

Attachments

  • Inner Primary,Clutch shims.
    nort build 002.jpg
    172 KB · Views: 494
Status
Not open for further replies.
Back
Top