Tools You Have Made to Maintain your Norton

This suggstion is more about identifying "Special Norton" tools so they're easier to find.
I use white self-amalgamating tape - and only on Norton tools - stops them getting lost among other tools.
Here's:
1. 11/64" drill bit for adjusting vernier iso's
2. 9/16" slim pushbike spanner for that "difficult" LH lower rear shock bolt head.
3. Shortened allen key for tensioning screws holding Comstock/cNw rear reed breather (close to gearbox)
Cheers
Rob
No.2 was helpful. So, yesterday I hacked down one of my bicycle pedal spanners and slotted it in behind the chain guard to nip the shock bolt up. Thanks.
 
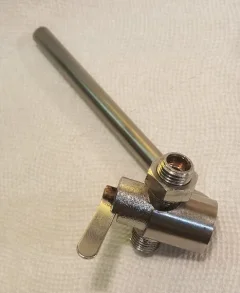
Received my custom made petcock holding tool.
Thank you Erik.
It works a treat, highly recommended

20210923_191220.jpgTools You Have Made to Maintain your Norton
 
Last edited:
Chain lube/rear wheel cleaning tool-

2pcs of 4"x4"x3/4" plywood. With bike on center stand push bike from the side to lift one leg off the ground and slide piece of wood under center stand with your toe. Go around to the other side and do the same. Wheel is now high enough off the ground to freely spin.
 
Tools You Have Made to Maintain your Norton


Opened up rear brake drum.
I use it to check the brake, like when installing new brake shoes.
Jan,
Not to sound stupid but what are you looking at with this tool?I have replaced a new drum and shoes and the brake is marginal at best.Backing plate is straight and I align the axle using the method in the manual. I know the brake worked better when new.Is it a matter of arcing the new shoes to the drum?Al spacers,bearings,etc are in properly.Thank you for any help
Mike
 
.. what are you looking at with this tool?I have replaced a new drum and shoes and the brake is marginal at best.Backing plate is straight and I align the axle using the method in the manual. I know the brake worked better when new.Is it a matter of arcing the new shoes to the drum?Al spacers,bearings,etc are in properly.Thank you for any help
Mike

When actuating the brake lever, you can see where the shoes are (not) touching the drum:

Tools You Have Made to Maintain your Norton


I made my rear brake hydraulic operated with self-centering, floating shoes.
It makes it a stronger and more consistent brake.
 
Last edited:
When actuating the brake lever, you can see where the shoes are (not) touching the drum:

Tools You Have Made to Maintain your Norton


I made my rear brake hydraulic operated with self-centering, floating shoes.
It makes it a stronger and more consistent brake.
Thank you.Much appreciated
 
When actuating the brake lever, you can see where the shoes are (not) touching the drum:

Tools You Have Made to Maintain your Norton


I made my rear brake hydraulic operated with self-centering, floating shoes.
It makes it a stronger and more consistent brake.
But doesn't the back plate & drum actually need to be mounted onto the Spidle to achieve this....yes the brake shoes will centralise themselves in the drum, but without the central shaft (spindle) i don't see how this could work as the back plate assemble could be way off centre when the shoes are against the drum
 
olympus:
the drum is centered on the dummy spindle by its bearing, but the brake plate is a sloppy fit.
That's why it is common practice to apply the brake while tightening the nut.
It helps to center the shoes, but it is in no way a guarantee that the shoes contact the drum over their full arc.
That can only be checked visually.
 
When actuating the brake lever, you can see where the shoes are (not) touching the drum:

Tools You Have Made to Maintain your Norton


I made my rear brake hydraulic operated with self-centering, floating shoes.
It makes it a stronger and more consistent brake.
I seem to recall that you did a disc rear brake Ludwig? Is this on another of your bikes then?
 
Glad you like it. You'll use it every time you R&R the tank......which is often. I have 4 more if anyone wants one.
 
I would be happy to but the shipping is $69 to Australia and only $20 to NZ. Something unusual the Australians require in shipping.
 
USPS has announced in the last few days that they have for the moment stopped accepting post to NZ, due to shipping difficulties. Perhaps they are now only offering courier costs rather than post?
 
This one is really simple - make 2 and they're very handy for extracting clutch plates. They're also strong enough to "pull" through the friction plates to the steel plate behind.
Just the very strong magnets from the reading heads of a dead hard drive - with ferrous bolts magnetically "stuck" to them to act as handles.
A picture says a thousand words, so...
Clutch plate extractor.JPG
 
This one is really simple - make 2 and they're very handy for extracting clutch plates. They're also strong enough to "pull" through the friction plates to the steel plate behind.
Just the very strong magnets from the reading heads of a dead hard drive - with ferrous bolts magnetically "stuck" to them to act as handles.
A picture says a thousand words, so...
View attachment 82146
I have a few of those hanging around as tool stickies, now I'll repurpose them as clutch plate extractors when needed. Thanks for the idea!
 
A tool I have that is very handy when servicing the bottom left shock mount on a Commando is an eBay $15 free ship,
Capri Tools Super-Thin Open End Wrench 1/2 x 9/16.
Just grind the 9/16 end to fit the chain guard pocket.

20200905_183349.jpg
 
Back
Top