RRussellTx - 1974 Commando 850 Project

Mine was built a month before yours. All looks familiar. Be sure you can still get the herringbone oil lines before you trash yours. They actually last a long time and may well be ok. Agree with the keep the original paint even on the frame just do touch ups. It is only original once!
 
My first resto was a MkIIA which looked identical to yours, except for the aforementioned plastic airbox and different 2nd gear ratios.

My humble contribution:
One essential mod - gearbox layshaft bearing.
The originals collapse due to being under-specified for the job. Layshaft flex causes the bearing cage to disintegrate, leading to a lock-up.
A lot of folks opt for a roller bearing upgrade, which requires shims to manage end-float, but my preference is for a 6203TB bearing, which is a drop-in replacement.
It allows some flex without the cage falling apart.

Other 'almost' essential mods:
Upgrade the front master cylinder by either sleeving down from 5/8" to 1/2" (or 13mm), or replacing with a 13mm. lots of sources, including new 'correct' ones from Andover-Norton.
Transforms the front brake from 'very '70s' to modern standards of stopping power.
Electronic ignition - as already said. Pazon is a good value product, others are available.
Reed valve breather - google XS650 reed valve for a cheap, fit for purpose valve. Other, more sophisticated ones are available.

The engines are great as standard, the clutch is the best one ever fitted to a Brit bike, and set up right it's a two-finger pull.

Parts aren't too expensive, and there's pretty much 100% availability. If Greg doesn't have it, direct from Andover Norton would be the way to go

If you can keep the original paint it would be great, but the original colours aren't as elusive as some folks think. Here's mine (and my first attempt at a metalflake paint job, which was an exact match when compared to an original sample):


Second gear ratios were the same on 2 and 2A. Both changed at same time for noise tests.

According to Norton White. Page 113 the second gear pair was changed in late 1973 from engine no 306591.

I agree with all the other upgrades you recommend and might add upgrading the top isolastic mount under the tank. I use a Dave Taylor headsteady but several are available. Makes a big difference to handling stability.
 
Last edited:
Second gear ratios were the same on 2 and 2A. Both changed at same time for noise tests.

According to Norton White. Page 113 the second gear pair was changed in late 1973 from engine no 306591.

I agree with all the other upgrades you recommend and might add upgrading the top isolastic mount under the tank. I use a Dave Taylor headsteady but several are available. Makes a big difference to handling stability.
Yes, I fitted a Dave Taylor head steady to mine too.
An upgrade to vernier isolastics would also be beneficial if the originals are perished, which is likely.
 
The slotted pistons were on the 750 only, it was sorted before the 850 came onto the scene.


From ZFD owner of Andover Norton,

The "dangerous" Hepolites were for 750s, and the downward slots on these are joined by a horizontal slot each side that runs behind a piston ring (easy to see looking into the piston). these are fit only as ashtrays, but they haven't been made since the early 1970s.
 
Out of interest, what kind of build are you going for? Stock, resto mod, etc ?

Initial Primary objective is to get it back to where it was in those original photos.
Step one is to break everything down and see what I'm up against.

Main areas of initial concern:
- Getting the Engine and Transmission figured out. It had 8500 miles when it was parked so I'm hoping for the best.
- Then see how much I can clean up to an acceptable level. Main concerns at this point are the Wheels, Forks and finding a good chrome shop.

After I get past these concerns, I'll know more and be able to assess my budget, vision and commitment.
 
Apart from the footrest arms & rear brake pedal, in the UK at least, it's cheaper buying new than getting stuff re-chromed. It may be different across the Pond
 
Apart from the footrest arms & rear brake pedal, in the UK at least, it's cheaper buying new than getting stuff re-chromed. It may be different across the Pond
Actually, all the places I've checked in the US want more for footrests and rear brake than buying new! Rims as way less new.
 
@RussellTx I sent you a couple of PMs with info. @marshg246 (Greg) should be able to fix you up parts-wise.

I recommend you Private Message @L.A.B. and have him move this thread to the Member Projects section.

Looks like you have a good 'un on your hands! "Should buff right out"
 
Good luck. The Blue Commandos are almost as fast as the Red Commandos. :)

Set aside $10KUS for restoration and see how much of it is left at the end. Could be a bunch, could be very little depending on how far you want to go.

A classic car guy shouldn't have any trouble rebuilding a Norton engine or gearbox. Have fun and get ready to buy some new tools.
 
Set aside $10KUS for restoration and see how much of it is left at the end. Could be a bunch, could be very little depending on how far you want to go.

I appreciate the ballpark! Fortunately, my budgeting mentality is more like someone with a weekly golf game - I don't mind dumping money I'll never get back on a hobby. I'll spend what I can without getting in trouble and just wait a few weeks if I get too crazy. I enjoy the process so it's worth the money for me.
 
Got some more work in today. Still waiting on multiple tools but I did get the Exhaust Locking tool I ordered.
I took a chance on the link below and the C32 is a perfect fit. At $15 bucks and free next day from Amazon Prime it worked out well.


After getting the Exhaust removed I realized that:

A. something was living in there with all the trash that fell out and
B. They created enough of a mess to eat through the exhaust so that goes on the 'Need new one' list...


Also, I'm starting to think you guys are a little sick...

First, the Air Filter Baffle that baffled me when I tried to figure out how to remove it.
Today, I dealt with the allen bolts that fasten the Carb spacer to the head. Had to ruin a perfectly good Allen wrench by cutting it down...
Also, the center allen bolt for the head steady is sending me to the tool store for another option as I have exhausted my box for something that will fit in there.

I was expecting some special tools like the clutch compressor but this is just hard to reach stuff...
Is the whole project going to be like this?

Anyway, having fun so far.

I also got the Admin to move the thread as suggested.

Thanks again for all the help!
RRussellTx - 1974 Commando 850 Project
 
Glad you got them off, but for a little more you could have had the correct tool. The one you bought is way too little to put the exhaust on correctly when you get there. One of the most terrible feelings on a Norton is having the exhaust roses (nuts) come loose while riding. Soon after coming loose the threads are destroyed in the head and you have an expensive repair on your hands!

BTW, most use the cut-down Allen wrench (it's the "official" way) to get the first inner screw out, but it can be done with a certain ball end Allen. What used to drive me mad now takes only 2-3 minutes to accomplish. Also, I don't even try to get the air cleaner off the "proper" way. I remove the carbs and then the air cleaner is simple.

These will get the carbs off and on: https://a.co/d/aOAJe9I
These are the only other Allen wrenches I use: https://a.co/d/3SvGPeD

There is a special tool for the center head steady Allen but it's a PITA to use. The Allen set above is all I use for the center one.
 
Those balanced pipes are hard to find new- especially ones which fit right.
If you're looking for replacements, just go with a set of the earlier type unbalanced pipes, which are readily available, although you'll need new exhaust roses with a longer thread (see below).
They have the advantage of not stripping out the exhaust port, which is a common problem on bikes with balanced pipes (i.e. every 850 I've had!).
If your exhaust roses have the blocked out fins your tool is fine, but some roses don't have them, so it's something to look out for.


Also, the center allen bolt for the head steady is sending me to the tool store for another option as I have exhausted my box for something that will fit in there.

Note that those three head steady fasteners are BSF (British Standard Fine) if you ever intend to replace them.

 
Note that those three head steady fasteners are BSF (British Standard Fine) if you ever intend to replace them.

Also, please buy the correct ones! I've seen too many bikes with stainless socket cap screws for those that are too short. Whoever is selling them is selling the wrong length and when too short the threads tend to strip in the head.
 
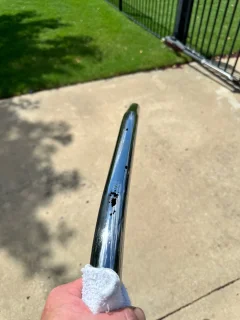
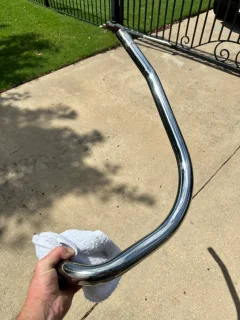
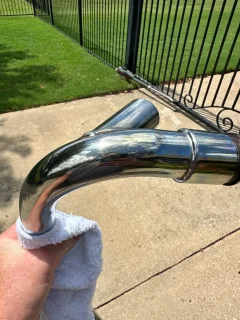
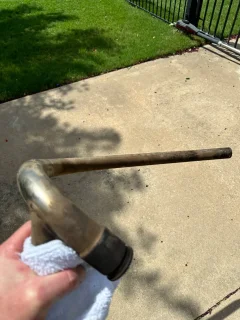
Got stuck needing a thin box end spanner to get the head bolts from the bottom side of the barrel so I switched gears to try out the WD40 and 0000 steel wool on the holy header. Figured I could not hurt it too much more.

Really surprised how well these cleaned up! The other side is also shown for comparison of how dirty they were.

How common is rust holes on the bottom of the exhaust headers? Might be an option to just call them drain holes.
We'll see what the rest of the tear down says.

Off to shop for more tools again...
 

Attachments

  • RRussellTx - 1974 Commando 850 Project
    IMG_8847.jpeg
    358.9 KB · Views: 47
  • RRussellTx - 1974 Commando 850 Project
    IMG_8846.jpeg
    507.7 KB · Views: 44
  • RRussellTx - 1974 Commando 850 Project
    IMG_8844.jpeg
    586.7 KB · Views: 44
  • RRussellTx - 1974 Commando 850 Project
    IMG_8848.jpeg
    521.5 KB · Views: 50
My trusty old Craftsman "L" key ball-end allen wrench set is the right tool for removing the carbs. 1/6 turn at a time, but it gets done.

Yes, mouse/rat pee is corrosive. I still remember blasting my first rat's nest out of some pipes on first start after getting an old rolling project running, sprayed stuff 20 yards out!
 
Just found this thread and I'm in.
Yes, we are sick and there is no known cure. Only therapy, which requires to obtain another one to work on.
And the cycle continues.
Not sure how far you are on disssembly, but pay good attention to spacers, washers etc.
Specifically the primary. Behind the rotor, clutch hub and the washers/spacers behind the inner primary case on the mounting stud.
These machines were manufactured with far looser tolerances than you're used too.
The term parts fitter fits these machines well. They are all a little different.
It's unusual for a Norton to lock up it's engine.
What is not unusual is for the Layshaft bearing in the Trans lets loose and locks everthing up.
There was a time when a 'Portugal' bearing was being used. Yours fits the timeline.
Search layshaft bearing and get scared spitless.
Here's one thread.
When you finally get the primary chain off, see if you can spin the engine.
Actually, there is play in the chain, see if you can rock the clutch wheel.

If you haven't already, get a proper set of sockets and spanners, aka, wrenches.
You will be able to get it apart well enough, proper assembly is another thing.
One area you will have trouble is the Cam shaft nut. It is 9/16w.
Here's a good chart showing the differences.
Wrench-Equivalents-556x1024.png

The head bolts are 1/4w. Sleeve nuts may be 3/16's.
 
I'm starting to understand why handguns are banned in England...

I have a buddy that is a huge Triumph guy and he loaned me the wrenches to get the head off in situ.
I've never been to his house so I got a tour of his collection and it is impressive! Dude has a sweet 1935 Gloria Southern Cross and several early bikes! Super guy!

Anyway, I want to get a sense of how screwed I am as well as get the wheels rolling as soon as possible so I wanted to pull the head and see what's what.

Since the engine is locked up, I had to skip the step where you rotate the engine to TDC to get the most room to get the head past the rods while still in the frame (spoiler alert). Finally got the head free as it was stuck pretty good and both pistons are at the exact same level (so not TDC). Also both cylinders are full of what looks like coffee grounds and the walls are NOT smooth...

Pretty sure it's not coming out without pulling the motor at this point.

Anyway, there was no getting past the frame with the cam in that position tonight so I'll regroup tomorrow as I wait on tools.

Thanks for all the help! This is a great forum!
 
Back
Top