Interstate Side Covers

Status
Not open for further replies.

Deets55

VIP MEMBER
Joined
Oct 3, 2013
Messages
1,585
Country flag
I am going to attempt to convert a left hand Interstate side cover W/ tool tray to fit my MKIII. I plan on removing the tray by drilling out the spot welds and cutting off the top bracket. I believe it should work. I would appreciate it if anyone could give me the correct location of:

The tab on the bottom of the cover that slides behind aluminum foot peg support plate.
Location and size of top Dzus fastener hole, measured from outside of cover.
Location and size of rear grommet hole, also measured from outside of cover.
Location of decals with and without "Electric Start" text. The non "ES" text would have to come from a MKII.

Any additional info would be helpful

Thanks,
Pete
 
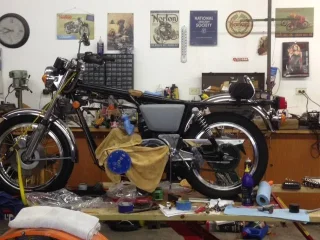
Ok, not as simple as I thought. Spent an hour with a cut off wheel and grinder and I think I'm close. I just need the location of the decals if any one has them. The vendor I bought the Interstate tank from had the steel side covers for $50.00 a pair, including shipping, I had to give them a try
 

Attachments

  • Interstate Side Covers
    IMG_0014.webp
    54.7 KB · Views: 614
You could have used the tool tray by using the earlier battery tray assembly which turns the battery 90 degrees, much more practical, gives some storage space, which is better than the useless plastic tray on a MK3....did that on mine....
 
Hey pete,
As you know I bought the same interstate tank as you and I had the same issue with the norton logo and pinstripes on the tank as you are having with the side cover logos. My solution was to google, "norton interstate tank" , and then hit the image tab to see a bunch of images of interstate tanks. Surprisingly, there was some variation in the location, so I just winged it and it's close enough for me... I still have to apply the catylized clear coat that I ordered from Eastwood to make it glossy and more fuel resistant.

I think it's close enough.. I only saved $1,800. over a top of the line gas tank... :lol:

Interstate Side Covers


If I was you, I would do an image search and then "wing it" . I know that I had my sidecover logo's cockeyed because i made them parallel with the top angle of the side cover. I'm repainting them too, and am gonna try to get them closer to where they are suposed to go... which seems like it's more level with the ground than following the shape of the side cover.
 
manx850 said:
You could have used the tool tray by using the earlier battery tray assembly which turns the battery 90 degrees, much more practical, gives some storage space, which is better than the useless plastic tray on a MK3....did that on mine....


I'm using an Odyssey 625 AGM battery, I don't believe it would fit side ways. Beside that I would like to be able to switch back to the Roadster tins and tank when ever I want. I keep my tools in that roll pack attached to the grab bar.
Thanks anyway.

Pete
 
o0norton0o said:
Hey pete,
As you know I bought the same interstate tank as you and I had the same issue with the norton logo and pinstripes on the tank as you are having with the side cover logos. My solution was to google, "norton interstate tank" , and then hit the image tab to see a bunch of images of interstate tanks. Surprisingly, there was some variation in the location, so I just winged it and it's close enough for me... I still have to apply the catylized clear coat that I ordered from Eastwood to make it glossy and more fuel resistant.

I think it's close enough.. I only saved $1,800. over a top of the line gas tank... :lol:

Interstate Side Covers


If I was you, I would do an image search and then "wing it" . I know that I had my sidecover logo's cockeyed because i made them parallel with the top angle of the side cover. I'm repainting them too, and am gonna try to get them closer to where they are suposed to go... which seems like it's more level with the ground than following the shape of the side cover.

Frank,

You tank is looking good. What did you eventually do with the red oxide primer? I did the same as you and have been searching the web to get ideas on decal placement. I have contacted Andy (B+) and he gave me some ideas about paint and pinstripes. I'm not going to worry about paint till spring or maybe after I get my bike together. I can't paint in my garage right now, to much stuff laying around.. Besides that I have two other bikes I need to get to and my son transmission needs to be torn apart. And then there the honey do list.......................

Pete
 
I saved this pic of an original sidecover as the paint was coming off.
Maybe helpful for location.
Interstate Side Covers


And this an original paint tank - taken off a new bike in a showroom.
Handpainted pinstripes, ex-factory...
Interstate Side Covers
 
Deets55 said:
... I plan on removing the tray by drilling out the spot welds and cutting off the top bracket.


Unless the MKIII air cleaner interferes, I wouldn't cut off the top bracket mounting arm. If your after-market side-cover is manufactured to OEM specs, you should be able to fit a dzus fastener to the factory hole in the frame and use the top bracket for mounting/attachment purposes.


.
 
Rohan said:
I saved this pic of an original sidecover as the paint was coming off.
Maybe helpful for location.
Interstate Side Covers


And this an original paint tank - taken off a new bike in a showroom.
Handpainted pinstripes, ex-factory...
Interstate Side Covers

Rohan,
Thanks for the pictures. If possible could you tell me the width of those pinstripes and the distance from the hard edge of the tank to the first pin stripe and the gap between them.
Thanks
Pete
 
Robert_Norton said:
Deets55 said:
... I plan on removing the tray by drilling out the spot welds and cutting off the top bracket.


Unless the MKIII air cleaner interferes, I wouldn't cut off the top bracket mounting arm. If your after-market side-cover is manufactured to OEM specs, you should be able to fit a dzus fastener to the factory hole in the frame and use the top bracket for mounting/attachment purposes.


Robert,
Didn't even think about trying to use that top bracket, that would have probably been a good idea. I had to remove a lot of extra material to clear the battery tray, battery, air box and frame, the bracket perished in the cross fire.

Thanks,
Pete
 
Deets55 said:
You tank is looking good. What did you eventually do with the red oxide primer? I did the same as you and have been searching the web to get ideas on decal placement. I have contacted Andy (B+) and he gave me some ideas about paint and pinstripes. I'm not going to worry about paint till spring or maybe after I get my bike together. I can't paint in my garage right now, to much stuff laying around.. Besides that I have two other bikes I need to get to and my son transmission needs to be torn apart. And then there the honey do list.......................

Pete

As you know, my stripper/acetone cocktail didn't do much to strip off the coating inside my tank, so I am just going to leave it alone. I usually cut the filters off my petcocks and use a pair of clear fuel filters inline in my fuel lines between the petcock and my carbs so I can see if crap is coming out of my tank. If I see them turning red or collecting flakes of red, then I'm going to investigate doing something, but I don't think I'm going to have an issue, and if I do I'll swap the roadster tank back in it's place while I remedy the interstate tank's issues.

I knew that masking off the double pinstripes would be all but impossible with normal wide tape, so I bought this tape for masking curves and it also has glue that resists paint bleeding under it.

https://www.amazon.com/3M-06404-Vinyl-T ... B00HSCMGY6

I masked the outside and inside edges of the curved borders of the double pinstripes with the flexible skinny tape and used the skinny tape as the center spacer to separate the 2 stripes. Then I taped up to the skinny tape with normal masking tape and papered the rest of the tank to keep the overspray off of it. You really can't mask a curve without this kind of tape. If you're a painter who can freehand pinstripes, that's awesome,... but I can't do that so I masked it off and sprayed it.
 
Deets55 said:
I am going to attempt to convert a left hand Interstate side cover W/ tool tray to fit my MKIII. I plan on removing the tray by drilling out the spot welds and cutting off the top bracket. I believe it should work. I would appreciate it if anyone could give me the correct location of:

The tab on the bottom of the cover that slides behind aluminum foot peg support plate.
Location and size of top Dzus fastener hole, measured from outside of cover.
Location and size of rear grommet hole, also measured from outside of cover.
Location of decals with and without "Electric Start" text. The non "ES" text would have to come from a MKII.

Any additional info would be helpful

Thanks,
Pete
One tip; when you have the cover set up and mounted after paint, locate and level the graphics with a torpedo level so they are parallel to the ground. I always thought they looked weird if slanted. You can do the same thing with the tank logo once you have relative placement measurements.

BTW, I have a spare stainless left side panel bracket for mounting to the dzus fastener if you need one. Still new in the package from RGM.
 
o0norton0o said:
Deets55 said:
You tank is looking good. What did you eventually do with the red oxide primer? I did the same as you and have been searching the web to get ideas on decal placement. I have

I masked the outside and inside edges of the curved borders of the double pinstripes with the flexible skinny tape and used the skinny tape as the center spacer to separate the 2 stripes. Then I taped up to the skinny tape with normal masking tape and papered the rest of the tank to keep the overspray off of it. You really can't mask a curve without this kind of tape. If you're a painter who can freehand pinstripes, that's awesome,... but I can't do that so I masked it off and sprayed it.

Frank,
I'm going to try and do it the opposite way. Usually when I pinstripe (as also suggested by Andy) I spray on the pinstripe color (gold in this case) and then use fine line tape on the areas I want to keep and shoot the color on top, remove the tape and clear. I have never tried any thing other than a straight line. If I am not satisifed with the way the the tape looks I am just going to shoot the whole thing a solid color.
Pete
 
One tip; when you have the cover set up and mounted after paint, locate and level the graphics with a torpedo level so they are parallel to the ground. I always thought they looked weird if slanted. You can do the same thing with the tank logo once you have relative placement measurements.

BTW, I have a spare stainless left side panel bracket for mounting to the dzus fastener if you need one. Still new in the package from RGM.[/quote]


Danno,
Thanks for the input, good advice on getting the lettering on correctly. I am pretty sure the early Dzus fasteners are different from the MKIII plus I have all the hardware anyway. Thanks for the offer. BTW you have a real nice looking bike, good job.

Pete
 
Deets55 said:
Thanks for the pictures. If possible could you tell me the width of those pinstripes and the distance from the hard edge of the tank to the first pin stripe and the gap between them.
Thanks
Pete

Norton Interstate pinstripes are about 3/32" or approx 2mm wide - (very approx) and the gap between them too
they vary a shade, remember they are hand pinstriped.

The stripes from the top edge look to be a 'sandwich' of 4 stripes, all about the same thickness and equidistant.
A blank one, a pinstripe, another blank one and the 2nd pinstripe.
The bottom run is done so the whole sweeping curve looks neat....

https://s31.postimg.org/l0p2ouhdn/tank_nos.jpg

I like that idea of painting on the pinstripe color, and then taping over it, shoot the color and then peel off the tapes. Will give it a try myself sometime. Some of these fine 3m tapes are intended to be good around curves too, if you stretch them a little while curving them....
 
Rohan,

Thanks for the information. I will try and put it to good use.

Pete
 
Deets55 said:
One tip; when you have the cover set up and mounted after paint, locate and level the graphics with a torpedo level so they are parallel to the ground. I always thought they looked weird if slanted. You can do the same thing with the tank logo once you have relative placement measurements.

BTW, I have a spare stainless left side panel bracket for mounting to the dzus fastener if you need one. Still new in the package from RGM.


Danno,
Thanks for the input, good advice on getting the lettering on correctly. I am pretty sure the early Dzus fasteners are different from the MKIII plus I have all the hardware anyway. Thanks for the offer. BTW you have a real nice looking bike, good job.

Pete[/quote] Thanks for the compliment, Pete. I didn't realize you were referring to the '75 plastic dzus on top of the cover.
 
I measured the pinstripes on an original interstate tank before I stripped it and although the pinstripes were a little inconsistent they were as close to 3mm thick and 3mm apart as makes no difference... presumably a 1/8" brush, and 3mm fine line tape works well enough for me.
Apologies for the blurry photo...
The first stripe was about 5mm in from the natural edge on the tank

Interstate Side Covers


My best endeavours at sidepanel graphics - the interstate panel graphic was a waterslide transfer and performed perfectly under a coat of lacquer.

Interstate Side Covers


I made these vinyl graphics because Norton didn't...

Interstate Side Covers


It does show the orientation and which line to follow

and on the bike...

Interstate Side Covers
 
Mmmmm, I've got some 3mm pinstriping tape.
And its noticeably wider than the hand done factory pinstripes.

Blue is 3mm in this pic.
Interstate Side Covers


But maybe the brushes wore thicker with use !
Or more than one hand did the striping....

P.S. 750 Interstates had a single pinstripe on their tanks.
Much wider stripe too...
 
Status
Not open for further replies.
Back
Top