Thanks for visiting Access Norton
- Guest view limit reached
- Create a free account (more details)
- Already a member? Click here to login
You are using an out of date browser. It may not display this or other websites correctly.
You should upgrade or use an alternative browser.
You should upgrade or use an alternative browser.
Broken Main Bearings (Outer Race)
- Thread starter johnfitzw
- Start date
- Status
- Not open for further replies.
Fast Eddie
VIP MEMBER
- Joined
- Oct 4, 2013
- Messages
- 23,053
When you measure for end float you measure between one hard stop point and another.But if it is indeed an oversize crank shoulder...and I agree that it's plausible, even likely... I don't understand how the crank had a measured 10 thou assembled end float, and the crank spun with an effortless flick of the fingers...
The hypothesis put forward by Detective Inspector Concours is that the hard stop on your damaged bearing side was the bearing outer hitting the shoulder, and NOT the rollers bottoming in the bearing outer as they should.
The crank still turned nicely because you had 10 thou float. But would still foul as described by Concours in use.
All seems very plausible to me.
Fast Eddie
VIP MEMBER
- Joined
- Oct 4, 2013
- Messages
- 23,053
John, where were the specially made spacer(s) located ?
KiwiShane
Basic
- Joined
- Mar 22, 2021
- Messages
- 2,371
New Zealand Nortons Owners Club Rally
Hello all, Just finished my ride report on my Jan-Feb NZ trip, which included attending the NZ NOC Rally, and the Hampton Downs (moved from Pukekohe) Classic Register race meet. Plus a lot of scenery. I hope you enjoy it. http://www.forum.fjr13.org/viewtopic.php?f=16&t=4879 here are a few...
robs ss
VIP MEMBER
- Joined
- Aug 16, 2016
- Messages
- 4,522
- Joined
- Nov 20, 2004
- Messages
- 21,368
@concours is right, you have the evidence on this pic where you have 2 arcs showing contact with the cases of something other than the bearing.
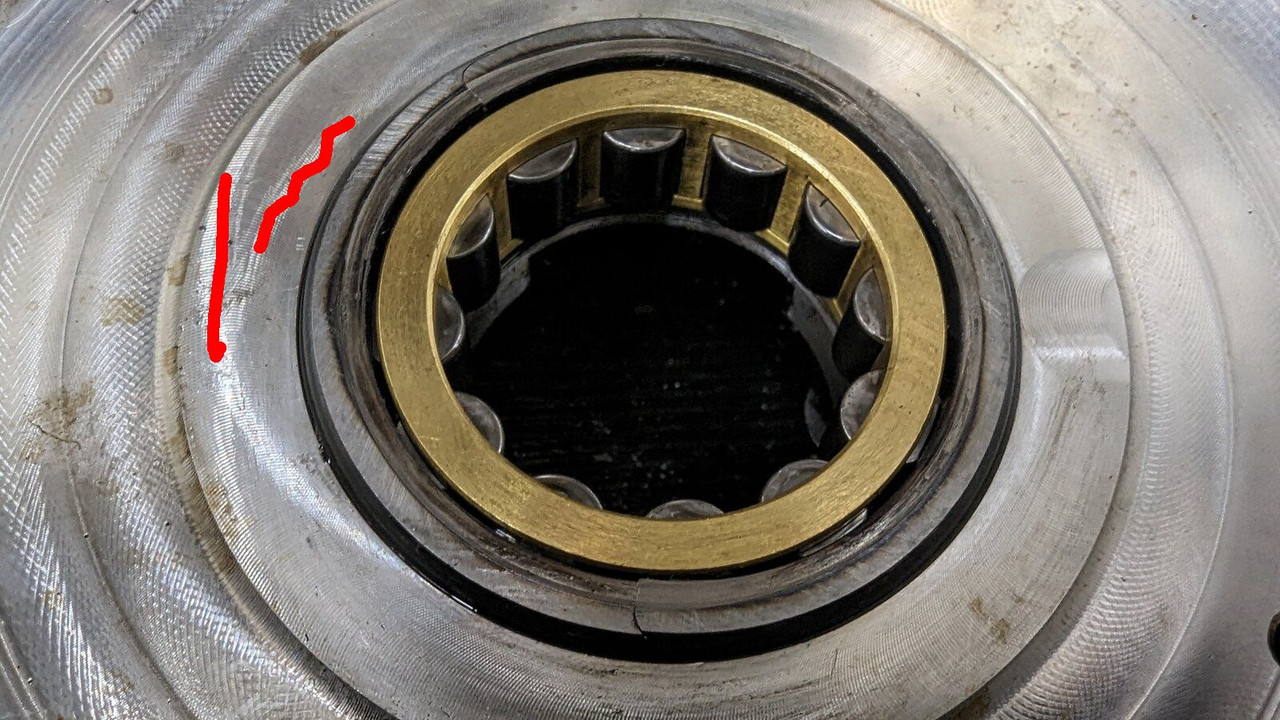
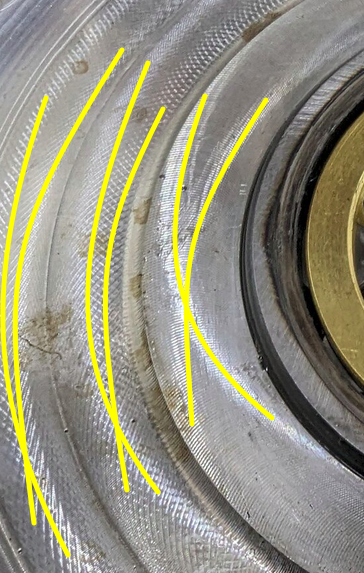
Two 'rings' further out seem to have a similar crossover pattern and look like machining marks (from a milling cutter?). The apparent crossover pattern could be an optical illusion caused by reflections from two separate light sources.
The bearing damage as Concours said would have been the result of the bearing shoulder coming into contact with the bearing outer race and the evidence is in the pictures.
concours
VIP MEMBER
- Joined
- Dec 29, 2011
- Messages
- 10,596
John, This is, (thankfully
 ) a relatively easy & inexpensive repair.
Get that crankshaft in a lathe, and cut the O.D. of that raised shoulder down to something similar to the OEM crankshaft.
A generous tool radius will assure no stress riser.
That tiny amount of material close to the center will not require re-balancing.
Replace the bearings, check end float, etc.
Ride & enjoy!!!

You WIN!!!
Get that crankshaft in a lathe, and cut the O.D. of that raised shoulder down to something similar to the OEM crankshaft.
A generous tool radius will assure no stress riser.
That tiny amount of material close to the center will not require re-balancing.
Replace the bearings, check end float, etc.
Ride & enjoy!!!
You WIN!!!
Last edited:
concours
VIP MEMBER
- Joined
- Dec 29, 2011
- Messages
- 10,596
Normal tool marks from a low production volume process. Nothing detracting from FFF.Two 'rings' further out seem to have a similar crossover pattern and look like machining marks (from a milling cutter?). The apparent crossover pattern could be an optical illusion caused by reflections from two separate light sources.
The bearing damage as Concours said would have been the result of the bearing shoulder coming into contact with the bearing outer race and the evidence is in the pictures.

kommando
Basic
- Joined
- May 7, 2005
- Messages
- 7,846
Two 'rings' further out seem to have a similar crossover pattern and look like machining marks (from a milling cutter?). The apparent crossover pattern could be an optical illusion caused by reflections from two separate light sources.
The bearing damage as Concours said would have been the result of the bearing shoulder coming into contact with the bearing outer race and the evidence is in the pictures.

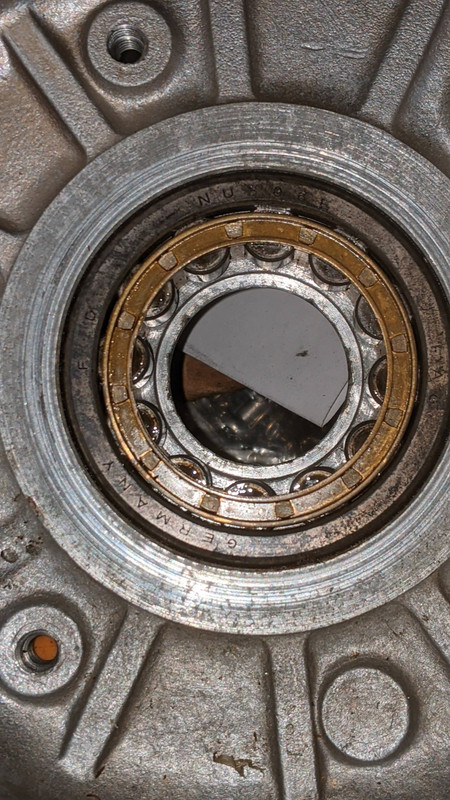
Yes you are right and here is an example of where the crank has touched the crankcase inner before the bearing inner. Concentric circles.
lcrken
VIP MEMBER
- Joined
- Mar 15, 2009
- Messages
- 5,077
May I suggest that while you still have the inner race on the crankshaft you could simply fit a new bearing onto it and see how close the outer race can get to the shoulder on the crankshaft. It does appear to me that Concour's explanation is the likely one. And Fast Eddies post explains quite clearly why you still have end float and smooth rotation. If you don't want to turn down the shoulder on the crankshaft, the alternative is to fit a spacer between the shoulder and the inner race, while also reducing the thickness of the bearing spacers you made, by the thickness of the crankshaft spacer, to keep the same end float and centrality of the crank. I'm assuming you used spacers in the crankcase to move the bearings inward to accommodate the pre-MK3 crankshaft width. The crankshaft spacers would only need to be thick enough to stop the bearing outer from contacting the crankshaft shoulders.
I'm still perplexed at this explanation, however.. Rotational Dynamics made a lot of Norton crankshafts, and I've never heard of this problem happening with any of them before.
Ken
I'm still perplexed at this explanation, however.. Rotational Dynamics made a lot of Norton crankshafts, and I've never heard of this problem happening with any of them before.
Ken
concours
VIP MEMBER
- Joined
- Dec 29, 2011
- Messages
- 10,596
"May I suggest that while you still have the inner race on the crankshaft you could simply fit a new bearing onto it and see how close the outer race can get to the shoulder on the crankshaft."
This isn't necessary.
All (except for some special) bearings are designed to have both inner & outer races coplanar within a few microns.
Understanding this, will also help understand the failure mode described earlier in this thread.
The yellow lines show the datum surfaces I refer to.

This isn't necessary.
All (except for some special) bearings are designed to have both inner & outer races coplanar within a few microns.
Understanding this, will also help understand the failure mode described earlier in this thread.
The yellow lines show the datum surfaces I refer to.
Last edited:
concours
VIP MEMBER
- Joined
- Dec 29, 2011
- Messages
- 10,596
The caliper is PLENTY ACCURATE to show the two hundred thousandths error we are discussing here. We can measure & talk microns if you insist, but the feature we are discussing is a simple as-forged (the O.D. Of that feature) raised boss that has been faced off. That O.D. , surface finish and roundness will vary significantly, (even before being bitched-up from rubbing contact with the outer race) because it's not a machined feature.Oops, the cases are shown in the first pics, I should have looked up there too! It does not look like the crank rubbed on the case, the dirty contact surfaces clearly indicate relative movement between bearing and crank. I would recommend careful measurements of the bearing contact surfaces, also the bearing, with real micrometers, not vernier calipers, calipers can easily be off by more than required bearing fit tolerances.
Last edited:
concours
VIP MEMBER
- Joined
- Dec 29, 2011
- Messages
- 10,596
Nah, just decades of experience, working on complex machinery, often without procedures, manuals, specifications or special tools/fixturing.Concours, you have the eyes of an eagle, the wisdom of an owl and the patience of a saint. And the proof of a Perry Mason!
Every step includes reverse engineering, logic check, devil's advocate & Murphy's law prevention.
Thanks though.
I just try to share this, before I go.
KiwiShane
Basic
- Joined
- Mar 22, 2021
- Messages
- 2,371
Very glad you and others are part of this forum that have your skill/tech/abilityNah, just decades of experience, working on complex machinery, often without procedures, manuals, specifications or special tools/fixturing.
Every step includes reverse engineering, logic check, devil's advocate & Murphy's law prevention.
Thanks though.
I just try to share this, before I go.
View attachment 109173
As we say down here...."your a clever bugger."
concours
VIP MEMBER
- Joined
- Dec 29, 2011
- Messages
- 10,596
I have echoed that sentiment since early on.Very glad you and others are part of this forum that have your skill/tech/ability
As we say down here...."your a clever bugger."
I'm sooo glad to have the collective wisdom
It has made owning this vintage bike a most pleasurable experience.
concours
VIP MEMBER
- Joined
- Dec 29, 2011
- Messages
- 10,596
NooooooNow you did it! Explain the bearings and different bearing numbers. Are they for Commando engines?
Spindle bearings for a 7 axis CNC turning machine.
TIR within one micron.
Interestingly enough, a lot of the same basic rules apply to our old paint shakers.
- Status
- Not open for further replies.
