Best technique for pulling Commando rocker shafts

p400

VIP MEMBER
Joined
Jul 14, 2014
Messages
1,293
Country flag
I need to pull rockers to allow valve job on a MK3 Commando head.
First issue is funny/odd threads in the end of the rocker shafts,
Second is I don't have the threaded tools in hand to pull these shafts.
What are you inmates doing?
I am requesting tips please.

I have several slide hammers .
Heat the head?

SpindleThreads2.jpgFigC4.jpg
 
Last edited:
Heat head around rocker. I made a puller since I was fortunate enough to have a spare fully threaded bolt that fit that rocker spindle thread and was long enough. It is barn yard engineering using spacers washers and a nut. It acts like a puller. I use a large piece of 1" aluminum rod and a hammer to drive them back into the heated head. I do use a heat gun. Oops lied I use a propane torch.
 
Thank you Schwany, Is there a bolt on the Mk3 that I can take off and use?

This is a 5/16 CEI thread?
 
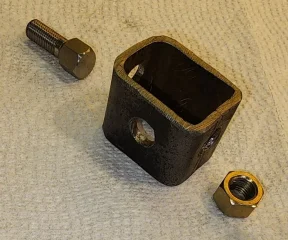
So I looked around for a metal hoop style or square tubing and found a section of bumper jack.
Cut off a 1.5" piece.
Drilled holes to accept the CEI bolt and cheap hammer slide.

20230825_152638.jpg

Then checked fit with 50yo cheap slide hammer.

5/16" CEI bolt came from the handlebars of a set of Brampton forks. Looks like it will work.


20230825_152628.jpg

Now warming head with solar exposure on a 95F day( my carbon cut for the day).
 
I had the Norton slide hammer tool, but mistakenly gave it to the individual that bought my Rotax powered ATK cuz the Norton slide hammer looked very similar to the slide hammer for the ATK. That is what I get for not paying enough attention.

Only thing I have noted doing it numerous times is the rocker spindles are a little difficult to remove first time, after that first time it gets a little easier. Heat is your friend.

I'm not sure the sun is gonna get it hot enough being so far away. ;)

Best technique for pulling Commando rocker shafts


In position example. I would clean the head up more if I was actually pulling the spindle.
Best technique for pulling Commando rocker shafts
 
I used the norton slide hammer and a heat gun per the norton instructions! Easy and fast! But any small slide hammer using correct threads would work.
 
I used a slide hammer until the threads got worn. Then I used this AN tool until I misplaced it: https://andover-norton.co.uk/en/shop-details/18703/rocker-shaft-extractor-tool

Now, I heat, bolt in, pull. If stubborn, a piece of tubing (I use PCV but any that has a larger ID than the spindle will work. Just heat, bolt through a washer with an OD larger than the tubing and tighten. If it doesn't come loose you can loosen, add washers and tighten or loosen a little and pry the bolt head with two screwdrivers. Often when the far end is out, it will just pull out of the warmed close end.
 
I had the Norton slide hammer tool, but mistakenly gave it to the individual that bought my Rotax powered ATK cuz the Norton slide hammer looked very similar to the slide hammer for the ATK. That is what I get for not paying enough attention.

Only thing I have noted doing it numerous times is the rocker spindles are a little difficult to remove first time, after that first time it gets a little easier. Heat is your friend.

I'm not sure the sun is gonna get it hot enough being so far away. ;)

Best technique for pulling Commando rocker shafts


In position example. I would clean the head up more if I was actually pulling the spindle.
Best technique for pulling Commando rocker shafts
I found this type tool the best for my spindles....bolt nut with an appropriate spacer worked excellent.
Thank you
 
I use a box section spark plug wrench as my rocker spindle puller tube, then a bit of all thread or suitable bolt, some washers and nuts. Plenty of propane heat at the inner end of spindle seat...that's where the inference fit comes from. Sorry, but sunshine will not do any good here.
 
I recently removed and replaced the rocker spindles in three heads. It was interesting (ok, I interest easy) how much the interference fit varied. With three heads I was playing with 12 shafts. Some spindles were very difficult to move either in or out, some were virtually a finger push/pull fit. I only cared about one head at that point. So the largest diameter spindles went in the loosest hole, smallest spindle in to the tightest, etc. It was nice to have the choices available to me, and I ended up with a satisfactory fit in all four bores.
Why so much variety in fit is a bit of a puzzle to me. Crappy machining tolerances? Ham fisted mechanics beating the spindles in and out of a cold head? Normal wear and tear in operation? Who knows.

I'd guess the middle one "Ham fisted mechanics beating the spindles in and out of a cold head"....
 
I only use the 1" aluminum round stock as a soft drift for the last quarter of an inch. I always use heat and can nearly push the spindles in by hand before I have to use the drift. If I don't heat the head up enough they usually only go in half way before getting hard to move. More heat to the rescue. I use a light weight hammer on the drift. Also use a big blade short screw driver to straighten the spindle so the slot aligns like it should. Has to be hot for that also otherwise the spindle can chip. How would I know that? :)

That soft aluminum drift has seen many different parts in front of it, not just Norton spindles. That's why the hammered-on end looks like it does.

I only have two Norton heads. One does have tighter fitting spindles than the other. Hand made Norton parts tolerances after a liquid lunch maybe.
 
Back
Top