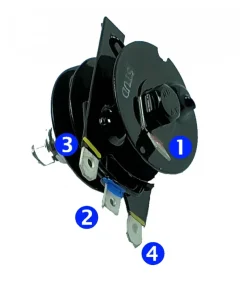
podtronics installation..last minute double check

Status
Not open for further replies.

seattle##gs

VIP MEMBER
Joined
Oct 28, 2014
Messages
2,103
Country flag
Is there ANY reason why I cannot ...
A) toss the existing regulator
B) plug the podtronics wires directly into the existing regulator leads? I would like to put on fresh connectors on the wires but otherwise it should be a plug-and-play conversion.
 
A) toss the existing regulator

That's the Zener* diode.


B) plug the podtronics wires directly into the existing regulator leads?

Connect it to the rectifier* leads (Pod. yellows to green/yellow and white/green, Pod. black to brown/blue and red to red or ground).

*Assuming these are original Lucas parts?
 
Last edited:
You can toss the zener while you are it. Use a bolt to hold the ground wire loop and shrink wrap the wiring connection. Or if you like originality just disconnect and shrink wrap the wiring connection.
 
Yes, the 2 AC wires from alternator to rectifier would connect to the input wires of the Podtronics, and the +/- wires from the harness would connect to red and black. And as mentioned above, disconnect the quick connect terminal from the zener and tie them up. You can leave both the zener and rectifier mounted in case you need to revert back to stock on the road.
 
Note your options in the attached picture.

When fitting a podtronics unit, you can directly replace the rectifier (which looks like this)
podtronics installation..last minute double check

It is important that you remove the zener diode from your z-plate though.
Or at the very least remove (and tape up) the Brown/Blue wire that goes to it.
There is a zener diode inside the podtronics unit, so leaving the standard one on the bike will cause you issues.

I also choose to remove the capacitor too.
But that's optional, and there is no harm in leaving it there if you want.


podtronics installation..last minute double check
 
This years edition of Norton News outlined an issue with Podtronics/Tri-Spark compatibility causing a misfire in the 3000-4000 RPM range. The cause is excessive electronic noise. The solution is to install a noise filter available from Podtronics.
Podtronics model POD-1P-Max (CS-4035, JRC 17-104A) is what is described in the article. I'm not sure what all of that means but I'd contact Podtronics to see if you need to take any preventative measures with your unit.
 
Yes, I have a Pazon. The blue capacitor is compatible with the Pazon? Is there any benefit to keeping it in the circuit?
The color coded wiring diagram is very good but when I tried to enlarge it to 8 1/2" X 11" it became too fuzzy. I was going to laminate it and put it into the manual.
 
The large, blue capacitor is part of the charging system, not the ignition system so yes, not an issue if you want to keep it.

The condensers and ballast resistor are removed when you go from points to electronic ignition.

Not sure why the quality of the pic is poor - I’ll DM it to you.
 
Neat diagram. With the Pazon, I ground the second coil directly to battery positive.
 
Status
Not open for further replies.
Back
Top