
You are using an out of date browser. It may not display this or other websites correctly.
You should upgrade or use an alternative browser.
You should upgrade or use an alternative browser.
Which of the several aftermarket or Andover Head Steadys are good for street riding?
- Thread starter oddiron
- Start date
- Status
- Not open for further replies.
Fast Eddie
VIP MEMBER
- Joined
- Oct 4, 2013
- Messages
- 20,656
As Fullauto says.
The link type head steady simply will not allow the top half of the engine any freedom to move side to side, which is the primary role of a head steady. But it gives it total unimpaired freedom to move up and down and thus allow the isolastics to work as intended.
The Jim Comstock / cNw version is certainly the most robust of this type on the market.
guest76
Guest
- Joined
- Nov 5, 2012
- Messages
- 1,034
The Comstock/cNw is beautiful and with Jim's engineering credibility you can guarantee functional too.
This will go on the MK3 when the tank is off next.
 https://coloradonortonworks.net/headsteady.html
I also think that Norman White's offering is worthy of consideration.
As I understand it, this is the third isolastic that the bike was originally designed to have, but was dropped in favour of cost savings.
It was made for years by Mick Hemmings as a Genuine Norvil Production Racer Part
(proper Norvil, not the other lot)
 http://www.normanwhite.co.uk/prod03.htm
This will go on the MK3 when the tank is off next.
https://coloradonortonworks.net/headsteady.htmlI also think that Norman White's offering is worthy of consideration.
As I understand it, this is the third isolastic that the bike was originally designed to have, but was dropped in favour of cost savings.
It was made for years by Mick Hemmings as a Genuine Norvil Production Racer Part
(proper Norvil, not the other lot)
http://www.normanwhite.co.uk/prod03.htmFast Eddie
VIP MEMBER
- Joined
- Oct 4, 2013
- Messages
- 20,656
The advantage of the third iso idea is that it helps take some engine weight.
I’ve never tried one though. It would be interesting to hear from those who have...
I’ve never tried one though. It would be interesting to hear from those who have...
- Joined
- May 7, 2005
- Messages
- 6,812
There are several fixes that all together contribute to good handling, I still run the standard box head steady but with the MK3 adjustable suspensory spring, I have the Kegler clamps on the swing arm, Koni shocks and CBR600RR Showa cartridges in the front forks. When I get round to the headsteady I will be first doing a variation of the Ludwig fix, even simpler than the other headsteady fixes.
I know the current box section works as when last on the IOM I felt the handling a bit off and an inspection found the headsteady to head bolts were loose. There is room for improvement still.
I know the current box section works as when last on the IOM I felt the handling a bit off and an inspection found the headsteady to head bolts were loose. There is room for improvement still.
- Joined
- Oct 10, 2017
- Messages
- 1,120
I put dave taylor type on my bike it greatly improved the wiggly feel on the rear end
robs ss
VIP MEMBER
- Joined
- Aug 16, 2016
- Messages
- 3,244
I recall that there was someone (Jim Comstock?) who placed a compression spring below the engine (from the cross-brace?) to counteract the "sag" on the isos - or is it just my muddled head?The advantage of the third iso idea is that it helps take some engine weight.
I’ve never tried one though. It would be interesting to hear from those who have...
Fast Eddie
VIP MEMBER
- Joined
- Oct 4, 2013
- Messages
- 20,656
I recall that there was someone (Jim Comstock?) who placed a compression spring below the engine (from the cross-brace?) to counteract the "sag" on the isos - or is it just my muddled head?
Yes, he did just that.
But I guess Norman’s argument might be “why bother? Just fit my third iso” !
cliffa
VIP MEMBER
- Joined
- May 26, 2013
- Messages
- 3,800
He did indeed, and if memory serves he had no rubbers in the front ISO tube either.I recall that there was someone (Jim Comstock?) who placed a compression spring below the engine (from the cross-brace?) to counteract the "sag" on the isos - or is it just my muddled head?
NPeteN
VIP MEMBER
- Joined
- Nov 20, 2018
- Messages
- 1,268
I have CNW, IMO you won't notice much unless you have the rest of the bike properly sorted out. Or if your previous head steady was old and failing. It looks great and I'll never need another one, for me, just one less thing to worry about.
You may need to jack your tank up for clearance.
You may need to jack your tank up for clearance.
maylar
VIP MEMBER
- Joined
- May 13, 2007
- Messages
- 4,213
I have CNW, IMO you won't notice much unless you have the rest of the bike properly sorted out. Or if your previous head steady was old and failing. It looks great and I'll never need another one, for me, just one less thing to worry about.
I have one too, and though I don't have many miles on it, it seems to inspire confidence in turns and has eliminated the hinged-in-the-middle feeling.
Not saying it can't be a placebo effect, but the old girl seems to handle better than ever.
You may need to jack your tank up for clearance.
Yep.
o0norton0o
VIP MEMBER
- Joined
- Apr 27, 2015
- Messages
- 1,745
Once you begin trying to improve your bike's handling, the quality of each element that you chose for your bike adds to the quality of your bike's handling. Jim Comstock's headsteady is the best "Tie rod" style of headsteady made. The "dave taylor" is similar, but not as heavy duty as Jim's. I have one of Jim's on my bike.
It's hard to pull the trigger on the most expensive item when you're a cheap bastard. I am that guy... but there is a difference in quality in this case.
It's hard to pull the trigger on the most expensive item when you're a cheap bastard. I am that guy... but there is a difference in quality in this case.
maylar
VIP MEMBER
- Joined
- May 13, 2007
- Messages
- 4,213
And avoid the temptation to spend extra for the polished version. It's truly beautiful but you can't see it when the tank is on.It's hard to pull the trigger on the most expensive item when you're a cheap bastard. I am that guy... but there is a difference in quality in this case.
johnm
VIP MEMBER
- Joined
- Feb 26, 2008
- Messages
- 1,611
I have the Dave Taylor one. Mostly because the CNW was not in stock when I was rebuilding my bike.
It made a big difference to accuracy of steering in corners. Especially noticeable on roundabouts.
I would say it's a good option. Maybe it will wear a little faster than others. If you have the money I'd say the CNW one is top of the market but the Dave Taylor option is a viable cheaper alternative.
- Joined
- Feb 12, 2013
- Messages
- 1,555
The Ludwig design is the best. The others are superb, but the wearing parts may be costly. The wearing pads on the LUDWIG DESIGN [ if they do wear ] will be peanuts.
Dereck
 www.britbike.com
PS DogT posted a copy of Ludwigs design'on 2nd Nov 2018. not sure how to include it here.
Here's for all including some notes.
Hello DogT ,
sorry for the somewhat late reply , but I guess there is no hurry .
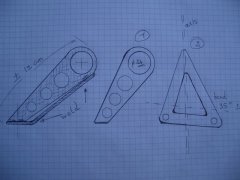
First of all , I would like to say that , even if it is a fairly simple piece of work , it should be made with care , and attention to detail .
Do not underestimate the forces involved .
That is why I would recommend 4 – 5 mm steel for material .
If you use plain iron ,make it 6 mm thick .
The 2 holes for the bolts in the cylinder head should precision drilled , not sloppy , or oval , so that it will always be installed in exactly the same position .
When cutting the parts , alow some excess material in all directions , which can be removed when finished .
Best to make cardboard templates to try out for first , .
You see that I made a triangular cut out in the base plate for weight saving , but this is time consuming and not really nessecary .
A big round hole ( or no hole) is fine .
The 35° bend (ply) in the base plate must be square with the frame , not parallel with the holes .
If steel , you’ll need to get it red hot to bend .
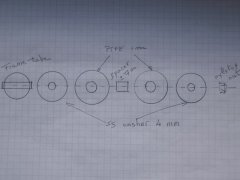
I used a trough bolt , but if you want to keep the threads in the small cross tube , use a stud ( not a bolt! ) threaded deep and loctited .
Spacer (1) is 8 to 10 mm long , diameter 14-15 mm , and makes the Hsteady stand off the frame , and allow space for cables , etc ..
Spacer (2) is about 12 mm dia. and the length depends on the thickness of the vertical HS plate + PTFE sliders .
The length of spacer 2 dertermines the clearance .
Both spacers should be a close fit and cut straight to ensure parallellism .
The 2 washers should also be machined smooth and straight , not generic stamped washers ..
Mine are out of 4 mm stainless.
The 2 PTFE washers slide over spacer 2 .
Actually , I don’t think mine are PTFE , but Ertacetal or Delron , or something similar .
I cut them out of a large 1mm sheet I have , and replace them every 10000 kms or so .
the big hole in the HS is 24 mm and spacer 2 is 12mm , so there is a clearance of 6 mm all around , but I’m shure you could get away with less .
the engine doesn’t move all that much .
Welding :
Install all the parts on the bike , but without spacer 2 , so that the vertical plate is clamped solid between the washers .
This wil make shure that everything is in line .
Make shure that the 24 mm hole is concentric with the stud .
The bike should be standing vertical and on its wheels ! .
On the centre stand ( engine cradle type) the engine will move up in the frame = not good .
On the side stand the engine will move left = even worse .
The idea is to mimic riding geometry .
A pit stand is best .
Tack weld the 2 parts .
Remove the HS from the bike and finish the welds , remove excess material , polish , etc ...
The welding must be high quality ! .
If you are unshure about your welding , get a professional to do it .
You will see that I also have a polyurethane ring inside the big hole .
It is not really needed ;I only has a witness function to see how much , and in wich direction the engine moves .
Now , does it vibrate ?
Yes , but I set all my clearances ( isos + HS) at 0.10 mm , half the factory value .
It gives a very mild vibration over the entire rev range , but it does not bother me , and isn’t tiresome , even after a 500 mile day .
I gladly accept a little vibration for better steering and feedback .
If you prefer less vibration , it is easy to make longer spacers (nr 2) .
The 3rd hole in the cyl. head can be used for a spring .
If you have any more questions I’ll be happy to answer .
Best regards , and good luck .
Jan
(Ludwig)
**********
I must admit I have no idea how big the side load can be , so I made it pretty strong : the vertical piece is 5 mm (3/16") thick steel , the base plate 4 mm .SS end washers are 4 mm . the hole part is fully 3 dimensional .
I mesured the amplitude of the vibration at the head : about 2 mm , so a clearance of 3-4 mm between spacer and eye is enough .
To ensure perfect alignement , the 2 parts are tack welded in situ .
Lateral movement is controlled by the length of the spacer . I set it at 0.10 mm (.004") . I only use 2 bolts on the head . On bolt 3 is a spring preset at 20 kg (44lbs?) to take the weight off the front iso.
I am hoping someone else will run with this, otherwise Jan is likely to think he has wasted his time explaining what he did with his bike.
I have to say, it works really well. I must admit, the use of my lathe and welder made a big difference, but I am sure someone will be able to work out how to do it without a lathe, a Jan appears to have done [ SS washers].
David, "Gortnipper" provided the photos of Jan's head steady in the same thread dated 2/11/18
Dereck
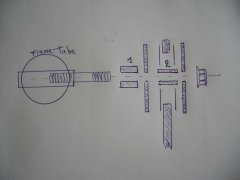
Headsteady
The purpose of the headsteady is to allow the engine to move freely , but only in the vertical plane . 1. STD : probably best to surpress vibration , but the soft silentblocks are not so good in preventing lateral movement . 2. Isolastic type : effectively limits lateral movement ,but more...
www.britbike.com
PS DogT posted a copy of Ludwigs design'on 2nd Nov 2018. not sure how to include it here.
Here's for all including some notes.
Hello DogT ,
sorry for the somewhat late reply , but I guess there is no hurry .
First of all , I would like to say that , even if it is a fairly simple piece of work , it should be made with care , and attention to detail .
Do not underestimate the forces involved .
That is why I would recommend 4 – 5 mm steel for material .
If you use plain iron ,make it 6 mm thick .
The 2 holes for the bolts in the cylinder head should precision drilled , not sloppy , or oval , so that it will always be installed in exactly the same position .
When cutting the parts , alow some excess material in all directions , which can be removed when finished .
Best to make cardboard templates to try out for first , .
You see that I made a triangular cut out in the base plate for weight saving , but this is time consuming and not really nessecary .
A big round hole ( or no hole) is fine .
The 35° bend (ply) in the base plate must be square with the frame , not parallel with the holes .
If steel , you’ll need to get it red hot to bend .
I used a trough bolt , but if you want to keep the threads in the small cross tube , use a stud ( not a bolt! ) threaded deep and loctited .
Spacer (1) is 8 to 10 mm long , diameter 14-15 mm , and makes the Hsteady stand off the frame , and allow space for cables , etc ..
Spacer (2) is about 12 mm dia. and the length depends on the thickness of the vertical HS plate + PTFE sliders .
The length of spacer 2 dertermines the clearance .
Both spacers should be a close fit and cut straight to ensure parallellism .
The 2 washers should also be machined smooth and straight , not generic stamped washers ..
Mine are out of 4 mm stainless.
The 2 PTFE washers slide over spacer 2 .
Actually , I don’t think mine are PTFE , but Ertacetal or Delron , or something similar .
I cut them out of a large 1mm sheet I have , and replace them every 10000 kms or so .
the big hole in the HS is 24 mm and spacer 2 is 12mm , so there is a clearance of 6 mm all around , but I’m shure you could get away with less .
the engine doesn’t move all that much .
Welding :
Install all the parts on the bike , but without spacer 2 , so that the vertical plate is clamped solid between the washers .
This wil make shure that everything is in line .
Make shure that the 24 mm hole is concentric with the stud .
The bike should be standing vertical and on its wheels ! .
On the centre stand ( engine cradle type) the engine will move up in the frame = not good .
On the side stand the engine will move left = even worse .
The idea is to mimic riding geometry .
A pit stand is best .
Tack weld the 2 parts .
Remove the HS from the bike and finish the welds , remove excess material , polish , etc ...
The welding must be high quality ! .
If you are unshure about your welding , get a professional to do it .
You will see that I also have a polyurethane ring inside the big hole .
It is not really needed ;I only has a witness function to see how much , and in wich direction the engine moves .
Now , does it vibrate ?
Yes , but I set all my clearances ( isos + HS) at 0.10 mm , half the factory value .
It gives a very mild vibration over the entire rev range , but it does not bother me , and isn’t tiresome , even after a 500 mile day .
I gladly accept a little vibration for better steering and feedback .
If you prefer less vibration , it is easy to make longer spacers (nr 2) .
The 3rd hole in the cyl. head can be used for a spring .
If you have any more questions I’ll be happy to answer .
Best regards , and good luck .
Jan
(Ludwig)
**********
I must admit I have no idea how big the side load can be , so I made it pretty strong : the vertical piece is 5 mm (3/16") thick steel , the base plate 4 mm .SS end washers are 4 mm . the hole part is fully 3 dimensional .
I mesured the amplitude of the vibration at the head : about 2 mm , so a clearance of 3-4 mm between spacer and eye is enough .
To ensure perfect alignement , the 2 parts are tack welded in situ .
Lateral movement is controlled by the length of the spacer . I set it at 0.10 mm (.004") . I only use 2 bolts on the head . On bolt 3 is a spring preset at 20 kg (44lbs?) to take the weight off the front iso.
I am hoping someone else will run with this, otherwise Jan is likely to think he has wasted his time explaining what he did with his bike.
I have to say, it works really well. I must admit, the use of my lathe and welder made a big difference, but I am sure someone will be able to work out how to do it without a lathe, a Jan appears to have done [ SS washers].
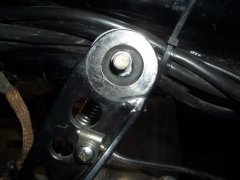
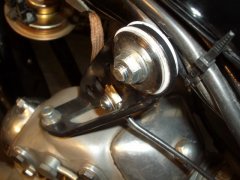
David, "Gortnipper" provided the photos of Jan's head steady in the same thread dated 2/11/18
Last edited:
robs ss
VIP MEMBER
- Joined
- Aug 16, 2016
- Messages
- 3,244
Could not find them so here they are again... (BTW - I like the cNw unit more)David, "Gortnipper" provided the photos of Jan's head steady in the same thread dated 2/11/18
Attachments
Last edited:
maylar
VIP MEMBER
- Joined
- May 13, 2007
- Messages
- 4,213
The cNw unit is a very nicely done kit. It comes pre-adjusted and as long as your iso's are in good order it's a bolt up and done sorta thing. The right side is what moves with the engine and the nut on the right Heim joint is what contacted the bottom of my tank until I lifted the back a bit.

o0norton0o
VIP MEMBER
- Joined
- Apr 27, 2015
- Messages
- 1,745
ludwig's design needs a third non-linear bolt in the base plate where it attaches to the head, so that up and down engine motion can't lever force perpendicularly to the line of his "2" bolts. A third non-linear bolt in the base plate ensures all the force from the up and down motion of the engine is strictly focused at the "slip joint" as he designed it.
Any friction at the slip joint with the 2 bolt base plate will apply force in the worst possible angle to his 2 bolt design... levering the base plate perpendicularly to the line of the 2 bolts. The rest of his design is sound and well reasoned.
...
Any friction at the slip joint with the 2 bolt base plate will apply force in the worst possible angle to his 2 bolt design... levering the base plate perpendicularly to the line of the 2 bolts. The rest of his design is sound and well reasoned.
...
Last edited:
- Status
- Not open for further replies.