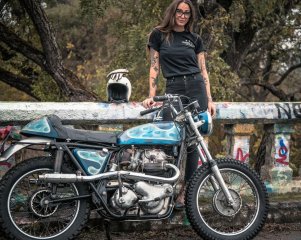
P11/121555 is now running

jerrykap

VIP MEMBER
Joined
Jul 23, 2014
Messages
235
Country flag
Hi all,

Took this old nail on a shakedown ride in the neighborhood today. It came back to life better than expected. I'm going to keep cleaning up what's there and have a little fun with it before I put it on the market. I don't know how long the motor will hold up or the many other important components will keep working but for now, clutch, brakes, steering, electrical are all working normally. I even got a nice plug reading.

I'd still like to know more about it's prior history. There's an inverted image on the back fender showing parking registration at Fort Hays, NB circa 1968 &`69. Does that ring any bells?
P11/121555 is now running

P11/121555 is now running

P11/121555 is now running
 
Hi all,

I've been spending some time with P11/121555 in order to make it into a better play bike and rider. I'm hoping to bring it up to the INOA rally this July in WA state. I took off the incorrectly located sidestand lug by carefully using a cut off wheel to cut through the brazed weld and a big hammer and chisel to knock it off. Fortunately it didn't damage the frame and I can now use the correct sidestand. Took apart the primary and installed new seals for the clutch and tranny, including a new clutch pushrod seal. There was lot's of evidence of leakage here. Of course I cleaned up the entire clutch operating system and used a less worn clutch center hub. Also pulled the head and cylinders for a look see and to stop the various engine oil leaks. Found the center front 3/8ths head bolt had never been installed, nothing in that hole but oil & carbon. Higher compression pistons were already fitted, bores checked ok so I just lightly honed them and stayed with the existing rings. The cylinder head was in very good condition so I put it back on with a new copper gasket that I now prefer to the flame ring type. While apart I took the opportunity to upgrade the ignition to a Pazon. Turned out to be much harder than expected and tested my patience thoroughly. I've done quite a lot of these electronic ignition installs over the years, but this one really did not cooperate. It was easy enough to hook it all up and produce a good quality spark keeping the 12V coils. The problem was in the basic static timing marks. I used my degree wheel to set it accurately and expected to start right up. Not so, I had to use trial and error to continually move the magnets/rotor until it was in the right range to fire. Just to be sure I did it once again using the P11 Manuals stated static timing as .343" BTDC. Same problem, no where near starting until I moved the magnetic rotor appropriately. It's now working fine but what a tedious process on the high pipe models. Anyone else have this problem before? I intend to ask Pazon why this happens. Now that it's starting and running well I can only dial in the timing by seat of the pants. Too bad a strobe timing feature wasn't engineered into the P11's. In any case I'm pleased with the work I did and the bike is better off for it. The idle now is smooth and consistent, hardly any oil leaks and still looks great in it's funky period paint & patina.

Please share your thoughts, C-ya,

Jer
 

Attachments

  • P11/121555 is now running
    Inked Iron photo shoot (28).jpg
    332 KB · Views: 397
Jerry, I fitted a TriSpark ignition, no extra box, all fits inside distributor, needs a pair of 6v coils, easy to time for me. I believe the TriSpark cost is higher, but ignition looks like OEM.

Your P11 looks the part for 1967-68, exactly what we did at that time. could have higher handlebars , but your choice.
 
Thanks P400,

The new 6V coils that I could have put on were new stock Lucas that are smaller in diameter and shorter so I stayed with the original 12V's. I'm seeing a fat blue spark so all's well there. The Pazon control box is very small and easy to hide. I like it's simple wiring and scuttlebutt has that Tri-spark is changing to an outside control unit because there have been some Commando failures due to vibrations. The bars that I have on now are original P11 ones that I had in my stash. Just finished a 15 mile test run so I'm going to let it cool and re-torque the head and check valve clearances along with a small list of finish work, like rewire my kill switch back to working order and possibly relocate the ridiculous ignition switch.

Cya, Jer

P11/121555 is now running
Here's another shot when I brought it home.
Jerry, I fitted a TriSpark ignition, no extra box, all fits inside distributor, needs a pair of 6v coils, easy to time for me. I believe the TriSpark cost is higher, but ignition looks like OEM.

Your P11 looks the part for 1967-68, exactly what we did at that time. could have higher handlebars , but your choice.
 
Last edited:
Too bad a strobe timing feature wasn't engineered into the P11's.

Hi Jerry,

I've never strobed a P11, but if you take off the outer primary you should be able to strobe using one of the marks on the rotor, if you have that version of rotor. You will have to correlate timing (BTDC) and angle of mark. If your rotor doesn't have marks, you could still put a dot of white typewriter correcting laquer (available in shops selling stationary) in the appropriate position and strobe against that.

-Knut
 
Thanks P400,The new 6V coils that I could have put on were new stock Lucas that are smaller in diameter and shorter so I stayed with the original 12V's. Cya, Jer

Yes, I did have to shop around to find "large diameter" 6v Lucas coils, but they are out there.
Yup, that's the higher bars for 1960's look, We were cool.
 
Last edited:
Hi Jerry,

I've never strobed a P11, but if you take off the outer primary you should be able to strobe using one of the marks on the rotor, if you have that version of rotor. You will have to correlate timing (BTDC) and angle of mark. If your rotor doesn't have marks, you could still put a dot of white typewriter correcting laquer (available in shops selling stationary) in the appropriate position and strobe against that.

-Knut
I thought of doing just that but haven't figured out a way to mount or mark a degree reference. The Pazon plate has degree scales on both sides for CW or CCW rotation but at this point it's pretty meaningless. Fortunately Norton's have good head design and aren't especially prone to detonation or pinging and there's a pretty good window of acceptable timing. Initially when I first got the engine to start on the Pazon the exhaust pipes turned cherry red in short order and the exhaust note was harsh and unpleasant. I concluded I had way too much advance and moved it correctly. Now it sounds and runs right but I'm still looking for the sweetest spot that gives easy starting (my right leg is wearing out) and good run out. So I adjust minutely every morning to note the difference. I'll get there soon. Thanks, Jer
 
I made a 20 gauge sheet metal "bridge" that picks up three inner chaincase screws. Using a degree wheel I found 30 degrees BTDC and made aligning marks on both the bridge and rotor. The screw holes in the bridge are purposely a tight fit.

I won't be able to test this until I get my sheet metal back from the painter, but my intention is to strobe it with the outer primary (and alternator stator) off. Wish me luck.
I'd like to see this when you get it done. I hope it works well. I may want to copy it. Thanks, Jer
 
Back
Top