Fork top "nut" engagement

Status
Not open for further replies.

Mr. Rick

VIP MEMBER
Joined
Feb 6, 2009
Messages
793
Country flag
Of course, I'm not so crazy as to try this, so let's just say a "friend" has the idea to get the clocks facing him more directly, to get the cafe look and to see the faces more easily.
The simplest way wd be to bend the ears of the clock holder. UNfortunately, every single person queried about bending cast aluminum says the same thing: "It's gonna break. Just don't do it". He has a couple of "spare" holders, and being sorta stubborn, will probably try to bend them anyway, putting them under load, heating to 350 F or so, letting them cool, and then increasing the load to get about 15 degrees of movement.

Another approach is to use some 1.5 x 1.125 aluminum pipe to make some bevel washers, one under the ear to tilt it up and another on top to get the "nut" headed straight down to the stanchion. The drawback here is that the bevel washers are necessarily much thicker than the stock item.
Stock parts have about 3/4" of thread which appear to be 1.125 dia and 20 tpi, so about 15 threads. We may assume that Norton determined 15 was enough, and perhaps more than enough.

So now the question is: What wd be the safe minimum for the number of threads to engage the stanchion? The answer wd determine if the goofy bevel washer idea is even feasible.
 
Option 1 best of luck with that
Option 2 You mean tapered washers not beveled washers. To get the angle you want the washers will take up
to much space (extra thickness) for your fork nuts (bolts) to have a satisfactory engagement (thread length)
and you would have to bore the gauge holders holes quite large to accept the fork nuts when on an angle.
Post some pics of the results
 
Sounds like a bad idea to me.

A simpler, and safer option would be to cut the clock holder mounts, re angle and weld them.

An even simpler option is to buy an off the shelf clock mount plate, usually sold in stainless steel, and bend that however you want (I used one of these, I didn’t bend it, and it tidies up the front end a lot IMHO).

He ain’t gonna bend the cast ones well. Even if they don’t break, they’ll be uneven and will just look like crash damaged parts !
 
An even simpler option is to buy an off the shelf clock mount plate, usually sold in stainless steel, and bend that however you want (I used one of these, I didn’t bend it, and it tidies up the front end a lot IMHO).
Don't forget to use the shorter nuts with these, or maybe he could use the broken off bits of the cast aluminum mounts as spacers.
 
I’m with FE, cut and weld.
If you have a stable way of cutting the bracket I think if you cut it at half the final angle (7.5 degrees for a 15 degree final) you should be able to flip the mounting piece over and it will match up correctly for the desired final angle. Be careful of the orientation when you cut, you could possibly wind up facing down instead of up. Draw it on a piece of cardboard and cut it out you will see what I mean. May need longer speedo and tach cables (or buy electronic gauges)
Pete
 
Mr. Rick
On my Mk3 I bypassed the fork nuts entirely and made an angled alloy plate which attached to the threaded console holes in the top clamp, then welded the instrument pods ( with the fork mounts cut off) to the plate. Gives the compact Z1 /Jota look I,ve always liked, but because you,ve angled the clocks upwards, there,s now a space between them and the headlight which looks awkward.
I fixed this by making my own stainless, standard type headlight mounts which raise the light to match the instrument cluster.
Instruments are better sighted, the headlight and indicators are raised for increased visibility and it works much better, specially with clip ons. A glance down at the clocks is a more natural 90 degrees or so.
The warning light console and ignition switch need moving back as well and to be honest, although it doesn,t cost much, there is alot of work involved to do it properly. Well worth it to me but maybe not to others.

As a "right click and insert" lazy person who doesn,t like iCloud etc, I can,t include pix but if you click on

https://commandospecialties.wordpress.com/category/british-bikes/page/1/

and scroll down past Norvin then keep going down to/isolastics/ nice youtube Commando selection to /another customer bike Jan 2018 / you can see the setup from the front right side. Click on the pic to zoom in.
Good luck if you decide to try the heat and bend but a partial angle cut and weld would be better!
 
Last edited by a moderator:
Very nice. I have to come up with something for mounting the gauges to a non-stock set of forks and triples, but I'd like to keep the original look as much as possible. Cutting the cups off and welding new brackets on look like a good solution. Thanks for the idea.

Ken
 
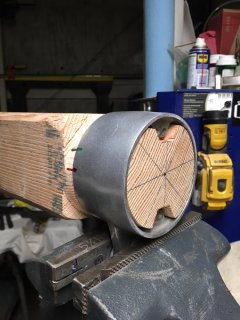
First (bending) attempt to push down on the cup with the ear mounted in a vice was a bust. Those ears are plenty strong; instead of the ear bending, the entire rear side of my workbench started lifting up!
 
Converta brackets, which I ran for a while, will kick back the instruments. You need to run instrument cables a few inches longer. Clubman Racing and Unity Triton carried them. You need shorter top nuts which Clubman Racing also sold.
 
First (bending) attempt to push down on the cup with the ear mounted in a vice was a bust. Those ears are plenty strong; instead of the ear bending, the entire rear side of my workbench started lifting up!
Your "friend" didn't attempt this cold? Did he?
 
Your "friend" didn't attempt this cold? Did he?

He's been advised that trying to bend them hot is the surest way to break them, hence the plan to put them under load, heat, and then wait for some cooling to take place.
And yes he was wearing a nice warm jacket...:)

The Converta brackets are cool, but too far from stock for his "taste", such as it is. And he's so cheap, he doesn't wanna hire a welder or buy new cables.
Of course, AFTER he breaks the first one, he'll likely be running down to the welder with the broken one and the other, too. :rolleyes:
 
Glad to hear that nobody caught a chill during this operation!!
I've had good results bending cast aluminium using heat
I may have been lucky !!
I always use a piece of wood to check the temperature ,just touching the aluminium until it leaves a black mark and you know the temperature is right, any more than that the aluminium starts to crumble
Your best bet is to cut them off and re weld them
On my commando I had to make them from scratch, I copied the commando design as I have Yamaha forks/yokes mine clamp on the stanchion above the yokes rather than bolt down
 
maybe I should of cast these on an angle
Fork top "nut" engagement
 
Here's what I (sorry, I mean my friend) made to try to bend them. We have a 350 F temp stick to tell if the cups are getting hot enough.

Nice cases, Don! and yeah, ya shoulda cast those ears on a 10-15 degree angle! In my friend's opinion, I mean...
 

Attachments

  • Fork top "nut" engagement
    ClockCase.JPG
    135.3 KB · Views: 273
Actually the things on top of your stanchions are 'Nolts'. I read that somewhere here.
 
So you read it on the internet? Well then, it must be true... :)
Quicker than "fork tube top bolts", for sure.
 
Status
Not open for further replies.
Back
Top