exploding rotor fix?

Status
Not open for further replies.
Joined
Feb 5, 2022
Messages
60
Country flag
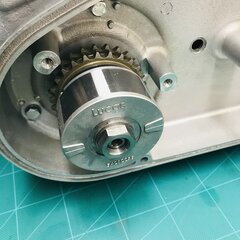
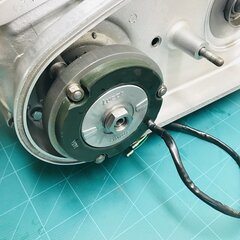
I've heard a lot about the lucas exploding rotors... but is there a fix that can be done to prevent explosion if I have the exploding variety (# xxxxx2006) but it is still tight (ok, has an almost imperceptible amount of wiggle)? Or is the only option to get a new one. Can the side be machined down and then clamped between two large washers, possibly forgoing the key all together? Or maybe with some sort of pegs to hold the washers to the rotor... or peg the washer to both the inner (steel) part and the outer (alloy) part and keep the key?


This is what I was looking for! Thanks.

For anyone else who finds this thread, the "fix" is to get two belleville washers, machine the faces of the rotor flat where the washers fit when concentric, and install with a washer on each side, cup side facing toward the rotor so as to clamp it. I assume the key is kept, and there is also some mention of shimming, on the back side of the rotor, but my understanding is that this is only to allign the rotor and stator, I don't imagine it has an effect on the clamping ability of the washers.

EDIT: the belleville washers should be 2" OD and 3/4" ID
 
Last edited:
This is what I was looking for! Thanks.

For anyone else who finds this thread, the "fix" is to get two belleville washers, machine the faces of the rotor flat where the washers fit when concentric, and install with a washer on each side, cup side facing toward the rotor so as to clamp it. I assume the key is kept, and there is also some mention of shimming, on the back side of the rotor, but my understanding is that this is only to allign the rotor and stator, I don't imagine it has an effect on the clamping ability of the washers.

EDIT: the belleville washers should be 2" OD and 3/4" ID
How thick?
 
Two axial washers will stop a radial 'expansion ?
Very optimistic.

YcKWXq.jpg


Edit - Not my picture.
 
Last edited:
Two axial washers will stop a radial 'expansion ?
Very optimistic.

View attachment 85850
If u look at how the rotor is constructed, the expansion is caused by the center steel piece rotating inside the alloy and magnets. Since the center steel is a hexagon inside the casting (with a magnet resting on each flat side), the twisting is what pushes the magnets out. So the idea with the washers (which are concave sprung steel) is not to prevent axial movement but to clamp the outer alloy and magnets to the crank shaft independently of the inner steel part (or clamping the inner steel to the outer alloy, depending on how you want to look at it) preventing the steel from rotating inside the alloy. I wouldn’t want to do this on a rotor that is already loose, but if I can save $100+ and feel confident in it on a road bike I will, especially when I already have the tools to turn the faces of the rotor flat.

The construction of the rotor: https://www.accessnorton.com/NortonCommando/lucas-alternator-rotors.18376/
 
Last edited:
but my understanding is that this is only to allign the rotor and stator, I don't imagine it has an effect on the clamping ability of the washers.

EDIT: the belleville washers should be 2" OD and 3/4" ID
The shims for the rotor are there for adjusting the distance between the rotor timing mark and the timing indicator plate which is mounted inside the primary chain case cover. You would shim the rotor so that the timing marks would be close but not hitting the timing indicator plate.

My 1974 Commando has the original rotor with the Belleville washers and has no shims at all. The timing indicator plate distance is correctly spaced. My original rotor is a factory modified early type rotor and was machined flat on both the front and back sides which allows the Belleville washers to compress flat. If someone wants to do this modification to the rotor, you may need to grind the end of the Woodruff key so that it doesn't interfere with the Belleville washer. Also, I put the spacer that goes between the sprocket and the rotor with the internal step facing the sprocket. That way the spacer has more purchase area on the Belleville washer.

Of course this would not be a fix for a loose rotor. This is just to help prevent a rotor from working loose.

My original rotor on my bike has almost 28,000 miles on it now. It is still holding up fine.


Peter Joe
 
Right, and a new rotor costs how much?
That looks seriously ugly TW. What else did it destroy on the way out?

Expansion was a polite work for total disintegration.
That picture (and others) was posted on ADV Rider from a bike that was recommissioned, maybe a member here, Robert ?.
I think one of the inner primary stator mount pedestals was also broken off at the base. (replacement inner primary, stator and rotor)
#
Steve, I can not remember how much my new 'Lucas rotor cost (I bought the new 3Ph Stator / Rotor / Podtronics off Rex's Speed shop in the UK as a package - The POD replaced now with a Tri Spark Mosfet)
I see no reason to screw around with parts that could fail, there looked to be nothing wrong with the original 1973/74 parts but replaced them anyway.

I have no inner shims, the inner spacer is reduced in thickness, the key is new, the rotor is modified (OD) , the stator is modified, the outer retaining nut is modified, the inner primary cover is modified.
It has no large OD Belleville washers.

st.jpg c8.jpg c9.jpg

Detect some movement in the rotor, not sure, throw it in the bin.
If I was closer post wise the OP could have had my original rotor which seemed fine. (round with a hole in the middle)
 
Expansion was a polite work for total disintegration.
That picture (and others) was posted on ADV Rider from a bike that was recommissioned, maybe a member here, Robert ?.
I think one of the inner primary stator mount pedestals was also broken off at the base. (replacement inner primary, stator and rotor)
#
Steve, I can not remember how much my new 'Lucas rotor cost (I bought the new 3Ph Stator / Rotor / Podtronics off Rex's Speed shop in the UK as a package - The POD replaced now with a Tri Spark Mosfet)
I see no reason to screw around with parts that could fail, there looked to be nothing wrong with the original 1973/74 parts but replaced them anyway.

I have no inner shims, the inner spacer is reduced in thickness, the key is new, the rotor is modified (OD) , the stator is modified, the outer retaining nut is modified, the inner primary cover is modified.
It has no large OD Belleville washers.

View attachment 85881 View attachment 85879 View attachment 85880

Detect some movement in the rotor, not sure, throw it in the bin.
If I was closer post wise the OP could have had my original rotor which seemed fine. (round with a hole in the middle)
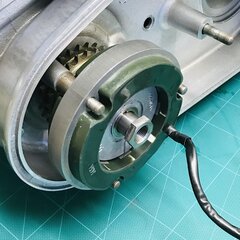
From everything I've read, the "total disintegration" is a result of the expansion; the rotor seems fine, then the center starts rotating inside the outer, pushing the magnets out. Once the magnets get pushed far enough out, they start scraping on the stator, eventually getting caught and exploding, ruining many other parts in the process. However if you can prevent the initial rotation of the inner part within the alloy, the rest will never happen. That's assuming of course that you have a rotor that doesn't have any existing looseness, which can be tested by clamping the inner part between two washers in a vice and attempting to rotate the outer part (with some sort of non-marring wrench/handle).

For someone who wants a set it and forget it solution, I probably would recommend getting a new one, but at the very least the washers will slow down the expansion to rate where looseness/ scrapping can be caught before total explosion with careful routine inspections.
 
Not entirely sure what you mean by this, but if I came across as rude or as disagreeing with you apologies, I didn't mean either. I completely understand that the washer clamp is a bodge (or dodge according to L.A.B. in the posts linked above). I am simply saying that if you are comfortable with greatly decreasing (not completely eliminating) the chance of an explosion on a fairly easily checked part (which I am), the washers would theoretically work; in fact they seem to be unofficially approved by Norton and installed on some bikes from new (see the posts L.A.B linked). Buying a new rotor is the better option if money is not a concern. It's also one of those "fixes" that I would only want to do myself, that way I know exactly what to look for when checking for early signs of failure.
 
Hose clamps are a radial device, washers axial but your point is taken. (and I was being a wise guy )

There is no such thing as rude on the internet, it is not real (technically) and I am a no one so my words are worth little.

My concern is I seem to be the only one suggesting a replacement rotor (even an ad in the parts wanted forum here for a decent used one) new or otherwise.
The Andover Norton parts pages show no such washers for the later model bikes so they do not appear to be parts on their (AN) radar and the rotor would have needed machining by Lucas at the time to accept those items.
Maybe they do work to some degree but based on that picture I posted, if they let go the bill would be in the $100's besides the pucker factor if at speed.

Ohh and welcome to this joint.
 
I am simply saying that if you are comfortable with greatly decreasing (not completely eliminating) the chance of an explosion on a fairly easily checked part (which I am), washers would theoretically work; in fact they seem to be unofficially approved by Norton and installed on some bikes from new (see the posts L.A.B linked).

I'm not aware of them being fitted to any bikes "from new", as comnoz (Jim Comstock) said;

The belleville washer was never standard on any Norton that I am aware of however it was a factory approved update to help keep the rotor attached to it's center. I keep a stack of them here and use them regularly. I will use them on both sides of the rotor if it helps to center the rotor in the stator. Jim
 
I am definitely in the "if in doubt, replace it camp" on this item.
The binding material in the rotor is aluminium, which has no endurance limit, meaning, if you repeatedly stress it to a reasonable degree it will fail someday, unlike steel.
For the price of a new rotor, I wouldn't risk it!
Cheers
 
Hose clamps are a radial device, washers axial but your point is taken. (and I was being a wise guy )

There is no such thing as rude on the internet, it is not real (technically) and I am a no one so my words are worth little.

My concern is I seem to be the only one suggesting a replacement rotor (even an ad in the parts wanted forum here for a decent used one) new or otherwise.
The Andover Norton parts pages show no such washers for the later model bikes so they do not appear to be parts on their (AN) radar and the rotor would have needed machining by Lucas at the time to accept those items.
Maybe they do work to some degree but based on that picture I posted, if they let go the bill would be in the $100's besides the pucker factor if at speed.

Ohh and welcome to this joint.
Wow, so easy to misinterpret things on the internet, my bad… anyway I get your point. Would anyone who has actually added the washers like to chime in as to their experience with it/ perceived effectiveness?
 
I've heard a lot about the lucas exploding rotors... but is there a fix that can be done to prevent explosion if I have the exploding variety (# xxxxx2006) but it is still tight (ok, has an almost imperceptible amount of wiggle)? Or is the only option to get a new one. Can the side be machined down and then clamped between two large washers, possibly forgoing the key all together? Or maybe with some sort of pegs to hold the washers to the rotor... or peg the washer to both the inner (steel) part and the outer (alloy) part and keep the key?
Why dick around and risk a massive damage and loss of $$$ when you can buy an improved new alterantor rotor for $120 ? This is an act of trying to save money at the wrong place.

Rob ss is correct. The early rotor (54212006) is held together by the aluminum casting material only, which is susceptible to creep. The driving force is centrifugal action on the magnets and in turn on the laminate caps and the aluminum casting, imposing radial stress on the latter, which balances through the outer skin. Machining the outer skin does not seem wise in light of this.

The OP claims that failure starts as a shear failure at the centre, allowing the latter to rotate. This is not the case due to geometric interlocking, and interlocking explains why old rotors may exhibit a slight "wiggle" (centre to outer casting play) without failing.

Centrifugal action is proportional to the square of the rotating speed (rev). Creep is also age dependant, that is, it accumulates over time. Make no mistake, your old alternator rotor will fail, despite Belleville washers.

- Knut
 
dont forget the loose rotor noise factor i thought the bottom end on my 68 BSA A65 was fixin' to throw a rod knocking at light throttle loads became alarming bike need a new rotor anyway so after i put the new one in noise went away much to my relief and $$
 
. but is there a fix that can be done to prevent explosion if I have the exploding variety (# xxxxx2006) but it is still tight (ok, has an almost imperceptible amount of wiggle)? Or is the only option to get a new one.
If you feel a bit of wiggle, try this. I tried this trick which worked well. Too well.

Oil filter wrench, some rubber strips and a couple thick washers in a vice clamping the rotor center.

The rotor broke loose with not much torque. Less than 15-20 ft lbs. by my guess and having just dome the clutch nut to 40 lbs.


IMG_20170819_155353.jpg


If you have any play, just get a new rotor like I did. You can then put a Belleville washer (or two) on it, like I have now with my CNW estart.
 
Status
Not open for further replies.
Back
Top