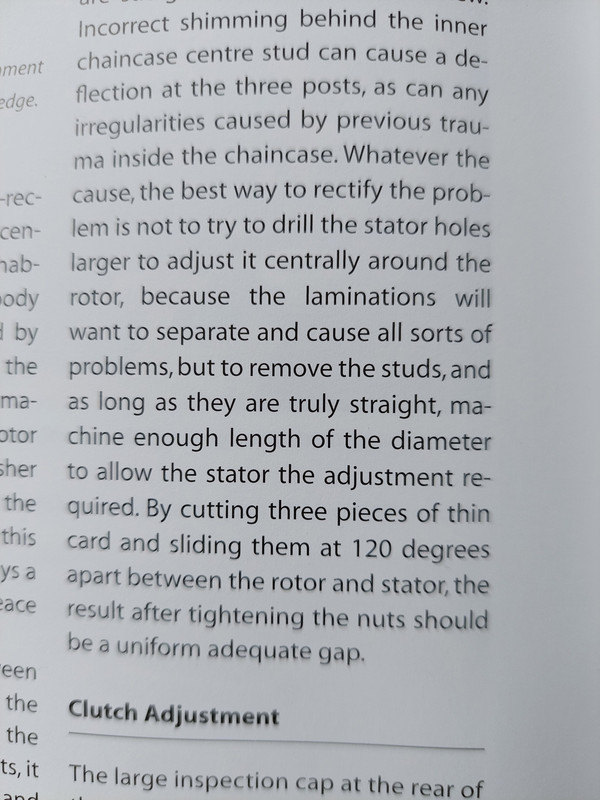
explanation please

Joined
Oct 28, 2014
Messages
1,996
Country flag
can anyone tell me why there is almost always too much clearance between stator and rotor about 10 o'clock to 6 o'clock and almost always too little clearance at 12 o'clock - 5 o'clock?
Theory #1...Norton drilled the holes slightly off in the primary cover and never corrected it. This could be either the big circle that indexes on the crankcase or the three studs for the stator.
 
88 views and not one response.
Post some photos or a video of what your are describing. Some measurements of the fluctuation in spacing you note, stuff like that.
There are soooo many variables that can cause what you speak of.
My stator/rotor does not reflect the problems you are stating.
 
can anyone tell me why there is almost always too much clearance between stator and rotor about 10 o'clock to 6 o'clock and almost always too little clearance at 12 o'clock - 5 o'clock?
Theory #1...Norton drilled the holes slightly off in the primary cover and never corrected it. This could be either the big circle that indexes on the crankcase or the three studs for the stator.
Yes, that is common. However, often the inner primary is improper shimmed. Also, the spacers are sometimes slightly different lengths. The bigger gap doesn't make a difference as long as the smallest gap is 0.008" or more.
 
The inner primary cover is fastened by 3 bolts and is located by the inner/outer primary stud...those 4 things in my opinion can cause variations..(and bent stator location studs ?)..ive tried jiggling the inner cover around ...made alloy spacers to adjust the stator to get it central ...and machined 0. 005. off the rotor ...problem solved.
 

Attachments

  • explanation please
    Screenshot_20230520-115521_Gallery.webp
    89.8 KB · Views: 111
Last edited:
can anyone tell me why there is almost always too much clearance between stator and rotor about 10 o'clock to 6 o'clock and almost always too little clearance at 12 o'clock - 5 o'clock?
Theory #1...Norton drilled the holes slightly off in the primary cover and never corrected it. This could be either the big circle that indexes on the crankcase or the three studs for the stator.
Somewhere over the decades I read, loosen the the nuts slight then gently tap the stator with a soft hammer on the opposite side of too little clearance. Tighten the nuts and recheck. Yes all the Commandos I have owned had this…’69, ‘70, 72, ‘73 750s. I don’t recall on the ‘74 850 JPN.
 
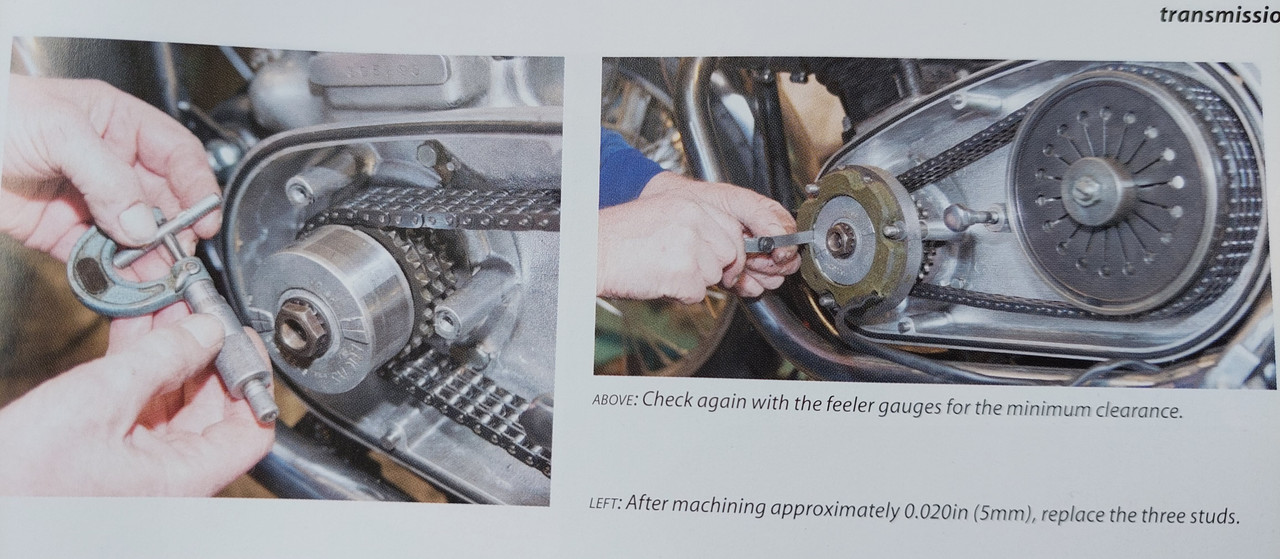
The inner primary locates on the crank case...I cannot get any movement here. The holes for the three mounting bolts were drilled oversize so the case would drop on with no problems. Quite often the center stud is off center in its hole, indicating alignment problems. Expecting the old perhaps worn out machinery to hold those dimensions is asking a lot. Perhaps it was never set up right in the first place. So they made the same error over and over again, some a little worse than others. I notice the same problem in the same place over and over. I usually use a dremel with a sanding roll on the stator but the current one is a real problem.
 
I also have taken a dremel to the stator ...in the end this sorted it out to get the required clearance i needed.
 

Attachments

  • explanation please
    Screenshot_20230520-134137_Brave.webp
    33 KB · Views: 108
The inner primary locates on the crank case...I cannot get any movement here. The holes for the three mounting bolts were drilled oversize so the case would drop on with no problems. Quite often the center stud is off center in its hole, indicating alignment problems. Expecting the old perhaps worn out machinery to hold those dimensions is asking a lot. Perhaps it was never set up right in the first place. So they made the same error over and over again, some a little worse than others. I notice the same problem in the same place over and over. I usually use a dremel with a sanding roll on the stator but the current one is a real problem.
I just used a deep drive impact socket on a T handle to tweak my double nutted studs a nudge.
 
No explaining needed the studs have to be adjusted to each stator/rotor from the factory they are done if over 50 years they probably have been changed, replaced so studs have to be readjusted for the stator/rotor to get it right and usually can be done with light taps but getting the right stud is the hardest to get right.
 
I've been doing this exact same thing today as, similar to the OP, my stator & rotor has little clearance at around 12 o'clock to 3 o'clock.

I took the precaution of buying 6 x new (060386) bolts in case one (or more) of the originals were bent. They weren't (of course they would have been if I hadn't have bought any :rolleyes: ). I gave three of them to my youngest lad to machine for me at his work.

explanation please

I may try ILLF8ED's tapping method, but weary of damaging the rear chain case stud bosses.

explanation please
By the sounds of things your lad on a lathe will be far more beneficial than a hammer...imo
 
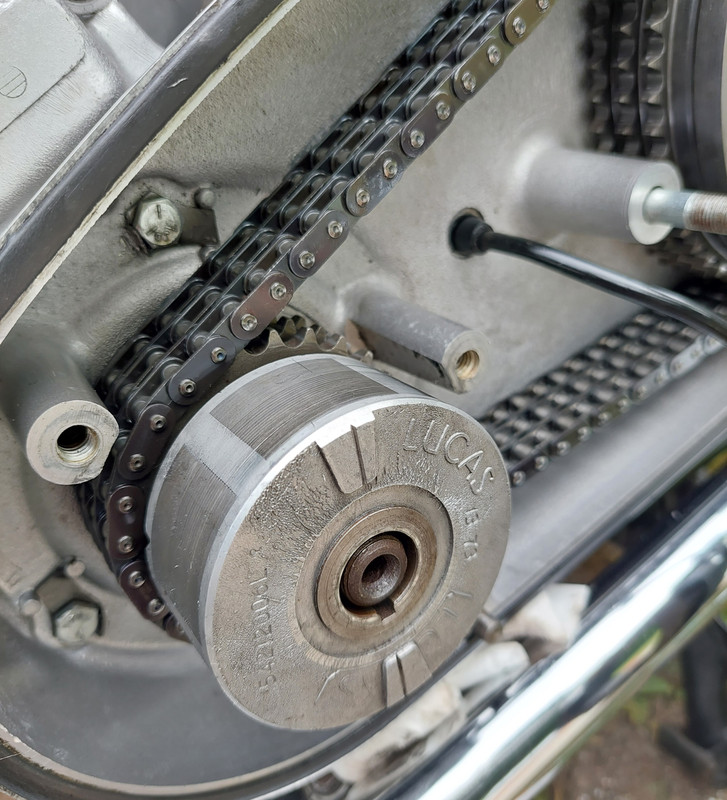
Get him to turn a few thou off the rotor too.

I do. I always run a .020” gap these days on all my Lucas / Lucas replica equipped old nails.

No rubbing, no power issues. One thing crossed off of ’the things to worry about‘ list.
 
Last edited:
I've been doing this exact same thing today as, similar to the OP, my stator & rotor has little clearance at around 12 o'clock to 3 o'clock.

I took the precaution of buying 6 x new (060386) bolts in case one (or more) of the originals were bent. They weren't (of course they would have been if I hadn't have bought any :rolleyes: ). I gave three of them to my youngest lad to machine for me at his work.

explanation please

I may try ILLF8ED's tapping method, but weary of damaging the rear chain case stud bosses.

explanation please
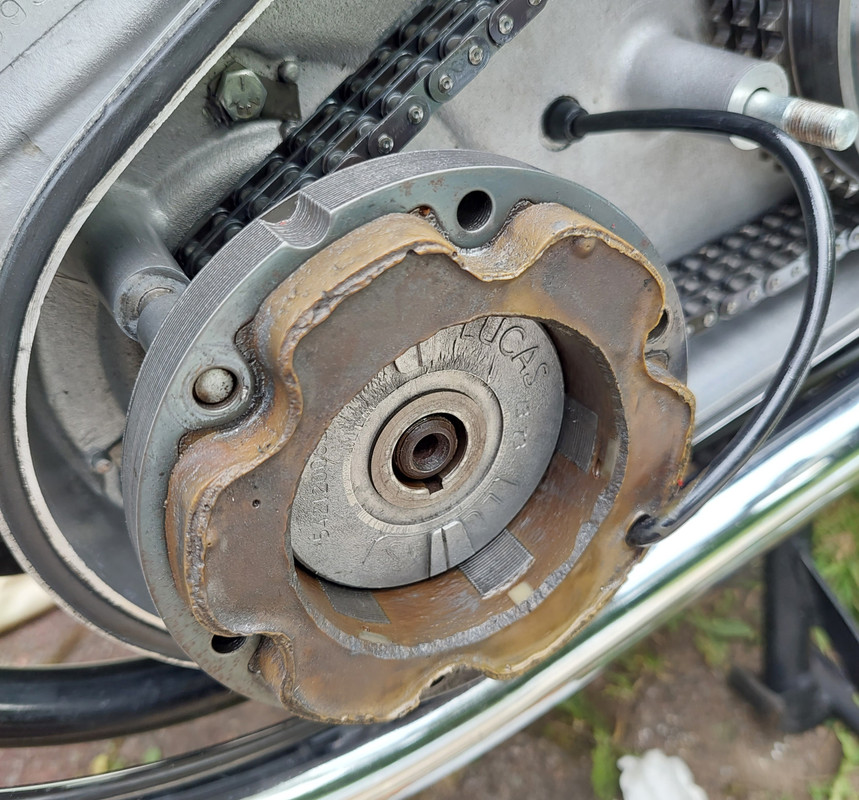
I could be wrong but to me it looks like the stator maybe showing a sign of slight excess heat ...based on the colour of the resin at the top half of the stator compared to the bottom...?
 
Last edited:
I would prefer to machine the rotor and not the studs.
Before machining anything, do this simple test to ensure that the stator is not cocked in relation to the rotor. At the tightest point slowly push a feeler gauge straight in. If loose at first and then gets tight before going all the way in the stator is likely cocked. Another way is to find the feeler gauge that will go all the way in and see if a thicker one will go part way in. The spacers in my experience are NOT precision, often cause a cocked stator, and can often be moved around to eliminate the problem. If cocked and not caused by the spacers, most likely the inner primary is incorrectly installed and/or shimmed.

Fast Eddie's way certainly takes away the PITA but since I don't have access to a lathe, I try a little harder and have never had to turn, file, drill, or bend anything. I do lightly use a tapered hand reamer to slightly open the inside and outside of each whole, but that does not make the hole larger all the way through.
 
Back
Top