1974 850 Roadster - On The Road Again - Maybe

MCP

Joined
Apr 8, 2013
Messages
92
Country flag
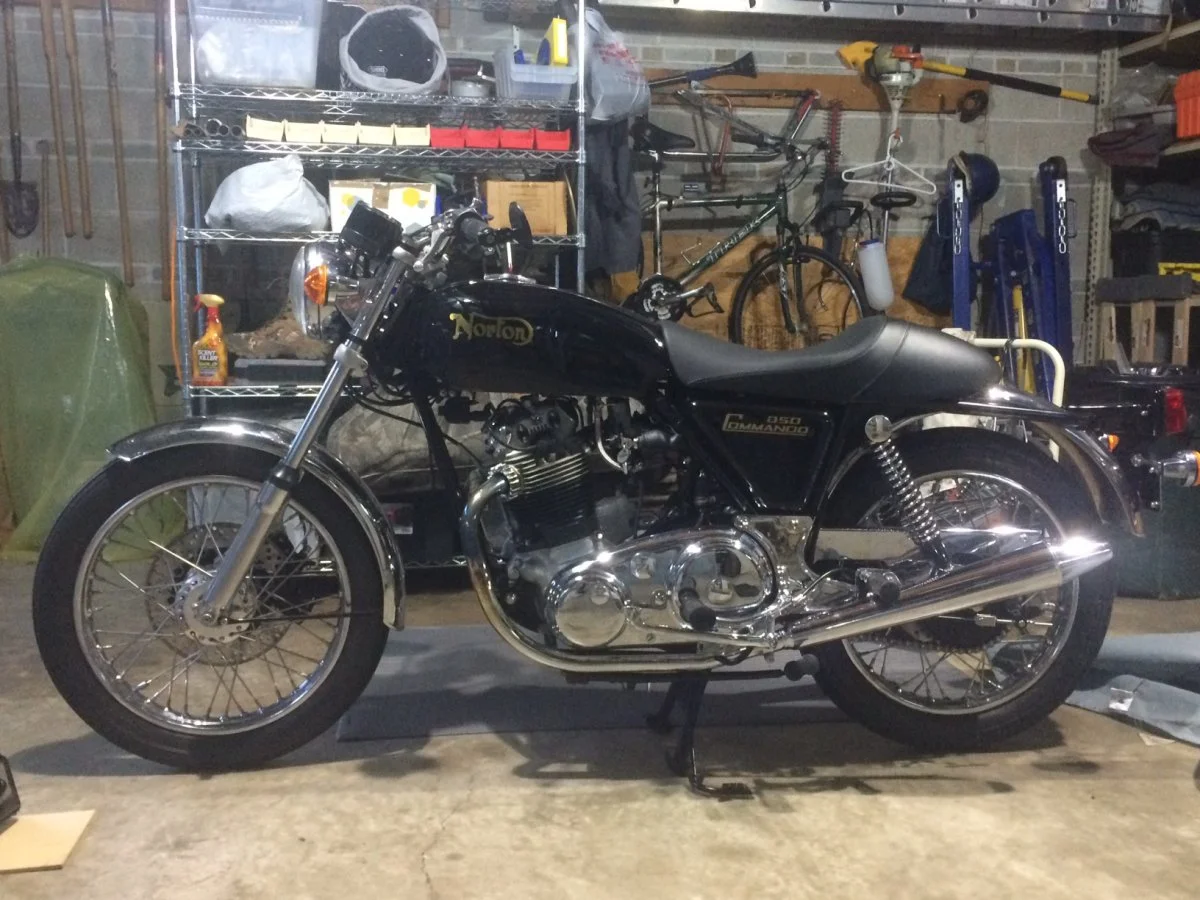
I have a 74 MK2A which I have owned since new but has been in storage for about 25 years - more like 30. I'm looking for some input on where and how to start on this. I would like to do as much as I can but I'm not knowledgeable enough to tear the motor down if need be. I have been doing work on my other bikes for years, fluids, brakes, and a few more involved projects and I worked on this bike when I was a teenager.

I don't need a showroom bike when done, and my budget is $3 -$5000 - I'd be a lot happier with $3000.

The current condition of the bike is:
- engine turns over with good compression - I'll have it tested.
- fuel tank has a bit of fuel in it - think its toast.
- triple tree is rusted
- ding in front fender and 1 pipe
- think I drained the carbs - hoses are off
- prior to storage I took the plugs out an put a bit of oil down each, then put the plugs back in
- handlebars have a bit of rust
- rims look good
- either the tires are holding air or have turned to cement


So, ideally I would like to do what I can and have someone finish it. The questions I have to start with are:

1) Where to start?
2) Should I be concerned with the isolastic motor mount?
3) What about the gear box, sump?
4) Anything I can do with the wheel bearings?

I have a lot of other questions too, but I'll start here.

Thanks for any feedback.
1974 850 Roadster - On The Road Again - Maybe
 
I tried to post a picture, but that didn't work.

Ok - got it

1974 850 Roadster - On The Road Again - Maybe


1974 850 Roadster - On The Road Again - Maybe


1974 850 Roadster - On The Road Again - Maybe


1974 850 Roadster - On The Road Again - Maybe
 
Last edited:
1) Where to start?........Bare Frame. Once you start digging in there you will be happy you did.
2) Should I be concerned with the isolastic motor mount?.....yes, what does rubber do when it gets old?
3) What about the gear box, sump?....have someone who knows what they are doing inspect and repair as needed. If you have the skills take it on yourself and take your time.
4) Anything I can do with the wheel bearings?....depends on condition....I replaced all bearings on mine with the mindset being I have it off now so inspect and replace if there is anything of questionable condition. Bearing are not that expensive compared to the peace of mind acquired when renewed.
Your project does take attention and dedication to attain a quality end result.


What is the one constant process that rubber, plastic and metal all share over 25 years of sitting...............

I just completed restoration of 74 Commando. Found it covered by a tarp underneath a collapsed hay loft in a barn in Nevada. This bike only had 1,300 miles on it, but had been sitting for 44 years.
Once I began initial inspection it immediately became apparent that every piece of rubber and plastic had to be replaced. From the cable sheathing to the Isolastics to the valves seals. The metal faired much better as it was aging in a constantly dry climate.

No way was I going to get on a 500 lb. two wheeled machine and trust it to hold together at 80 + MPH without a complete tear down and rebuild.
My initial budget took a serious ass kicking. To the point I changed the password to my Excel spreadsheet so you know who would be delayed in realizing the money I was putting into it. I took my time and spaced out my "investment";) over a year and half.

My thought process, and motivation was a simple one, bring this bike back to a reliable and safe condition. I always made sure I spent at least 30 minutes a day on whatever system of the bike I was taking on at that time. Helped keep me motivated.

Not passing judgement or trying to issue edict here, just sharing one restorers thought process and end desire.

 
Linelinger - nice job on the bike and thank you for the input - common sense really replacing parts that naturally deteriorate; I guess I was hoping for the easy answer - and I tend to forget how much time has passed since I bought it.

What was the most difficult part of the restoration?

1) Technically?
2) Generally?

One of my concerns in stripping the bike to the frame is remembering the steps to get it back together, particularly if I string this out over a year. I was thinking of taking photos of each stage hoping that would help. I wouldn't do any motor work, I don't have the skill or confidence in that.

Did you do wiring too?

Thanks
 
Whatever your budget is, double it (unless you researched every nut, bolt, and seal you'll need).

Here is a punchlist:

CHASSIS
FRAME
SWINGARM
TRANNY FRAME
FRONT ENGINE MOUNT
FRONT ISOLASTIC
TOP ENGINE MOUNT
REAR ISOLASTIC
SHOCKS
FORKS
YOKES
F. WHEEL ASSY
F. BRAKE CALIPER
F. FENDER
F. TIRE
F. AXLE
R. WHEEL ASSY
R. BRAKE CALIPER
R. FENDER
R. TIRE
R. AXLE ASSY w/ adjusters
CYCLE PARTS
SEAT
GAS TANK
FAIRING
FAIRING BRACKETS
WINDSCREEN
MIRRORS
OIL TANK
OIL & FUEL LINES
OIL FILTER & ADAPTER
SIDECOVERS
HEADLIGHT MOUNTS
INSTRUMENTS
METER MOUNTS
AIR FILTER
HANDLEBARS
THROTTLE
CLUTCH LEVER
F.BRAKE LEVER
F.BRAKE CABLE / HOSE
F.BRAKE MASTER CYL.
GRIPS
SIDESTAND
CENTERSTAND
Z-BRACKETS
FOOTPEGS
R.BRAKE PEDAL
R.BRAKE CABLE/HOSE
R.BRAKE MASTER CYL.
SHIFTER
KICKSTARTER
THROTTLE CABLE ASSY.
CHOKE LEVER & CABLES
CLUTCH CABLE
TACH CABLE
SPEEDO CABLE
CHAIN
CHAINGUARD
BRACKETS
TAIL LIGHT BRACKET
BATTERY TRAY
HARDWARE
ELECTRICAL
HEADLIGHT & BUCKET
TAIL LIGHT
WIRING
BATTERY
REGULATOR / ZENER DIODE
RECTIFIER
LIGHT SWITCH
HORN
FLASHER
ASSIMM, 2MC, CAPS
KEYSWITCH
RIGHT CLUSTER
LEFT CLUSTER
TURN SIGNALS (4)
IGNITION
COILS & PLUG WIRES
BOTTOM END
CRANKCASES
TACH DRIVE
CRANKSHAFT
MAIN BEARINGS
RODS
PISTONS
TIMING COVER
IGNITION COVER
CAM
CAM DRIVE ASSY & CHAIN
PRIMARY CASES
PRI. CHAIN
E.STARTER
STARTER DRIVETRAIN
CLUTCH
ALTERNATOR
TRANNY COVERS & BITS
TRANNY CASE
TRANNY GEARS & SHAFTS
TRANNY BUSHINGS & BEARINGS
OIL PUMP
TOP END
CYLINDERS
CAM FOLLOWERS
HEAD
HEADBOLTS
GUIDES
VALVES
SPRINGS
ROCKERS
INSPECTION CAPS
PUSHRODS
CARBS
HEADERS
MUFFLERS
EXHAUST HARDWARE
ENGINE BOLTS
SPARK PLUGS
CONSUMABLES
 
Thank you for these links, great information and ideas for the process.

Is it possible to remove the entire motor once I have disconnected everything. I have the clutch puller (I put a stronger clutch in years ago) but I don't have any other of the specialty tools in order to split the primary from the engine. Since I'm not going to work on the motor myself, I'll take it to someone; I was hoping I could just pull it as one piece. That would make it easier for me, do you have any thoughts on that option.

Thanks


There was a technical articles on Old Britts web site that seem to have been taken down, but you can find some of it still on the Wayback machine.

https://web.archive.org/web/20120102041834/http://www.oldbritts.com/dismantling.html

and then the reverse

http://www.oldbritts.com/ob_new_bike.html

and lots of general stuff - which was very useful to me in my rebuild.

http://www.oldbritts.com/ob_tech.html
 
grandpaul - thanks for the list.

I'm going to take the list and put it in an excel sheet then insert the individual parts for each category (with prices) based on what I expect to replace. I`ll use that for my base budget.


Whatever your budget is, double it (unless you researched every nut, bolt, and seal you'll need).

Here is a punchlist:

CHASSIS
FRAME
SWINGARM
TRANNY FRAME
FRONT ENGINE MOUNT
FRONT ISOLASTIC
TOP ENGINE MOUNT
REAR ISOLASTIC
SHOCKS
FORKS
YOKES
F. WHEEL ASSY
F. BRAKE CALIPER
F. FENDER
F. TIRE
F. AXLE
R. WHEEL ASSY
R. BRAKE CALIPER
R. FENDER
R. TIRE
R. AXLE ASSY w/ adjusters
CYCLE PARTS
SEAT
GAS TANK
FAIRING
FAIRING BRACKETS
WINDSCREEN
MIRRORS
OIL TANK
OIL & FUEL LINES
OIL FILTER & ADAPTER
SIDECOVERS
HEADLIGHT MOUNTS
INSTRUMENTS
METER MOUNTS
AIR FILTER
HANDLEBARS
THROTTLE
CLUTCH LEVER
F.BRAKE LEVER
F.BRAKE CABLE / HOSE
F.BRAKE MASTER CYL.
GRIPS
SIDESTAND
CENTERSTAND
Z-BRACKETS
FOOTPEGS
R.BRAKE PEDAL
R.BRAKE CABLE/HOSE
R.BRAKE MASTER CYL.
SHIFTER
KICKSTARTER
THROTTLE CABLE ASSY.
CHOKE LEVER & CABLES
CLUTCH CABLE
TACH CABLE
SPEEDO CABLE
CHAIN
CHAINGUARD
BRACKETS
TAIL LIGHT BRACKET
BATTERY TRAY
HARDWARE
ELECTRICAL
HEADLIGHT & BUCKET
TAIL LIGHT
WIRING
BATTERY
REGULATOR / ZENER DIODE
RECTIFIER
LIGHT SWITCH
HORN
FLASHER
ASSIMM, 2MC, CAPS
KEYSWITCH
RIGHT CLUSTER
LEFT CLUSTER
TURN SIGNALS (4)
IGNITION
COILS & PLUG WIRES
BOTTOM END
CRANKCASES
TACH DRIVE
CRANKSHAFT
MAIN BEARINGS
RODS
PISTONS
TIMING COVER
IGNITION COVER
CAM
CAM DRIVE ASSY & CHAIN
PRIMARY CASES
PRI. CHAIN
E.STARTER
STARTER DRIVETRAIN
CLUTCH
ALTERNATOR
TRANNY COVERS & BITS
TRANNY CASE
TRANNY GEARS & SHAFTS
TRANNY BUSHINGS & BEARINGS
OIL PUMP
TOP END
CYLINDERS
CAM FOLLOWERS
HEAD
HEADBOLTS
GUIDES
VALVES
SPRINGS
ROCKERS
INSPECTION CAPS
PUSHRODS
CARBS
HEADERS
MUFFLERS
EXHAUST HARDWARE
ENGINE BOLTS
SPARK PLUGS
CONSUMABLES
 
Thank you for these links, great information and ideas for the process.

Is it possible to remove the entire motor once I have disconnected everything. I have the clutch puller (I put a stronger clutch in years ago) but I don't have any other of the specialty tools in order to split the primary from the engine. Since I'm not going to work on the motor myself, I'll take it to someone; I was hoping I could just pull it as one piece. That would make it easier for me, do you have any thoughts on that option.

Thanks
Yes, it is possible, and I did it with the frame on a stand. It needs four hands or do the reverse of these.

https://www.accessnorton.com/NortonCommando/complete-engine-install.19969/

https://www.accessnorton.com/NortonCommando/advice-for-fitting-engine-gearbox-to-frame.22783/
 
grandpaul - thanks for the list.

I'm going to take the list and put it in an excel sheet then insert the individual parts for each category (with prices) based on what I expect to replace. I`ll use that for my base budget.
That was taken from my spreadsheet, I could save you the time.
 
So I've taken the plunge and started to restore the bike. My plan is to strip it down, replace whats needed but not remove the motor or gear box. When its assembled I'll take it to a local British mechanic who will access the motor and if need be pull it. I hope that won't be necessary.

These steps are ass backwards, but it gives me a winter project so in the spring it will be ready for the final look over.

I'm no mechanic and this is my first restoration project, so here are the first of many questions to come.

Oh yea, I'm trying to do this on the cheap so bear with me and thanks for any input.

Wondering if these are salvageable.

Master cylinder piston
1974 850 Roadster - On The Road Again - Maybe


Master cylinder
1974 850 Roadster - On The Road Again - Maybe


Caliper Piston
1974 850 Roadster - On The Road Again - Maybe


Main shaft
1974 850 Roadster - On The Road Again - Maybe
 
I returned an 850 '74 to service after it sat for 3-4 decades. Had 8300 on the clock when I acquired it as a HiRider last January. Engine was able to start & run, but the (single) Amal 932 carb needed a very thorough cleaning and new needle jet & needle. Since I'm new to carbs/points, didn't want to complicate things with restoring as a dual carb with points. Fitted an EI. For the front brake, I bought the MC 1/2" re-sleeve kit from Madass140 on these forums with new stainless covered hydraulic hose. Fully rebuilt the caliper with new seals and pistons (stainless). Wheel bearings were showing no signs of notchiness and seem very smooth, evidence of grease still doing it's thing. New tubes/tire (Dunlop K70's with bead-balanced tubes). The 4 position ignition switch was not being reliable and though they can be serviced, mine was falling apart when I dismantled so just got a replacement. I cleaned/polished all the electrical component contacts (reg/zener/2 MC/Ground connections etc etc). Did all the component tests listed in the shop manual. Solved a low running voltage issue. New coils came with my EI (Vape-Wassell EI w. Lucas coils kit from Eurojumbalya). New fluids all around. New filter. New fuel hoses with in line filters. New petcocks (originals were leaking).New gas cap seal. New brake/clutch/choke/throttle cables. New rear shoes & springs. Ran for the first month or two with original ISO's...now I've replaced the front (vernier type) and headstead...rear to come at a later time).

Bike is running great...done 4000 miles on it this summer but I still have more major jobs planned. Just a couple of weeks ago she started making smoke right side exhaust on throttle blips. Seemed like was the intake valve seal and did the procedure listed in this forums to swap out the seal without removing the head. Solved the smoke. Need to do the left side soon for good measure but it is still sealing sufficiently. Noted the valve springs were under length spec so will also swap those out for new.
The season is now over here and I'm planning to do shock rebuild with new bushes/seals etc. Tranny layshaft bearing. Swingarm spindle pull out and clean (may do the mod with collars). New chain needed.

My point is, if your bike is in reasonable shape, low mileage, good compression, starting/running, you may not absolutely require a complete tear down to get it on the road. Do all the jobs needs to get to reliable and functional, then delve deeper after some riding.
 
Tornado, sounds like your plan has worked out well. I'm working along the same lines.

Thanks
 
Tornado, do the layshaft bearing as soon as possible. Things get ugly when it fails, locks the rear wheel.
 
Tornado, do the layshaft bearing as soon as possible. Things get ugly when it fails, locks the rear wheel.
Yup...it's on thje list for the winter lay-over...which just started last week ;-)
 
Take pictures of every step of disassembly and tear down and even more when reassembling, keep shooting all the way to completion. They become an invaluable reference when rebuilding and offer verification of work performed upon resale.
 
I've taken the head off (need to repair a fin from years ago) and I'm looking for your thoughts on what to do or not with these pistons?

Background - I had the compression tested 30 odd years ago prior to storage and it was good then, with very few miles ridden after that and a service. My goal is to replace the basics now, everything but the internals, paint it and then have it looked over and tuned by a professional. Fingers crossed there are no serious issues on that check out. There are 20,000 miles on the bike.

1) Since the head is off for service and possibly paint I was thinking of taking the barrels off for paint too. Is that an issue? Opening a can of worms?

2) I've been reading where the pistons if bad should be de-carboned. Are these bad? Good idea?

1974 850 Roadster - On The Road Again - Maybe


1974 850 Roadster - On The Road Again - Maybe


1974 850 Roadster - On The Road Again - Maybe


Thanks for any input.
 
Back
Top