1972 Roadster Rebuild

If you can use some thin ply/mdf between the jaws of the grips and the dowels, that can help from munting them.
 
Great advice, as usual, thank you both. Followed your instructions word for word, but being gentle wasn't getting it done, so I had to crank up the vice grips and that worked. Besides, Old Britts has new dowels in stock, although rather pricey(!!). The gasket surface did need sanding down as you suggested, just need to made an emery paper run to the hardware store tomorrow to finish it up.
 
If you are working off any edges besides the repaired area, STOP IMMEDIATELY!!!!

You may have already filed off too much at the repaired area. It may need to be built back up again, then the repaired area brought back in line with the rest of the undisturbed body. If you start removing material unevenly, or on the non-repaired sections, you risk having a too-tight gearbox that will either not work, or possibly fail.
 
PJ1 Fast Black engine paint curing on the wood stove.
 

Attachments

  • 1972 Roadster Rebuild
    IMG_5993.JPG
    265.3 KB · Views: 1,200
Kind of slow progress on the gearbox reassembly lately, end of life care for my sweet old English Springer Spaniel girl.
I needed to sand down the lay shaft bearing diameter to slip fit it into the new superblend bearing inner race. I had no way to chuck the 11/16" shaft diameter in order to spin the shaft, so I used emery paper strips to run back and forth on and around the bearing diameter, like buffing a pair of shined shoes, to hopefully keep it reasonably round.
 

Attachments

  • 1972 Roadster Rebuild
    IMG_6008.JPG
    175.4 KB · Views: 1,181
  • 1972 Roadster Rebuild
    IMG_6009.JPG
    168 KB · Views: 1,182
I like that Speedi-Sleeve cam repair. I've only had one cam that I had to repair, and I sent it out to be ground, hard chromed, and final ground. That worked great, but the Speedi-Sleeve is probably a whole lot quicker and cheaper, and should work just as well. What size or part number seal did you use?

Ken
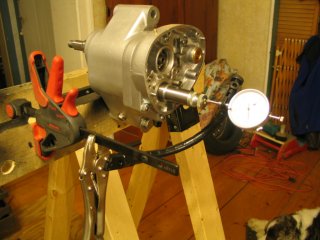
 
Hi Ken, I can't take credit for doing that repair. Nick Woodbury at Classic Bike Experience saw to that. He is assembling the bottom end to the point of bolting the cases together for the last time. I meant to ask him for that info, but will now.
Bill
 
Gearbox rebuilding is going very slowly as I get parts and special tools in, and now I think I'm confused. I get .016" end play on the new kick start shaft, without the .020" gasket installed. Fred's (Old Britts) rebuild instructions suggest that a .010" shim is then called for if shooting for approx, .005" end play. But with the .020" gasket in place, I would think a .030" shim would then be correct. But Fred says to "SUBTRACT the thickness of the gasket from the amount you need to shim". Shouldn't that sentence read "ADD" .020" for the gasket?
 

Attachments

  • 1972 Roadster Rebuild
    IMG_6035.JPG
    220.1 KB · Views: 944
NO, Fred is correct.

You have gap "X".

You want to arrive at .010"

Subtract .020 of the gasket thickness from "X". (X - .020 = Y)

The remainder, "Y", is the thickness of shimming required.
 
If you are using an isolastic shim the inside diameter needs to be slightly enlarged. Otherwise the shim won't fit down on the kickstarter shaft which has a bit of radius at the base of the shaft. If not enlarged the shim won't seat correctly and will screw up the measurement. A sanding drum in a dremel tool will make quick work of enlarging the shims id.
 
Fred says shoot for .005" end play. I have .016" (X) end play with a .020" gasket not installed. Are you saying 016 - .020 = -.004

I need a minus .004" shim? I'm still confused. Opening up the shim i.d. I understand.
 
pantah_good said:
Fred says shoot for .005" end play. I have .016" (X) end play with a .020" gasket not installed. Are you saying 016 - .020 = -.004

I need a minus .004" shim? I'm still confused.
You need a thinner gasket!
 
Sorry, I still can't get a mental picture of why that would be. I was going to try assembling it with the gasket to see what happens. But first, are thinner gaskets available or is that a do it yourself project? Or is there another fix - I'm just not seeing what's going on?
Bill
 
I would try assembling everything you have on-hand, as-is.

If your gasket is a thick composite "cardboard" like piece, yes, a flat paper gasket is much thinner, but less forgiving of marred gasket faces.
 
The gasket is the standard green one that came in the Old Britts gasket kit. I am wondering about the new (from Old Britts) 06-7710 layshaft roller bearing. The inner race was just a little snug on the layshaft. I could move it by hand though. And I'm also wondering if the outer race was fully home and bottomed out when I installed it in the shell. Could either of those be reducing the end play I'm measuring? And also the kick start shaft is brand new from AN. I might as well pull it apart and check all that stuff, and then assemble again, as you say, with everything on hand including the gasket. I was hoping to order shim(s) and get them by the end of the week.

Edit - the gasket is tan or light brown, originally from AN.
 
You should have heated the gearbox shell and chilled the outer race, and it should have dropped in flat on the bottom.

The bearing with inner race should be a light press (or tap) fit on a thoroughly clean layshaft (I typically polish them with fine grade emory paper).

Yes, those interference fits, and the kicker gear body, can take up some of the available end float space if not FULLY home.

I would caution AGAINST tapping on the layshaft to get the inner bearing's outer race to seat more fully...
 
Back
Top