1972 Roadster Rebuild

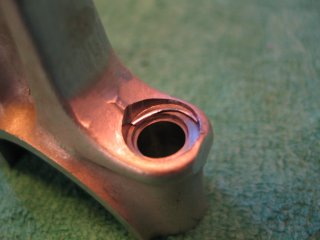
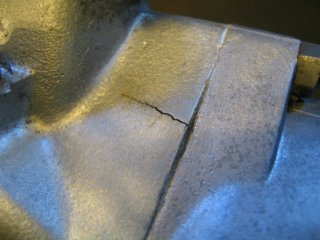
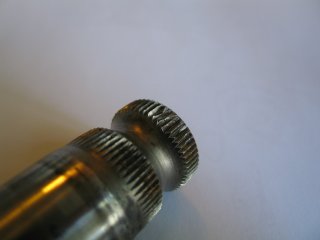
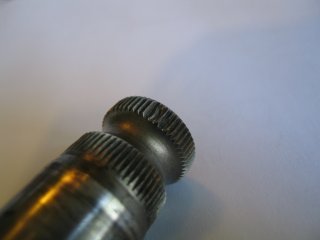
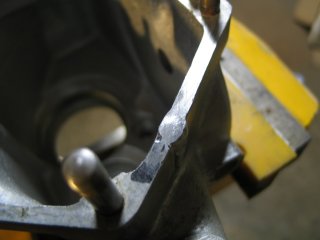
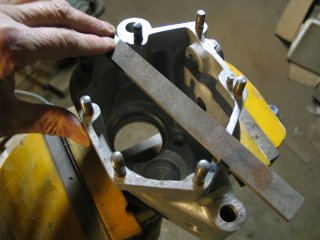
Today I discovered this engine's D.S. connecting rod was apparently last assembled incorrectly with the out of center head of one of the bolts not lined up properly in the out of center counter bore, then fully tightened up. It dragged down the overhung aluminum to within about a mm of the bottom of the counter bore. I think I might be able to carefully clean out that squished aluminum with my Dremel tool. Can this rod hopefully be saved?
Bill
 

Attachments

  • 1972 Roadster Rebuild
    IMG_5850.JPG
    153.7 KB · Views: 698
Doesn't look too bad. A little judicious work with the Dremel to clean out that sprue and you should be good to go as long as you don't create any stress risers (new sharp edges)
 
Well, here's some progress of a sort. This week I sold my DR field and brush mower that I didn't need anymore and just spent all the money, and then some, for new rear wheel components. One of madass140's beautiful new rear hub assembly's, a Borrani WM3x19 rim and ss spoke kit from Buchanan, and a ContiClassicAttack 110/85-19 tire with Michelin 19 MF tube from Partzilla. Life is good.
Bill
 
Just found out from Continental this a.m. that the Conti Classic Attack 110/85-19 rear tire that Partzilla had assured me was in stock in the U.S. hasn't even gone into production yet, and won't until mid 2017. Luckily I got a hold of Buchanan's before they had started putting holes in the new 19" Borrani, and changed the order to an 18" WM3 rim. Ordered a Conti Classic Attack 110/90-18 rear to go with the 100/90-19 front Conti that is already mounted up on the rebuilt front wheel assembly. I think the Conti 100/90-19 rear is available in the U.K. and Europe, but not here. I had wanted to put 19's at both ends, but I guess it wasn't meant to be.
 
Laced the new 18" WM3 Borrani to my nice new Madass rear hub today. I hope the spoke pattern looks correct to the experts here...the new rim's drilling was slightly different from the original rim. The new Ferodo rear shoes from Vintage Brake fit the new drum pretty good. I will be mailing the timing cover and oil pump off to AMR tomorrow for their anti-wet sump mod. I emailed Mike about doing the additional drilling on the timing cover. He said he is looking into that, but is holding off for now. I'll drill that additional hole when I get the cover back, and put the set screw in the case half while they are still apart. I'm having Nick at The Classic Bike Experience in Essex Junction, VT get the engine bottom end re-assembled to the point where the cases are bolted back together, then I'll take over. Got the triple clamps all done and the new bearings from Old Britts should be here tomorrow. The frame and associated parts are back from the powder coater, and are looking very nice.
Bill
 

Attachments

  • 1972 Roadster Rebuild
    IMG_5887.JPG
    256.1 KB · Views: 469
  • 1972 Roadster Rebuild
    IMG_5889.JPG
    258.6 KB · Views: 477
  • 1972 Roadster Rebuild
    IMG_5886.JPG
    325.8 KB · Views: 475
I'm getting ready to take the gearbox apart, and after cleaning it up I noticed this crack coming from the edge of the gearbox shell where it mates with the inner cover. The shell is bulged out some around the crack. Before I open it up, are there any educated guesses as to what might have caused that? Does that damage look repairable?
Bill
 

Attachments

  • 1972 Roadster Rebuild
    IMG_5936.JPG
    187 KB · Views: 624
  • 1972 Roadster Rebuild
    IMG_5934.JPG
    237.1 KB · Views: 626
pantah_good said:
Laced the new 18" WM3 Borrani to my nice new Madass rear hub today. I hope the spoke pattern looks correct to the experts here...the new rim's drilling was slightly different from the original rim.

When I was talking to the guy who I am buying my rims from here in NZ (who has been at it a long, long time) he had some interesting things to say about the new Borrani rims when I asked about them. His best guess is that they are made in China and then finished and drilled in Italy. He told me that Buchanan's had told him that they had rejected about 180 out of 240 rims (I think this are roughly the amounts he said) shipped to them from Borrani. He no longer sells them.
 
pantah_good said:
I'm getting ready to take the gearbox apart, and after cleaning it up I noticed this crack coming from the edge of the gearbox shell where it mates with the inner cover. The shell is bulged out some around the crack. Before I open it up, are there any educated guesses as to what might have caused that? Does that damage look repairable?
Bill

I'm sure that can be tig-welded, but you need to look inside and see if there's a cracked bearing seat or something else that has been pushed out of shape. Cosmetically it's repairable, but structural repair is another matter.
 
Re: New Sign On

Danno said:
That is the gnarliest exhaust I've ever seen still clinging to a motorcycle. :shock:

The one on the flood bike wasn't much better.
 
pantah_good said:
The shell is bulged out some around the crack. Before I open it up, are there any educated guesses as to what might have caused that?

The layshaft 1st gear pinion is directly behind that area, so I'd guess a piece of metal (gear tooth perhaps?) may have got drawn in between the gear and the case?
 
I'm thinking there is no saving this kickstart shaft due to the mangled splines in two places - right?
 

Attachments

  • 1972 Roadster Rebuild
    IMG_5949.JPG
    116.4 KB · Views: 529
  • 1972 Roadster Rebuild
    IMG_5950.JPG
    115.3 KB · Views: 542
gortnipper said:
When I was talking to the guy who I am buying my rims from here in NZ (who has been at it a long, long time) he had some interesting things to say about the new Borrani rims when I asked about them. His best guess is that they are made in China and then finished and drilled in Italy. He told me that Buchanan's had told him that they had rejected about 180 out of 240 rims (I think this are roughly the amounts he said) shipped to them from Borrani. He no longer sells them.
On both these new Borrani rims I laced up I noticed there were bumps at the butt joint weld areas that were a little larger than I'm used to. There was no way to true them out, the beads ran good, and they really weren't going to be noticeable when the bike is fully assembled, so I kept going. I like the Borrani's because they are not anodized and come already nicely polished.
Bill
 
pantah_good said:
I'm thinking there is no saving this kickstart shaft due to the mangled splines in two places - right?
I've seen MUCH worse that still held on reasonably well; but if you've got the money...
 
grandpaul said:
pantah_good said:
I'm thinking there is no saving this kickstart shaft due to the mangled splines in two places - right?
I've seen MUCH worse that still held on reasonably well; but if you've got the money...

As long as the lever clamps on tight with no wiggle, it'll be ok. I would file down the boogered splines so they don't screw up the splines on the lever. If you have it all apart, it's easy to replace, but if the box is still together, try the above.
 
It's apart. When I pulled the engine and gear box out of the frame, the ONLY way I could get the kickstart lever off the shaft was to basically destroy the lever clamp. I justified doing that because I'd already decided to get the RGM designed kickstart lever. The last thing I want on this bike is a sketchy kickstarter, so I'm going to replace that buggered shaft with the shaft & bushing from Andover, which is priced reasonably well. I'm not sure why the shaft assembly from Old Britts is so much more expensive, just because it includes the pawl parts. I'm assuming they are both Andover parts.
 
Finally got the gearbox housing back from my aluminum welder friend of a friend. When I got the box disassembled there was a loose piece of broken off kick start pawl floating around inside, which was about 1/4" dia., that had gotten dragged thru against the case by 1st gear. Used my Dremmel tool to rough down the weld, then draw filed the gasket surface down by holding one end of the file onto the opposite gasket surfaces and going back and forth with the other end of the file. The three case parts will now get vapor blasted and the outer cover polished.
 

Attachments

  • 1972 Roadster Rebuild
    IMG_5983.JPG
    131.8 KB · Views: 511
  • 1972 Roadster Rebuild
    IMG_5985.JPG
    150.4 KB · Views: 474
  • 1972 Roadster Rebuild
    IMG_5981.JPG
    209.8 KB · Views: 467
Might be too late, but you should remove all the studs and the alignment dowels, then finish the mating surface on a true, flat surface with a large sheet of fine sandpaper.
 
That hadn't occurred to me, probably because of the dowels. I assume the studs would screw out with a couple of jam nuts, but what about the dowel pins? Use heat and vice grips?
 
First, a little penetrant, and tap with a screwdriver handle. Repeat a couple of times over an hour.

Then, heat and vice grips (gently, don't smash them)
 
Back
Top